This Chocolate Icebox Pie is a dream come true for chocolate lovers—think silky, fluffy, chocolate custard nestled in a golden graham cracker crust, all crowned with a generous cloud of real whipped cream. If you’re craving something nostalgic yet a little bit decadent (and don’t feel like turning on the oven for hours!), this is the dessert you’ve been searching for.
Why You’ll Love This Recipe
- Chocolate Lover’s Paradise: The filling is rich, velvety, packed with real chocolate, and just the right amount of sweetness—absolutely irresistible for anyone who craves chocolate.
- No-Fuss, No-Bake Vibes: Most of the magic happens in the fridge, not the oven, resulting in a creamy pie that’s perfect for make-ahead entertaining or hot day cravings.
- Texture Heaven: The contrast between the crisp graham cracker crust, marshmallow-light mousse, and fluffy whipped cream keeps every bite utterly delightful.
- Crowd-Pleasing Results: Whether for a family celebration, potluck, or just a special night in, this Chocolate Icebox Pie always draws smiles around the table.
Ingredients You’ll Need
You truly don’t need fancy ingredients to create something so special. Each element in this Chocolate Icebox Pie brings its own personality to the party—crunch from the crust, creamy chocolate filling, and a lift of airy whipped cream. Here’s what makes this classic dessert shine.
- Graham cracker crumbs: Provide a sweet, slightly nutty crunch for the base; the perfect foil for creamy chocolate filling.
- Unsalted butter: Holds the crust together and adds a rich, luxurious flavor—you’ll need it for both the crust and the filling.
- Granulated sugar: Used to sweeten both the crust and custard, plus to whip into the cream.
- Flour: Thickens up the custard to make it sliceable and luscious.
- Unsweetened chocolate: Gives that deep, true chocolate flavor—don’t substitute for cocoa powder here!
- Evaporated milk or heavy cream: Brings the silky, creamy texture to the custard filling. Choose heavy cream for extra richness!
- Egg yolks: For a smooth, custardy filling—don’t skip these, they’re key for structure.
- Small marshmallows: Melt into the custard, adding both sweetness and a pillowy, mousse-like texture.
- Heavy whipping cream: For a soft, billowy topping that finishes the pie beautifully.
- Semisweet chocolate for grating: Adds a hit of flavor and makes the pie look extra fancy.
- Chopped pecans: Optional, but they give a toasty crunch on top that pairs with the chocolate like a dream.
- Salt: Just a pinch balances out all that chocolaty goodness.
Variations
The beauty of this pie is how easy it is to personalize. Whether you’re working around allergies or just want to tweak the vibe for the season, Chocolate Icebox Pie is endlessly adaptable—so don’t be afraid to make it your own!
- Nut-Free: Swap chopped pecans for toasted coconut flakes or simply leave them out for a smooth-topped finish.
- Rocky Road Effect: Use kosher marshmallows if you want little pockets of barely-melted marshmallow—hello, extra chew and texture!
- Gluten-Free Crust: Grab gluten-free graham crackers or cookies to make the base safe for everyone.
- Coffee Kick: Stir in a teaspoon of instant espresso powder into the custard filling for a mocha twist that’s so grown-up.
- Chocolate Cookie Crust: Use crushed chocolate wafer cookies in place of graham crackers for maximum chocolatey impact.
How to Make Chocolate Icebox Pie
Step 1: Make the Graham Cracker Crust
Start by blending graham cracker crumbs, softened butter, and a bit of sugar in a mixing bowl until everything is beautifully moistened and clumps together like sand at the perfect beach. Press this mixture firmly and evenly into your pie dish—don’t rush here, a good base makes all the difference! Once shaped, bake the crust briefly until just set and golden, then let it cool completely. This is your sturdy, crackly foundation for all the creamy goodness to come.
Step 2: Whisk the Chocolate Custard
In a saucepan, stir together sugar, salt, and flour. Meanwhile, melt your chocolate squares either in a small microwave-safe dish or gently over a double boiler for ultimate smoothness. Pour the glossy chocolate into the pan with the dry ingredients and add the milk (or cream)—give it a good whisk until even. Next, add water and those egg yolks, whisking as you go so everything is silky and cohesive.
Step 3: Cook and Thicken the Custard
Now comes the patience part—on medium-low heat, whisk the custard mixture almost constantly for 10–15 minutes, watching as it gradually thickens and transforms into rich, chocolatey pudding. Don’t rush, and don’t stop stirring or the bottom can scorch! Once it clings to the whisk and forms gentle lumps, remove from heat and immediately stir in the butter, followed by the marshmallows. Those will melt right in, giving the filling its signature light, mousse-like texture. Allow the filling to cool to room temperature before transferring.
Step 4: Assemble and Chill
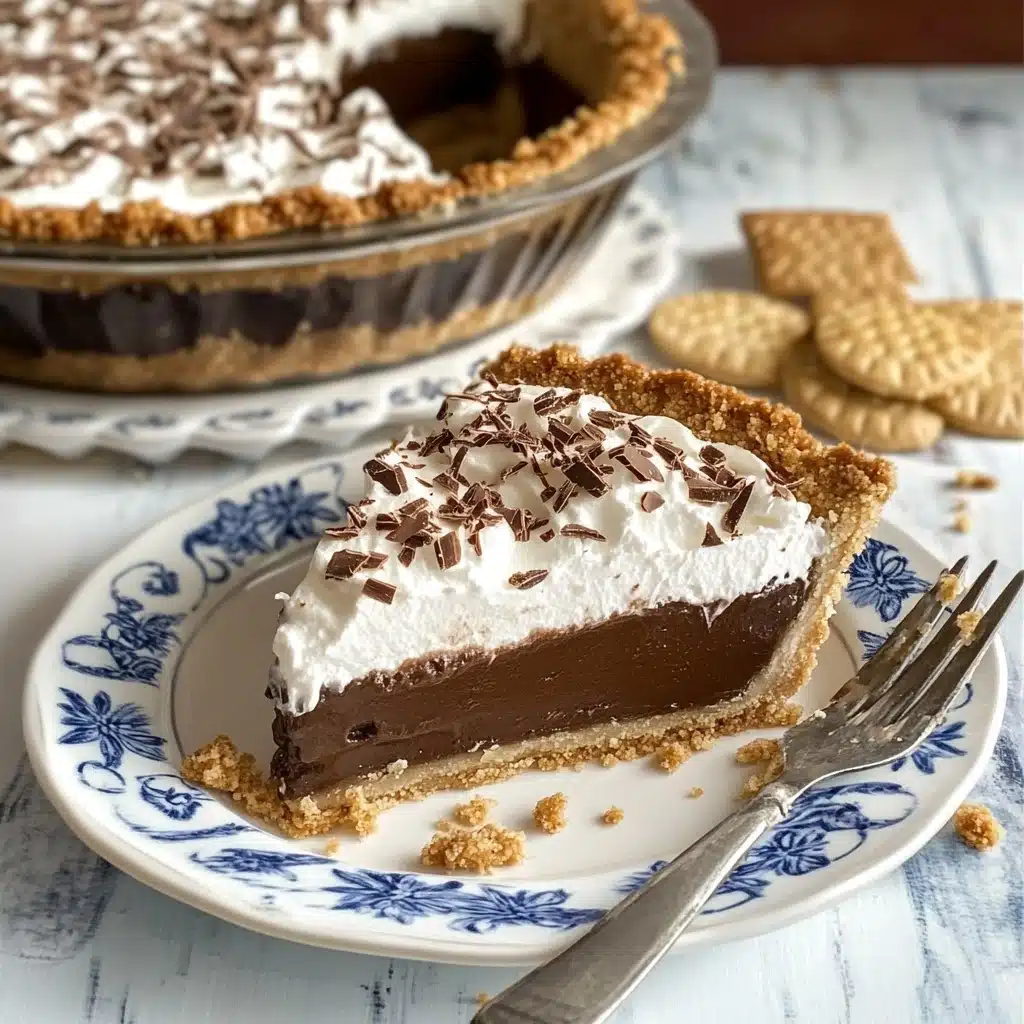
Spoon the cooled chocolate filling into your prepared graham cracker crust, smoothing the top into an inviting swirled sea with a spatula. Now the hardest part—refrigeration! Let the pie chill, uncovered, for at least 6 hours (overnight is best for sliceable perfection). This is when your pie sets up into its luscious, creamy self.
Step 5: Make the Whipped Cream Topping
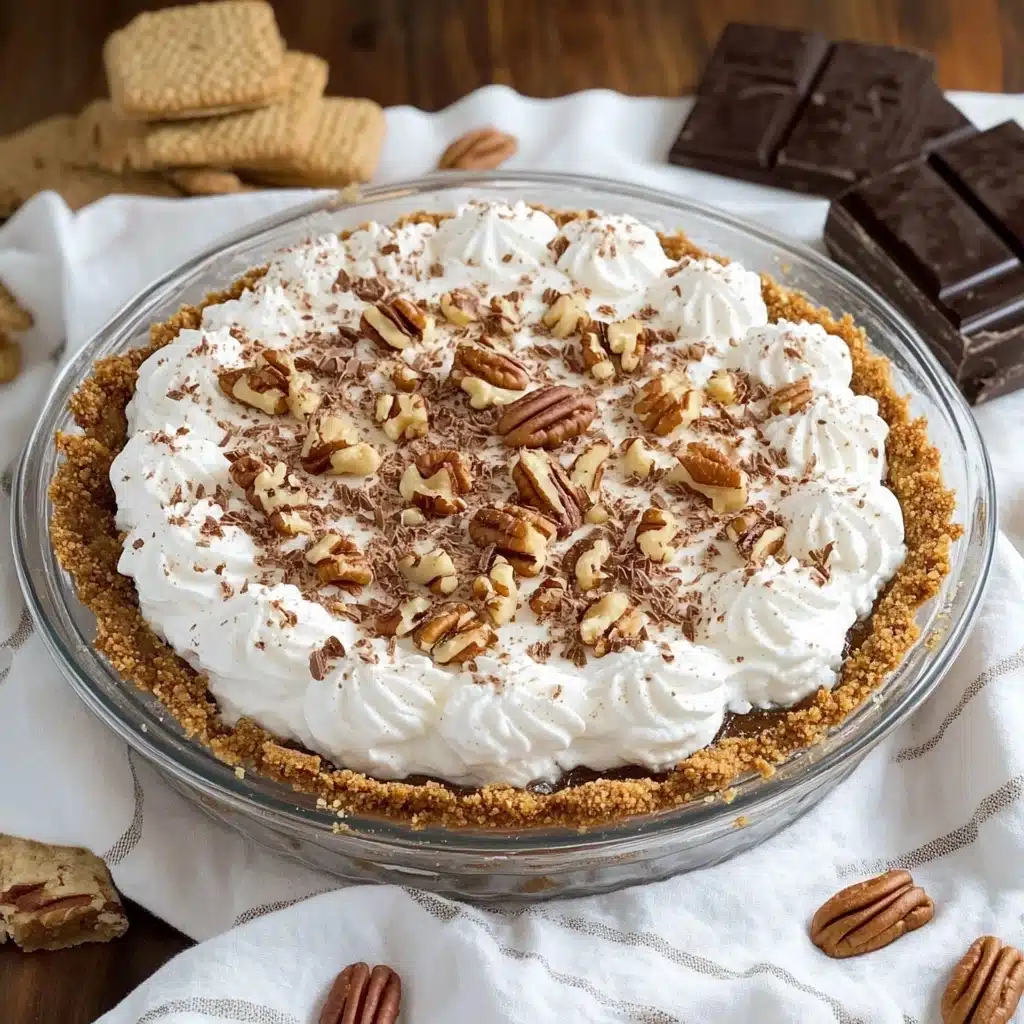
When you’re almost ready to serve, whip cold heavy cream with a bit of sugar until soft peaks form—think clouds, not butter! You can spread this lovely cream over the pie with an offset spatula or, if you’re feeling extra, pipe it on with a star tip for bakery-style vibes.
Step 6: Add Final Touches & Serve
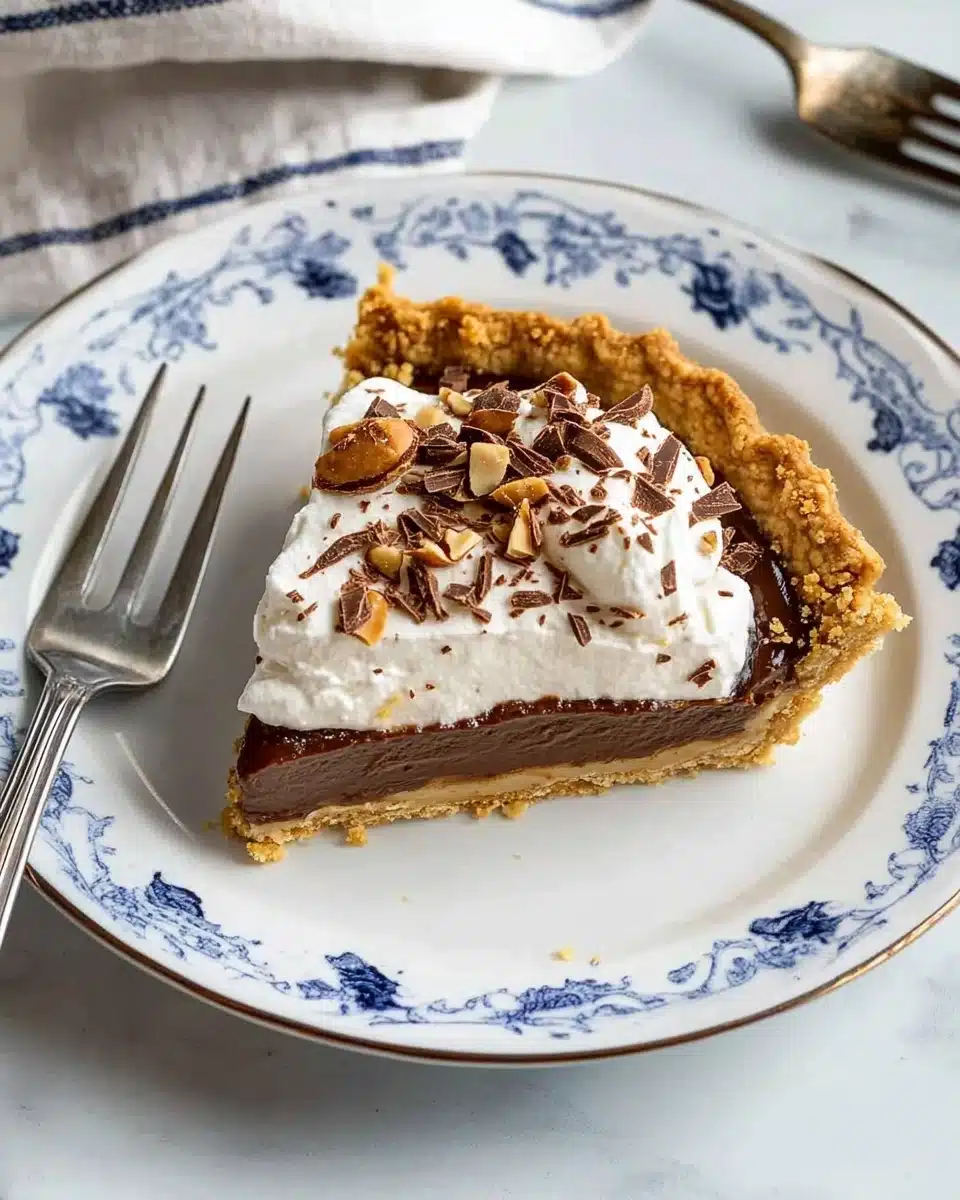
Finish with a snowfall of grated semisweet chocolate and a scatter of chopped pecans. Chill the pie again for at least another hour. When you’re ready, slice, serve, and prepare for happy sighs all around—that’s what Chocolate Icebox Pie is all about!
Pro Tips for Making Chocolate Icebox Pie
- Custard Patience: Keep your eye on the stovetop and whisk gently but constantly—the chocolaty custard is prone to scorching and needs a little love for that dreamy, smooth finish.
- Cool Completely: Don’t add your whipped cream topping until the filling is fully chilled or it could melt—waiting is hard, but the resulting slices are perfection!
- Piping Perfection: If you want bakery-worthy swirls, pipe cream with a star tip, but don’t sweat it—a simple swoosh with a spatula looks (and tastes) just as good.
- Chocolate Choice: Spring for a good-quality unsweetened chocolate bar instead of chips for the best depth of flavor—your tastebuds will thank you.
How to Serve Chocolate Icebox Pie
Garnishes
The finishing touch for a Chocolate Icebox Pie is all about personal flair. Grated semisweet chocolate gives a decadent look and a burst of flavor, while chopped pecans add crunch and nuttiness. You could also shower the top with chocolate curls, chocolate chips, or even a sprinkle of flaky sea salt for a sophisticated edge—go with your mood!
Side Dishes
Since Chocolate Icebox Pie is wonderfully rich, pair it with fresh, tart berries like raspberries or sliced strawberries on the side—a little acidity cuts through the chocolate and refreshes the palate. For a celebration, serve it after a lighter meal or beside a cup of hot coffee or espresso.
Creative Ways to Present
Try slicing and serving in elegant parfait glasses for individual desserts, or bake the crust in a tart pan with a removable bottom for easy, show-stopping slices. Mini pie tins make adorable (and portable) single servings for picnics or parties—don’t forget to top each with its own little swirl of cream and a pinch of shaved chocolate!
Make Ahead and Storage
Storing Leftovers
Leftover Chocolate Icebox Pie should be covered loosely (so the whipped cream stays fluffy!) and stashed in the fridge. It keeps beautifully for up to 3 days—perfect for stolen midnight slices or packed-lunch treats.
Freezing
If you need to make the pie well in advance, freeze it without the whipped cream topping for the best texture. Wrap the pie tightly in plastic wrap and then foil; thaw overnight in the fridge before adding your fresh whipped cream and garnishes just before serving.
Reheating
Since Chocolate Icebox Pie is meant to be enjoyed chilled, there’s luckily no need for any reheating. Simply remove a slice from the fridge and enjoy—it’s at its creamiest and most flavorful when cold!
FAQs
-
Why did my Chocolate Icebox Pie filling turn lumpy?
Lumpy custard usually means the eggs cooked too quickly or the mixture wasn’t whisked constantly while on the heat. Make sure to use medium-low heat, add eggs gradually, and whisk, whisk, whisk for a silky filling.
-
Can I make Chocolate Icebox Pie a day ahead?
Absolutely! In fact, this pie is even better when made ahead—it needs a long chill for the filling to set. You can add the whipped cream up to 3 hours before serving for the prettiest results.
-
What’s the best way to cut clean slices?
For picture-perfect slices, dip a sharp knife in hot water, dry it off between cuts, and wipe clean with a warm, damp cloth. Letting the pie chill overnight also helps those slices hold their shape beautifully.
-
Can I use a different type of crust for Chocolate Icebox Pie?
Definitely! While graham cracker crust is traditional, chocolate wafer cookies, Biscoff, or even a nutty shortbread crust all make fantastic (and deliciously different) bases for this pie.
Final Thoughts
If you’re seeking a dessert that’s creamy, nostalgic, and guaranteed to make you swoon at first bite, Chocolate Icebox Pie is your answer. Give it a whirl and don’t forget to share a slice with someone you love—you just might start a new family tradition!
Print
Chocolate Icebox Pie Recipe
- Prep Time: 30 minutes
- Cook Time: 25 minutes
- Total Time: 7 hours 35 minutes
- Yield: 1 9-inch pie
- Category: Dessert
- Method: Baking, Chilling
- Cuisine: American
- Diet: Vegetarian
Description
Indulge in the creamy, rich goodness of this Chocolate Icebox Pie. A luscious chocolate custard filling nestled in a graham cracker crust, topped with fluffy whipped cream, chocolate shavings, and crunchy pecans. A decadent treat for any occasion!
Ingredients
Crust
- 1 1/3 cups graham cracker crumbs
- 5 tablespoons unsalted butter, room temperature
- 1/4 cup granulated sugar
Filling
- 2/3 cup + 2 tablespoons granulated sugar, divided
- 1/8 teaspoon salt
- 5 tablespoons flour
- 1 3/4 squares unsweetened chocolate
- 12 ounces evaporated milk or 1/2 cup heavy whipping cream (1 can)
- 2 large egg yolks, lightly beaten
- 2 cups small marshmallows
- 1/4 cup unsalted butter
- 1 cup heavy whipping cream
- Semisweet chocolate for grating
- 2 tablespoons chopped pecans
Instructions
- Make Crust – Preheat oven to 375 degrees F. Combine graham cracker crumbs, butter, and sugar. Pat mixture into a pie dish and bake for 8 minutes. Cool.
- Make Filling – Combine sugar, salt, flour in a saucepan. Add melted chocolate, milk/cream, water, egg yolks. Cook until thickened. Add butter and marshmallows. Cool. Fill crust. Chill.
- Whip Cream – Whip cream with sugar until fluffy. Spread on pie, top with chocolate shavings and pecans. Chill before serving.
Notes
- You will also need: small and medium mixing bowls, 9-inch pie plate or dish, small saucepan, whisk, electric mixer, spatula, grater.
- This recipe was tested with both regular and kosher marshmallows. Feel free to use kosher marshmallows for a ‘rocky road’ effect.
Nutrition
- Serving Size: 1 slice
- Calories: 382 kcal
- Sugar: 16g
- Sodium: 160mg
- Fat: 27g
- Saturated Fat: 15g
- Unsaturated Fat: 10g
- Trans Fat: 0g
- Carbohydrates: 30g
- Fiber: 1g
- Protein: 5g
- Cholesterol: 106mg


