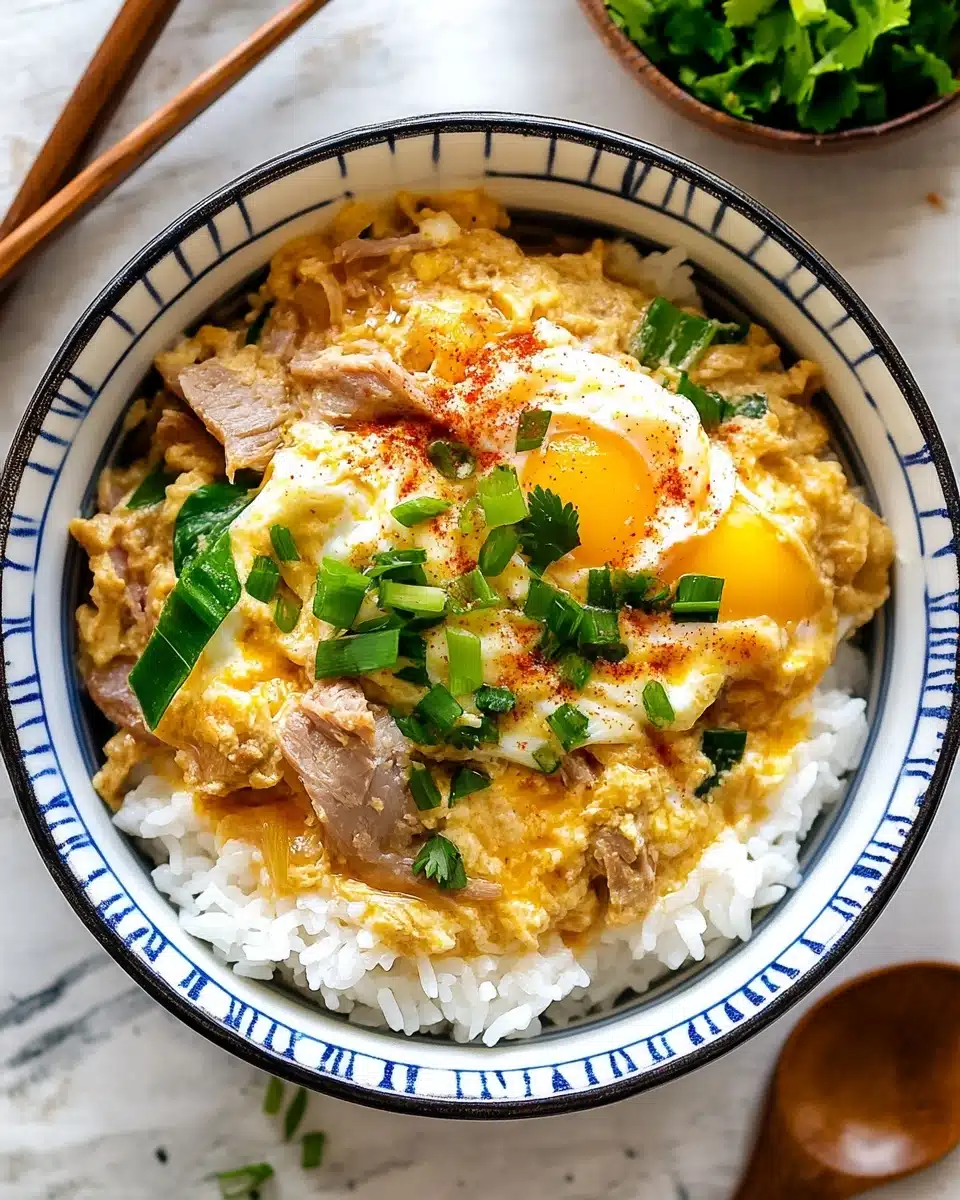
If you’ve never savored a heartwarming bowl of Oyakodon, you’re in for a delightful treat. This Japanese classic combines tender chicken with silky eggs, all nestled atop a bed of fluffy rice. It’s comfort food at its finest and unfailingly satisfying every time you crave a wholesome meal.
Why You’ll Love This Recipe
- Comforting Ingredients: Each spoonful is a heavenly mix of savory flavors and tender textures.
- Quick and Easy: From start to finish, you can have this on the table in just 25 minutes.
- Versatile and Adaptable: Easily tweak it to accommodate vegetarian or vegan preferences.
- Perfect for Sharing: This Oyakodon is ideal for serving up a tasty dinner to family and friends.

Ingredients You’ll Need
The magic of Oyakodon lies in its simplicity, with a handful of ingredients creating a delightful harmony. Each component contributes to the dish’s overall appeal, blending taste, texture, and color into one incredible bite.
- Onion: Adds a gentle sweetness and soft texture once cooked.
- Chicken Thighs: Offers a tender, juicy bite that’s perfect for soaking up the flavorful broth.
- Sake: Marinates the chicken, adding depth and umami richness; can be substituted if needed.
- Eggs: Provides that luscious, silken finish atop the rice; use an egg substitute for dietary modifications.
- Dashi: A cornerstone of Japanese cooking, it creates a savory base that ties the dish together.
- Soy Sauce: Adds a salty, umami kick, enhancing every ingredient in the dish.
- Mirin: A sweet rice wine that balances out the salty and savory notes.
- Sugar: Just a touch to elevate and balance all flavors.
Variations
One of the joys of cooking Oyakodon at home is how adaptable it is. Feel free to experiment and customize it based on the ingredients you have on hand or dietary needs.
- Vegetarian Oyakodon: Swap chicken with tofu or a plant-based meat substitute and replace dashi with vegetable stock.
- Spicy Twist: Add a hint of heat by incorporating shichimi togarashi into the mix.
- Mushroom Delight: Introduce sliced mushrooms alongside the onions for an additional earthy flavor.
How to Make Oyakodon
Step 1: Prepare Your Ingredients
Begin by slicing your onion and chopping the mitsuba or scallions to ensure you have everything at hand. For the chicken, trim any excess fat and cut into bite-sized pieces. Marinate with sake for an extra flavor boost.
Step 2: Mix Your Seasonings
In a bowl, combine the dashi, soy sauce, mirin, and sugar, stirring until the sugar dissolves completely. This mixture will infuse your dish with traditional Japanese flavors.
Step 3: Cook the Chicken
In your pan, lay the onions flat and pour the seasoning mixture over, followed by the marinated chicken. Simmer gently until the chicken is cooked through, enhancing the tender texture with the softened onions.
Step 4: Add the Eggs
Once the chicken and onions have melded beautifully, it’s time for the eggs. Pour them in two stages, drizzling to create that signature soft, slightly runny texture that Oyakodon is known for.
Pro Tips for Making Oyakodon
- Egg Technique: To keep the classic marbled effect, don’t over-whisk the eggs before adding them.
- Pan Size: Use an appropriate-sized pan to ensure the seasoning mixture just covers the onions and chicken, enhancing the flavor profile.
- Juicy Chicken: Marinate the chicken in sake for a fuller flavor and softer meat.
- Perfect Simmer: Maintain a gentle simmer to ensure the dish remains delicate and not overcooked.
How to Serve Oyakodon
Garnishes
Top your Oyakodon with mitsuba or scallions for a fresh, vibrant touch. A sprinkle of shichimi togarashi can also add a welcome kick, while sansho pepper offers a subtle, tingling sensation.
Side Dishes
Pair this delightful dish with a side of miso soup or a simple cucumber sunomono (vinegar salad) to complete your Japanese meal experience. These sides add texture and freshness to your meal.
Creative Ways to Present
Play with presentation by serving the Oyakodon in traditional donburi bowls, which keep the warmth in beautifully. Or opt for a modern touch by dishing it up in wide, shallow bowls for a stylish look.
Make Ahead and Storage
Storing Leftovers
The beauty of Oyakodon is that it’s just as good the next day! Store any leftovers in an airtight container, and they’ll keep beautifully in the refrigerator for up to three days.
Freezing
If you plan on freezing, separate the rice from the chicken and egg mixture. Seal them in separate containers to maintain their textures and flavors. Thaw overnight before reheating.
Reheating
To reheat, simply warm the chicken and egg mixture gently in a pan, and microwave the rice until steaming hot, then reassemble. This method ensures a fresh taste every time.
FAQs
-
Can I use breast meat instead of thighs for Oyakodon?
Absolutely! Chicken breast can be used, though it may be slightly drier. To compensate, marinate well and monitor cooking time closely to keep it juicy.
-
What if I don’t have dashi on hand?
No worries! You can substitute dashi with chicken stock or water with a dash of soy sauce and sugar for that umami effect.
-
How do I ensure the eggs are perfectly runny?
The key is to add eggs in two stages and cook them just until they are set yet still a bit runny. Keep an eye on the heat to avoid overcooking.
-
Can I make Oyakodon vegan?
Yes, you can. Use firm tofu or a plant-based protein instead of chicken and opt for an egg substitute like JUST Egg. Make sure to use vegan dashi or a simple vegetable broth for the base.
Final Thoughts
Oyakodon is more than just a meal; it’s a heartfelt embrace from the kitchen, offering you warmth and comfort with each delicious bite. Invite your loved ones to gather around and experience this Japanese favorite, and I promise, it will quickly become a cherished staple at your dining table.
Print
Oyakodon Recipe
- Prep Time: 15 minutes
- Cook Time: 10 minutes
- Total Time: 25 minutes
- Yield: 2 servings
- Category: Main Course
- Method: Stovetop
- Cuisine: Japanese
Description
Oyakodon is a comforting Japanese rice bowl featuring tender chicken and silky eggs simmered in a flavorful dashi-based sauce, served over steaming short-grain rice. This easy-to-make dish combines savory, sweet, and umami flavors with a soft egg topping, making it perfect for a quick yet hearty meal.
Ingredients
For the Seasonings
For the Chicken and Egg
For Serving
Instructions
- Prepare the Seasonings: Combine dashi, soy sauce, mirin, and sugar in a bowl or measuring cup and stir until the sugar dissolves.
- Slice and Marinate the Chicken: Slice the onion lengthwise into ¼-inch (6 mm) strips. Trim excess fat from chicken thighs and cut into ¾–1 inch wide strips, then diagonally slice against the grain into ¾–1 inch squares. Transfer to a bowl and sprinkle with 1 Tbsp sake; set aside for 5 minutes.
- Crack Eggs: Crack eggs into a bowl, lift with chopsticks to cut whites into small clumps, without whisking completely. Gently poke yolks to break if intact.
- Cook the Chicken and Onions: In a medium frying pan, add sliced onions in a single layer and pour in the seasoning mixture. Turn on medium heat and simmer until just starting to reduce. Add chicken on top, distribute evenly. Lower heat to medium low and cook uncovered for 5–6 minutes, flipping halfway through until chicken is no longer pink and onions are tender.
- Add Eggs in Two Stages: Increase heat to medium, then drizzle two-thirds of eggs in a circular pattern over the chicken and onions, avoiding edges. Cook until whites are slightly set but yolks remain runny. Add the remaining third of the eggs, including more yolk on top, and cook on medium low until just done, usually a few more minutes.
- Finish and Serve: Add chopped mitsuba on top. Serve hot over steamed rice, spooning the chicken and egg mixture on top. Optionally, sprinkle with shichimi togarashi and sansho pepper.
Notes
- Ensure the eggs are slightly runny for authentic texture and presentation.
- You can substitute plant-based meat and egg substitutes for a vegan/vegetarian version.
- Using a small oyakodon pan makes individual servings easier, but a larger pan can be used for multiple servings simultaneously.
- Adjust seasoning to taste; you can add more soy or mirin for sweetness or saltiness.
- Leftovers reheat well in the microwave for up to 2 days.
Nutrition
- Serving Size: 1 bowl
- Calories: 537 kcal
- Sugar: 11 g
- Sodium: 1197 mg
- Fat: 13 g
- Saturated Fat: 4 g
- Unsaturated Fat: 9 g
- Trans Fat: 0.1 g
- Carbohydrates: 50 g
- Fiber: 1 g
- Protein: 42 g
- Cholesterol: 414 mg


