
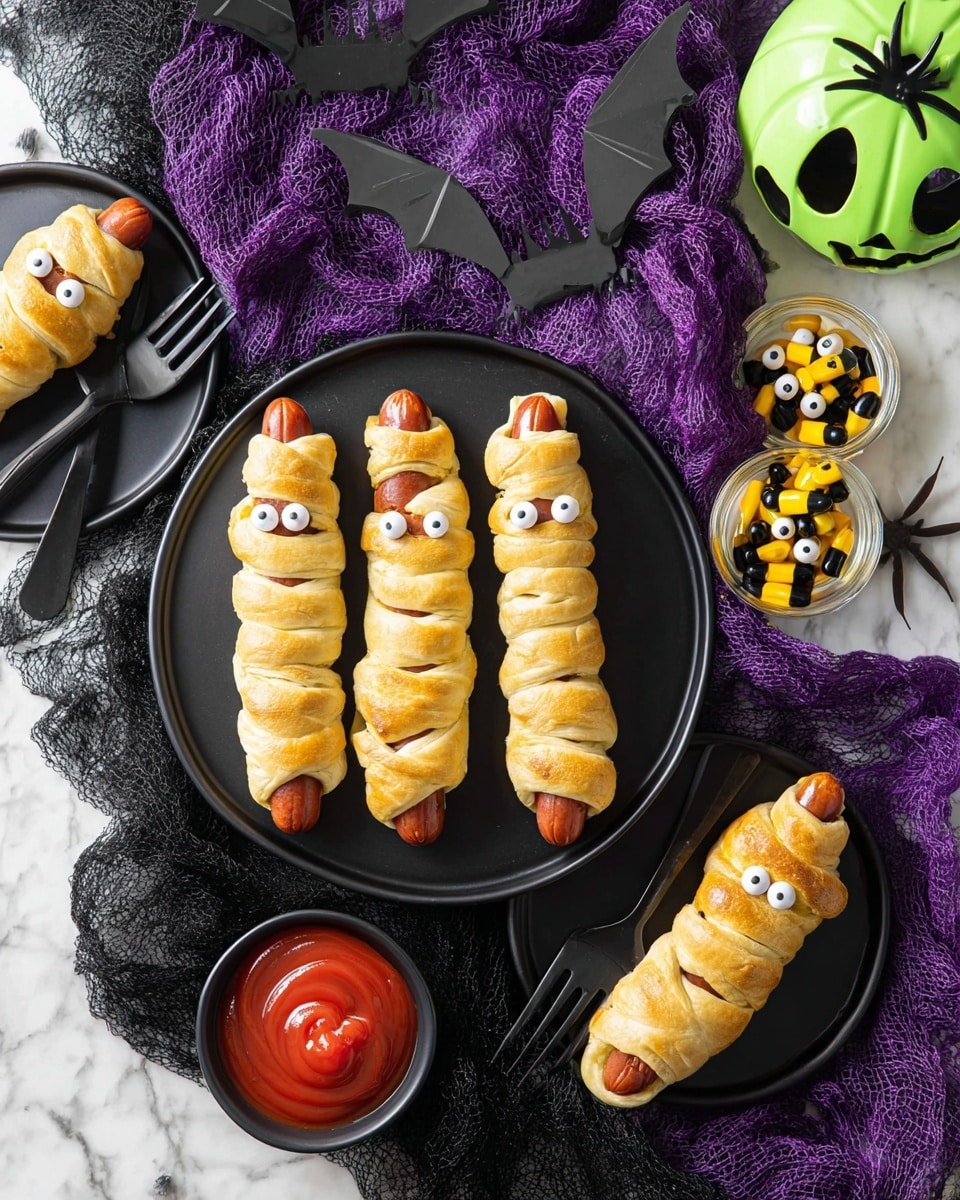
If you’re looking for a Halloween treat that’s as fun to make as it is to eat, you’ve got to try my Crescent Mummy Dogs Recipe. These little cheesy, crescent-wrapped hot dogs are a total crowd-pleaser, whether you’re feeding kids or adults who love a playful snack. Plus, they come together super fast – you’ll be amazed at how easy this recipe is for a festive, spooky dinner or party appetizer.
Why You’ll Love This Recipe
- Simple Ingredients: You only need a few staples, making it super easy to whip up anytime.
- Kid-Friendly Fun: The spooky mummy look always gets giggles and eager hands reaching for seconds.
- Quick Prep & Bake: Ready in under an hour, perfect for last-minute Halloween plans or snacks.
- Customizable: I’ll share tips so you can mix in your favorite cheeses or dips for a personalized twist.

Ingredients You’ll Need
For this Crescent Mummy Dogs Recipe, the ingredients are straightforward — they play well together to create a crispy, cheesy, and savory bite every time. I recommend grabbing refrigerated crescent dough from the fridge aisle, and of course, quality hot dogs and good melting cheese will make a big difference.
- Refrigerated Crescent Rolls or Dough Sheet: Using Pillsbury™ Original is my go-to for flaky, buttery dough that crisps beautifully.
- American Cheese Slices: It melts perfectly inside the mummy wrap and adds that classic creamy flavor.
- Oscar Mayer™ Classic Wieners Hot Dogs: These have just the right flavor and size for wrapping, but you can try other brands if you prefer.
- Cooking Spray: Keeps your crescent dough nice and crispy without sticking.
- Mustard or Ketchup: Essential for drawing on little faces — I love mustard for that spooky “mummy” look!
Variations
I love that the Crescent Mummy Dogs Recipe is totally adaptable to whatever you have on hand or dietary needs you might want to address. I’ve played around adding spices, swapping out cheeses, and even going veggie with meatless sausages. Try the variations below to make it your own!
- Cheese Swap: I once used pepper jack for a little heat and my family went crazy for it—adds a nice kick inside those crescent wraps.
- Mini Mummies: Use cocktail sausages instead of classic hot dogs for bite-sized party snacks.
- Gluten-Free: Swap crescent rolls for a gluten-free dough alternative and use nitrate-free hot dogs for a healthier spin.
- Veggie Option: Try vegetarian or plant-based hot dogs to keep the fun vibe without meat.
How to Make Crescent Mummy Dogs Recipe
Step 1: Prep Your Dough and Cheese
Start by heating your oven to 350°F — that way it’s ready to go when your mummies are wrapped up. If you’re using the classic crescent rolls, unroll the dough and separate it at the perforations into 4 rectangles. I always press those perforations firmly to seal so my dough doesn’t fall apart while wrapping. If you have the dough sheet, just cut it into 4 rectangles. Then, with a knife or pizza cutter, slice each rectangle lengthwise into about 10 thin strips (under ½ inch wide). That gives you 40 strips total for wrapping. Don’t rush this part—the thinner they are, the more mummy-like the effect!
Step 2: Wrap the Hot Dogs Like a Mummy
Cut your American cheese slices into quarters (each quarter is about half a slice cut in half again). Then, wrap 4 strips of dough around each hot dog, together with one quarter slice of cheese. I stretch the dough just a little to cover the hot dog snugly, overlapping the strips like mummy bandages. Leave about half an inch near one end uncovered to expose the hot dog “face.” It’s a little detail that makes these so charming and spooky! If the dough feels sticky, a light dusting of flour on your hands helps.
Step 3: Bake and Decorate
Place your wrapped hot dogs cheese-side down on a large ungreased cookie sheet. I usually spray them lightly with cooking spray to encourage a crispy golden bake. Pop them in your preheated oven for 13 to 17 minutes until the dough is light golden brown and the hot dogs are heated through. Pro tip: watch closely near the end so the “bandages” don’t burn! When they’re done, use a toothpick dipped in mustard (or ketchup if you prefer) to add eyes and a spooky face on that exposed hot dog tip. This step really brings your mummies to life.
Pro Tips for Making Crescent Mummy Dogs Recipe
- Seal the Dough: Press those crescent perforations tight before cutting to avoid the dough unravelling while baking.
- Thin Strips Make for Better Mummies: Cutting the dough strips thin allows for a more authentic mummy look and ensures thorough baking.
- Cheese Placement: Wrap cheese slices under the dough strips to keep them from spilling out and melting everywhere.
- Watch Your Bake Time: Ovens vary, so check early to prevent the dough from over-browning or drying out.
How to Serve Crescent Mummy Dogs Recipe
Garnishes
I love keeping it simple here with classic mustard “eyes,” but I’ve also tried tiny dots of ketchup and even small olive slices for an extra spooky feel. Another favorite garnish I use sometimes is a quick brush of garlic butter on the baked dough for a savory finish—just be sure to add that right out of the oven!
Side Dishes
My go-to sides with Crescent Mummy Dogs are crispy sweet potato fries or a fresh crunchy salad to balance out all that warm dough and cheese. For a real Halloween party, I like to throw in a bowl of creamy pumpkin soup or serve with roasted veggies seasoned with rosemary and garlic—it feels cozy and complete.
Creative Ways to Present
One time, for a Halloween kids party, I arranged the Crescent Mummy Dogs upright in a “tray coffin” lined with lettuce for a fun and festive centerpiece. Another idea is to serve them alongside little “witch’s brew” cups of mustard dip or create a platter with “graveyard” signs made from toothpicks for that extra spooky touch.
Make Ahead and Storage
Storing Leftovers
Leftover mummy dogs keep really well in an airtight container in the fridge for up to 3 days. I like to reheat them gently so the dough doesn’t get too tough—more on that below!
Freezing
I’ve frozen unbaked Crescent Mummy Dogs wrapped on the baking sheet and covered tightly in plastic wrap for up to a month. When you’re ready to eat them, just thaw in the fridge overnight and then bake as usual. It’s a total time-saver for busy days.
Reheating
To reheat, pop your mummy dogs in a preheated 350°F oven for about 5–7 minutes. This keeps the dough crispy instead of soggy as it might get in the microwave. If you’re in a rush, I do a quick 30-second zap in the microwave then finish with a couple of minutes under the broiler to crisp up the outside.
FAQs
-
Can I make Crescent Mummy Dogs Recipe without American cheese?
Absolutely! Feel free to swap in any cheese that melts well, like cheddar, mozzarella, or pepper jack. Just make sure to cut the cheese into small quarters so it folds easily inside the dough strips and melts evenly.
-
What type of crescent dough works best for Crescent Mummy Dogs Recipe?
I find Pillsbury™ Original Crescent Rolls or the crescent dough sheet both work wonderfully. The sheet cuts more evenly, but the rolls give a nice buttery flavor and flaky texture. Just be sure to seal any perforations before slicing.
-
How long do Crescent Mummy Dogs stay fresh?
They’re best enjoyed fresh out of the oven, but stored in an airtight container in the fridge, they’ll last 2 to 3 days. Reheat as recommended for the best texture.
-
Can I prepare these ahead and bake later?
Yes! You can wrap the hot dogs in crescent dough, place them on a baking sheet covered with plastic wrap, and refrigerate for a few hours before baking. Just add a couple of extra minutes to the baking time if they’re chilled.
Final Thoughts
This Crescent Mummy Dogs Recipe is one of those fun kitchen projects that feels like play but results in a seriously tasty treat. I love how it combines simple ingredients into something festive and memorable—perfect for Halloween or anytime you want a cute, nostalgic snack. I truly think you’ll enjoy making it as much as eating it, and once you master the wraps, you might find yourself experimenting with all kinds of fun “mummy” snacks. Trust me, your family and friends will be asking for more!
Print
Crescent Mummy Dogs Recipe
- Prep Time: 0 hr 30 min
- Cook Time: 0 hr 17 min
- Total Time: 0 hr 47 min
- Yield: 10 Mummy Dogs
- Category: Snack
- Method: Baking
- Cuisine: American
Description
Crescent Mummy Dogs are a spooky and fun Halloween-themed snack featuring hot dogs wrapped in crescent roll dough with cheese ‘bandages.’ They are easy to prepare, kid-friendly, and baked until golden brown, making a perfect festive treat that’s ready in under an hour.
Ingredients
Ingredients
- 1 can (8 oz) refrigerated Pillsbury™ Original Crescent Rolls (8 Count) or 1 can (8 oz) refrigerated Pillsbury™ Original Crescent Dough Sheet
- 2 1/2 slices American cheese, quartered (2.5 oz)
- 1 package (10 count) Oscar Mayer™ Classic Wieners Hot Dogs
- Cooking spray
- Mustard or ketchup, if desired
Instructions
- Preheat the oven: Heat your oven to 350°F to ensure it reaches the right temperature by the time the dogs are wrapped and ready to bake.
- Prepare the dough: If using crescent rolls, unroll the dough and separate at the perforations to create 4 rectangles. Press the perforations to seal the dough. If using the dough sheet, unroll and cut into 4 rectangles.
- Cut the dough into strips: Using a knife or pizza cutter, slice each rectangle lengthwise into 10 thin pieces, each under 1/2 inch (1 cm) wide, yielding about 40 strips total.
- Prepare the cheese: Slice the cheese into quarters, roughly 1/2 slice per piece, then cut in half again to create small cheese strips.
- Wrap the hot dogs: Wrap 4 dough strips around each hot dog with a quarter slice of cheese underneath, slightly stretching the dough to cover the hot dog completely to mimic mummy bandages.
- Create the face opening: Leave about 1/2 inch of one end of each hot dog uncovered by pulling back the dough strips slightly, so the ‘face’ of the mummy peeks through.
- Arrange and prepare to bake: Place the wrapped hot dogs cheese-side down on an ungreased large cookie sheet, then lightly spray the dough with cooking spray to help it brown evenly.
- Bake: Place in the preheated oven and bake for 13 to 17 minutes, or until the dough is light golden brown and the hot dogs are heated through.
- Add facial details: Use a toothpick dipped in mustard to draw eyes and mouth on the exposed ‘face’ of each mummy dog, adding a fun finishing touch.
Notes
- A fun and festive Halloween dinner or snack that’s sure to please kids and adults alike.
- The cheese inside the dough helps keep the hot dog moist and adds a cheesy flavor.
- Using cooking spray on the dough helps achieve a nice golden color during baking.
- Feel free to substitute mustard with ketchup or your favorite condiments for decorating the mummy faces.
- These can be made ahead of time and baked shortly before serving for convenience.
Nutrition
- Serving Size: 1 Mummy Dog
- Calories: 220
- Sugar: 4 g
- Sodium: 710 mg
- Fat: 12 g
- Saturated Fat: 6 g
- Unsaturated Fat: 4 g
- Trans Fat: 0 g
- Carbohydrates: 11 g
- Fiber: 0 g
- Protein: 8 g
- Cholesterol: 40 mg


