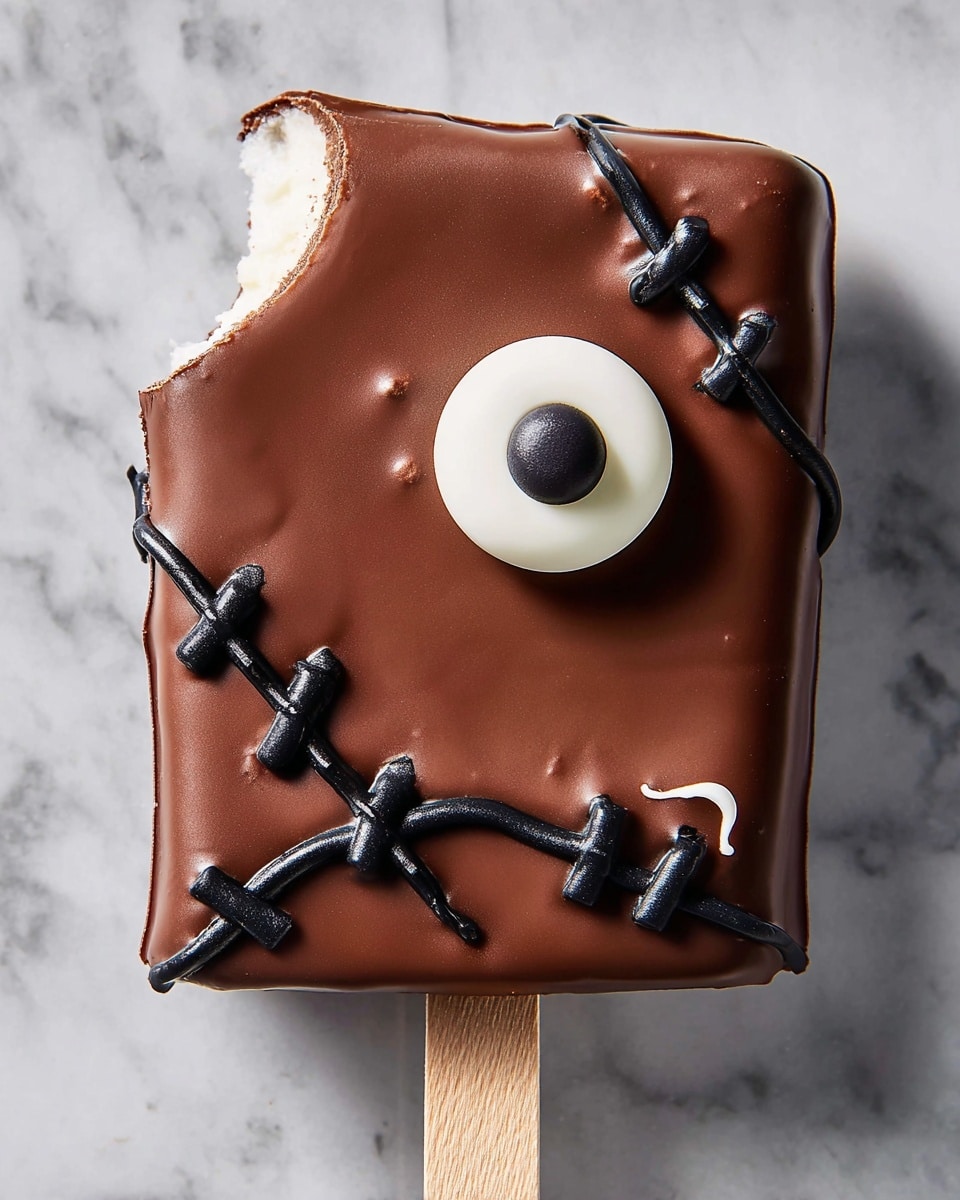
If you’re looking for a fun and festive treat that’s just overflowing with Halloween charm, you’re going to love this Hocus Pocus S’mores Pops Recipe. It’s easy, super cute, and oh-so-delicious — the perfect way to bring a little magic (and marshmallow mischief) into your kitchen. When I first made this, my family went crazy for it, and I’m pretty sure yours will too. Ready to make some pops that taste as good as they look? Let’s dive in!
Why You’ll Love This Recipe
- Super Simple to Make: No oven required and just a few ingredients make this a breeze to whip up.
- Perfect for Halloween: The candy eyes and spooky frosting decorations bring the perfect Hocus Pocus vibe to your party.
- Kid-Approved Treat: My kids couldn’t stop begging for more once they saw these adorable pops.
- Delicious Twist on Classic S’mores: Marshmallow crème makes these pops creamy and decadent without any toasting fuss.
Ingredients You’ll Need
The beauty of this Hocus Pocus S’mores Pops Recipe is how simple the ingredients are, yet how perfectly they come together. The graham crackers add crunch, the marshmallow crème gives that classic gooey texture without campfire hassle, and the chocolate coating is dreamy. Let me share a few tips on picking your ingredients!
- Graham crackers: Choose your favorite brand for a sturdy base; halving them creates the perfect pop-sized sandwiches.
- Marshmallow crème: Unlike regular marshmallows, this spreads easily and stays soft inside the sandwich.
- Semisweet chocolate chips: These melt smoothly and balance sweetness — I use good-quality chips for best flavor.
- Coconut oil: Adding this helps the chocolate glaze to be shiny and smooth for dipping.
- Candy eyes: The fun, spooky touch — look for ones that are easy to stick and not too big.
- Black cookie frosting: Gives you a nice, thick consistency for drawing that witchy detail — store-bought works great.
Variations
I love how easy it is to mix things up with this Hocus Pocus S’mores Pops Recipe. Whether you want to tweak the flavors or adjust to dietary needs, it’s super flexible. Here are a few ideas I’ve tried or want to try next time!
- Peanut Butter Swirl: I once added a thin layer of peanut butter inside the sandwich before the marshmallow crème — it gave a lovely nutty contrast that my family adored.
- Vegan Version: Swap marshmallow crème for a vegan-friendly marshmallow spread and use dairy-free chocolate chips for a plant-based treat.
- Spiced Chocolate: Adding a pinch of cinnamon or pumpkin pie spice to the melted chocolate made a cozy seasonal twist that was a hit.
- Mini S’mores Pops: Use mini graham crackers for bite-sized versions perfect for parties and kids’ lunches.
How to Make Hocus Pocus S’mores Pops Recipe
Step 1: Assemble the S’mores Sandwiches
Start by spreading about a tablespoon of marshmallow crème on half of the graham crackers. This is the secret to that soft, gooey center without the mess of toasting. When spreading, be gentle so the crackers don’t break. Now, carefully place a popsicle stick halfway onto the crème-covered side so it sticks out like a handle. Top with the other half of the cracker to complete your sandwich. Set these on a parchment-lined baking sheet, then pop them in the freezer — and don’t skip this chilling step, it helps the chocolate coating stick better!
Step 2: Make the Chocolate Coating
In a microwave-safe bowl, combine the semisweet chocolate chips and coconut oil. Microwave in 20-second bursts, stirring well after each, until everything is melted and silky smooth — usually about a minute total. I found that stirring frequently prevents burning and gives a glossy finish. This chocolate dip is what makes these pops extra magical!
Step 3: Dip and Decorate
Take your chilled s’mores sandwiches and dip each one fully into the melted chocolate. Use a small spatula or butter knife to help coat the sides evenly — I learned this trick after struggling with drips. While the chocolate is still wet, press a candy eye onto the right side of each pop, about halfway down. Place them back on the parchment-lined sheet and into the refrigerator to firm up, for at least 15 minutes.
Step 4: Add the Witchy Details
Once the chocolate has hardened, grab your black cookie frosting to draw the fun and spooky details. I like to outline the candy eye with a circle, add two semicircles to the outer corners of the graham cracker “book,” and draw stitches across the chocolate for that iconic Hocus Pocus look. Bonus points for steady hands here — but don’t worry, a little imperfection adds character! Chill the pops again for another 15 minutes so everything sets perfectly.
Pro Tips for Making Hocus Pocus S’mores Pops Recipe
- Chill Before Dipping: Freezing the assembled sandwiches first helps the chocolate coat smoothly without cracking or melting the marshmallow.
- Use Coconut Oil Wisely: Adding coconut oil thins the chocolate to a perfect dipping consistency and gives a nice shine when set.
- Precision Decorating: Use the tip of a toothpick or a small piping bag for cleaner lines with the cookie frosting.
- Avoid Moisture on Candy Eyes: Make sure the chocolate is still wet, but not too soggy, when adding eyes—otherwise, they won’t stick well.
How to Serve Hocus Pocus S’mores Pops Recipe

Garnishes
I like to keep garnishes simple but festive — a sprinkle of edible glitter or some tiny Halloween-themed sprinkles on the chocolate before it sets adds a magical sparkle. Sometimes I add a tiny mint leaf on top just for that unexpected fresh pop of color and contrast.
Side Dishes
These s’mores pops pair beautifully with warm apple cider or a rich hot chocolate for the ultimate Halloween comfort combo. For parties, I arrange them alongside some candy corn and pumpkin-shaped sugar cookies — everyone loves the colorful mix!
Creative Ways to Present
For a Halloween party, I like to stand these pops upright in a pumpkin bowl filled with candy and shredded tissue paper—the effect is super festive and makes them easy for guests to grab. Another fun idea is to wrap each pop in clear cellophane tied with orange and black ribbons for take-home favors.
Make Ahead and Storage
Storing Leftovers
If you have leftovers (which might not happen, but just in case!), store your s’mores pops in an airtight container in the refrigerator to keep the chocolate firm and the marshmallow fresh. I stack them carefully with parchment between to prevent sticking.
Freezing
Freezing is a great option if you want to prepare these ahead of time. Just freeze them on a tray first, then wrap individually in plastic wrap before placing in a freezer-safe bag. When you’re ready, thaw them in the fridge overnight — they taste almost as good as fresh!
Reheating
There’s no real reheating needed for these pops, but if you’re looking to soften the chocolate slightly before serving, just let them sit at room temp for 10 minutes. Resist microwaving — it can melt the marshmallow too much and make things messy.
FAQs
-
Can I make these without a freezer?
While freezing the assembled s’mores pops first makes chocolate dipping easier, you can chill them in the refrigerator for a bit longer (about 30 minutes) as a substitute. Just be gentle when dipping to prevent the marshmallow from squeezing out.
-
How long do these pops stay fresh?
When stored in an airtight container in the fridge, these Hocus Pocus S’mores Pops stay fresh for up to 3 days. Beyond that, the graham crackers may get soft and lose that delightful crunch.
-
Can I use dark chocolate instead of semisweet?
Absolutely! Dark chocolate will give a richer, less sweet flavor. Just be sure to melt it gently with the coconut oil to keep that smooth, shiny finish.
-
Is there a substitute for marshmallow crème?
If you can’t find marshmallow crème, you can try using regular marshmallows softened slightly by warming them, but spreading will be trickier. The crème is easiest and gives the creamiest texture.
-
How do I keep the candy eyes from falling off?
Make sure to add the candy eyes while the chocolate is still wet and tacky. If the chocolate starts to harden, the eyes won’t stick well. Press gently but firmly into place, and refrigerate immediately.
Final Thoughts
I honestly can’t recommend this Hocus Pocus S’mores Pops Recipe enough if you want an adorable, crowd-pleasing Halloween dessert that’s fuss-free but full of flavor and personality. It’s one of those recipes where I actually get excited to make it every year because it brings out laughter and that little spark of magic in the kitchen. So grab your ingredients, get cozy, and make some pops that will have everyone talking — you’re going to nail it!
Print
Hocus Pocus S’mores Pops Recipe
- Prep Time: 15 minutes
- Cook Time: 0 minutes
- Total Time: 45 minutes
- Yield: 6 pops
- Category: Dessert
- Method: No-Cook
- Cuisine: American
Description
Hocus Pocus S’mores Pops are a fun and festive Halloween treat that combines classic graham cracker s’mores with a spooky twist. These pops feature marshmallow crème sandwiched between graham crackers, dipped in rich melted chocolate, and decorated with candy eyes and black cookie frosting to create a spooky, playful design perfect for Halloween parties or family fun nights.
Ingredients
Graham Cracker Sandwiches
- 12 graham crackers, halved
- 1/2 cup marshmallow crème
- 6 popsicle sticks
Chocolate Coating
- 2 cups semisweet chocolate chips
- 3 tablespoons coconut oil
Decorations
- 1 bag candy eyes
- 1 container black cookie frosting
Instructions
- Prepare Graham Cracker Pops: Spread about 1 tablespoon of marshmallow crème on half of the graham cracker halves. Place a popsicle stick halfway onto the marshmallow crème so that it sticks out like a handle. Top with the other halved graham cracker to form a sandwich. Arrange the assembled pops on a parchment-lined baking sheet and freeze while making the chocolate coating.
- Make Chocolate Coating: In a medium heatproof bowl, microwave the semisweet chocolate chips and coconut oil in 20-second increments, stirring between each, until fully melted and smooth—approximately 1 minute total. This creates a glossy, smooth chocolate sauce for dipping.
- Dip the Pops: Dip each graham cracker sandwich into the melted chocolate, ensuring it is completely covered. Use a butter knife or silicone spatula to help coat the sides fully with chocolate. Then place each coated pop back on the parchment-lined baking sheet. Immediately place one candy eye on the far right side about halfway down each graham cracker “book.” Refrigerate until the chocolate hardens, about 15 minutes.
- Decorate: Use the black cookie frosting to draw a circle around each candy eye, add two semicircles on the outer corners of the graham cracker “book,” and add “stitches” details on the chocolate coating to complete the spooky design.
- Set and Serve: Refrigerate the decorated pops until the frosting is set, at least another 15 minutes. Serve chilled for best texture and appearance.
Notes
- This recipe is perfect for an easy and eye-catching Halloween dessert that kids and adults will love.
- Freezing the pops before dipping helps keep the marshmallow crème firm and prevents melting.
- Use good-quality semisweet chocolate chips for the best flavor and shine.
- Customize decorations with different candy eyes or colored frosting for variety.
- Store leftovers in the refrigerator to keep the chocolate coating firm.
Nutrition
- Serving Size: 1 pop
- Calories: 1065
- Sugar: 120 g
- Sodium: 302 mg
- Fat: 57 g
- Saturated Fat: 29 g
- Unsaturated Fat: 28 g
- Trans Fat: 0 g
- Carbohydrates: 143 g
- Fiber: 8 g
- Protein: 7 g
- Cholesterol: 0 mg


