
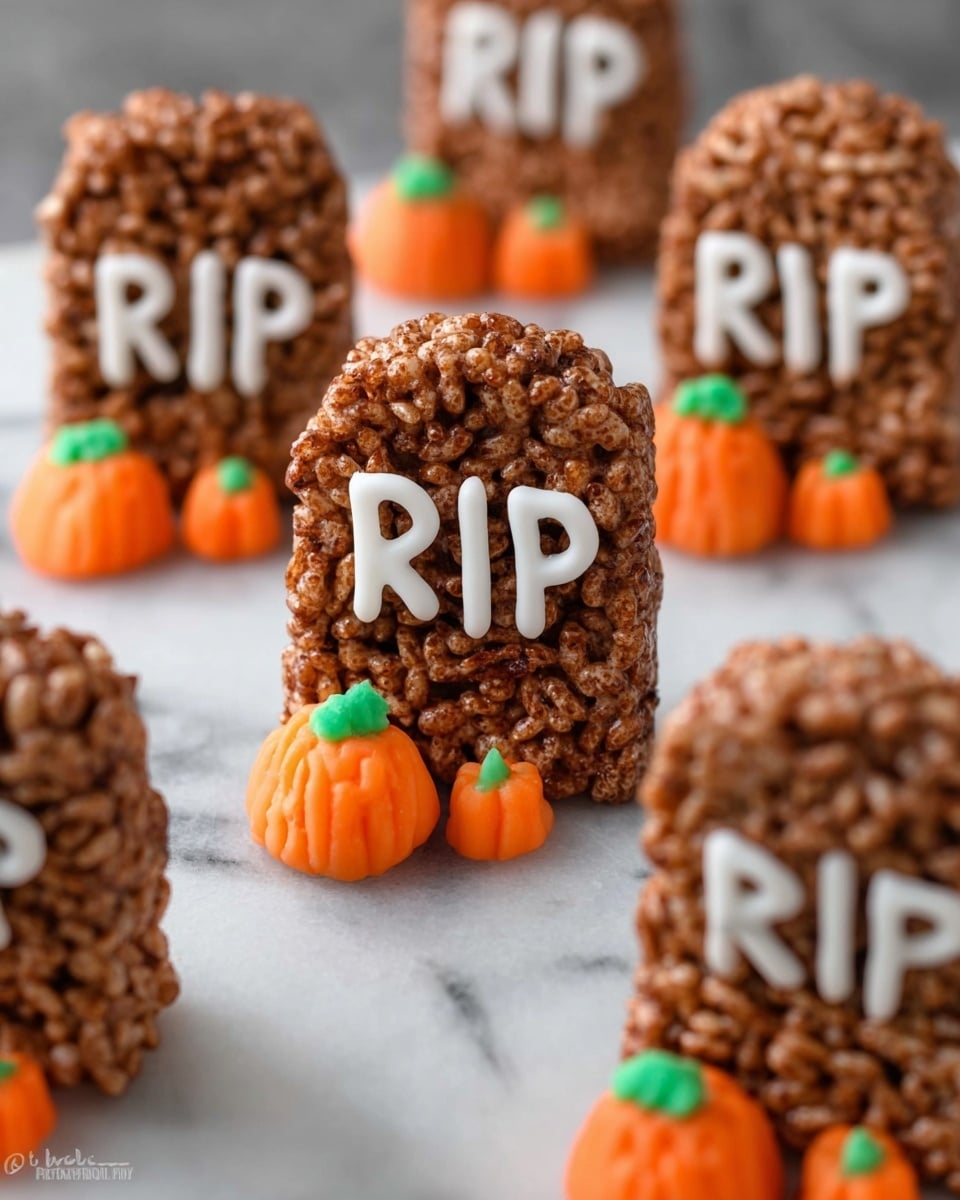
If you’re on the hunt for a spooky treat that’s as fun to make as it is to eat, you’re going to fall head over heels for this Tombstone Rice Krispies Recipe. I absolutely love how it brings a playful Halloween vibe with that deliciously chocolatey crunch — a perfect twist on classic Rice Krispies treats. Stick with me, and I’ll walk you through every step to nail these tombstones in your kitchen, whether it’s your first time or you’ve dabbled with no-bake treats before. Trust me, your friends and family will be asking for the recipe (and the trick-or-treaters won’t be disappointed!).
Why You’ll Love This Recipe
- Playful Presentation: These Rice Krispies tombstones add a fun, spooky element to your dessert table that’s perfect for Halloween parties or themed gatherings.
- Easy and No-Bake: No oven needed! This recipe comes together with simple stovetop and microwave steps — perfect if you’re short on kitchen time.
- Decadent Flavor Boost: Adding Nutella takes these treats from basic to next-level chocolatey deliciousness — your taste buds will thank you.
- Customizable and Fun: You can adapt decorations, sizes, and flavors easily to fit your style and occasion.

Ingredients You’ll Need
When I first made this Tombstone Rice Krispies Recipe, I appreciated how straightforward the ingredients list was — all pantry staples with a fun Nutella twist. Each item brings something special for a perfectly balanced, chocolaty treat that holds its spooky shape well.
- Mini marshmallows: Use mini marshmallows to ensure even melting and easier mixing for a perfectly sticky base.
- Butter: Helps the marshmallows melt smoothly and binds everything together without overpowering flavors.
- Nutella: This is the secret chocolate-hazelnut star that adds richness and keeps your tombstones irresistibly moist.
- Cocoa Rice Krispies: These chocolatey cereal pieces provide crunch and that classic Rice Krispies texture — be sure to use the cocoa kind for max flavor.
- Melted white chocolate or white frosting: For the “RIP” detailing — melted white chocolate pipes beautifully, but white frosting works if you’re in a pinch.
Variations
I love mixing things up with this Tombstone Rice Krispies Recipe. Whether you want to amp the chocolate factor or make it more allergy-friendly, tweaks are a blast to try. It’s really about making the spooky treat feel like your own!
- Add-ins or Mix-ins: I’ve tried tossing in mini chocolate chips or crushed pretzels for that extra texture kick — and it’s a crowd-pleaser every time.
- Peanut Butter Swap: If Nutella isn’t your thing, creamy peanut butter works as a tasty substitute, giving a different but equally delicious twist.
- Vegan Version: Use vegan marshmallows and dairy-free butter alternatives to make this treat vegan-friendly without sacrificing that gooey magic.
- Colorful Tombstones: Feel free to swap cocoa Rice Krispies with regular ones and add food coloring to the marshmallow mix for some Halloween-inspired colors instead.
How to Make Tombstone Rice Krispies Recipe
Step 1: Melt the Marshmallows and Butter
Start by plopping your mini marshmallows and butter into a large microwave-safe bowl. Microwave for 1 minute and then give it a good stir. This step gets the melting party started, but don’t stop there — continue microwaving in 30-second bursts, stirring in between until everything is smooth and completely melted. This little patience pays off with a silky base that’s easy to work with and won’t get lumpy. I usually keep a silicon spatula handy because it scrapes the sides perfectly without sticking.
Step 2: Stir in Nutella
Once your marshmallows and butter are melted, it’s time to mix in the Nutella. I love how Nutella melts right into the warm mixture, creating this gorgeous chocolate-hazelnut ribbon of flavor throughout. Stir gently but thoroughly until it’s seamlessly combined. This step transforms the treat from ordinary Rice Krispies to something that feels downright decadent.
Step 3: Add the Cocoa Rice Krispies
Now fold your cocoa Rice Krispies into the chocolatey marshmallow-Nutella mixture. Make sure every cereal piece is coated — this helps with that classic sticky hold and gives your tombstones that fantastic crunch. I find folding in with a spatula works better than stirring wildly; it preserves the cereal’s shape and iciness better.
Step 4: Shape Your Tombstones
This is where the fun kicks into high gear! Grab small handfuls and shape them into tombstones — you can make them a variety of sizes, but consistency helps when you want them to stand upright. A crucial tip I learned the hard way: butter your fingers (or lightly oil them) before handling the mixture, or you’ll end up with sticky hands stuck to chocolatey messes. I like placing my shaped tombstones on parchment paper so they don’t stick to the counter. Press the bottoms flat — this helps with stability when standing up.
Step 5: Let Them Set and Decorate
Allow your tombstones to cool and firm up. Once set, melt some white chocolate (I like using candy melts here) or prepare white frosting to pipe on a spooky “RIP” message. I discovered a foolproof trick to pipe with precision — make a tiny piping bag using a small ziplock bag by snipping the corner off. It makes the writing look neat and professional without needing fancy tools. Your guests will love that personal spooky touch!
Pro Tips for Making Tombstone Rice Krispies Recipe
- Butter Your Hands: This simple step saves you from a sticky struggle when shaping your tombstones — trust me, it makes all the difference!
- Microwave in Intervals: Avoid overheating marshmallows by microwaving in short increments and stirring often to keep that smooth consistency.
- Flat Tombstone Bases: Pressing the base flat ensures your tombstones stand upright easily — no one wants a spooky lean!
- Use Parchment Paper: Working and cooling your tombstones on parchment keeps them from sticking to surfaces and makes cleanup quick.
How to Serve Tombstone Rice Krispies Recipe
Garnishes
I like to keep the decorations simple but effective — a little dusting of edible glitter can add a magical graveyard shimmer. Sprinkling crushed Oreos around your serving platter gives the look of dirt, which always gets a curious and impressed reaction from guests. For an extra festive touch, a few candy eyeballs stuck on using white frosting turn these tombstones into eerie characters!
Side Dishes
Pairing these tombstones with a tall glass of cold milk is a no-brainer — it balances out the rich chocolatey goodness perfectly. For Halloween parties, I love serving them alongside pumpkin spice cupcakes or salted caramel popcorn to keep that sweet-salty vibe going.
Creative Ways to Present
For last year’s Halloween bash, I set these tombstones upright in a “graveyard” cake made from chocolate cake crumbs and green coconut to resemble grass. It was a hit! You can also serve them on rustic wooden boards or arrange as a centerpiece surrounded by candy corn for a colorful display. Get creative with how you display them — the more thematic, the better the reaction!
Make Ahead and Storage
Storing Leftovers
I always store leftover tombstones in an airtight container at room temperature for up to 3 days. Keeping them sealed well prevents drying out and helps maintain that soft, chewy texture. If you notice they’re getting a little firm, just give them a few seconds in the microwave before serving — like magic, they soften right back up.
Freezing
Freezing is definitely an option if you’re making these tombstones way ahead of time. I wrap each treat individually in plastic wrap and place them in a freezer-safe bag. They freeze beautifully for up to a month. When you’re ready, thaw at room temperature for about an hour and then they’re ready to spook and snack on.
Reheating
For the best texture when reheating leftovers, pop the tombstone in the microwave for about 8-10 seconds. Be sure not to overdo it, or they’ll get too gooey. This quick zap brings back that fresh-made softness almost as if you just whipped them up moments ago.
FAQs
-
Can I use regular Rice Krispies cereal instead of the cocoa version?
Absolutely! Using regular Rice Krispies will create a lighter color and more classic flavor. If you want to keep the chocolatey vibe, you could add a tablespoon of cocoa powder to the marshmallow mixture, but the recipe will still work perfectly without cocoa cereal.
-
What’s the best way to melt marshmallows without them burning?
Microwaving in short bursts—like 30 seconds at a time—and stirring in between is your best bet. This method evenly melts your marshmallows with butter, preventing scorching and yielding a smooth, gooey texture.
-
Can I substitute Nutella if I don’t have any on hand?
Yes! Peanut butter is a fantastic substitute that adds a nice nutty twist. You can also swap with any chocolate hazelnut spread or even melted chocolate chips for a different flavor profile.
-
How long do Tombstone Rice Krispies treats keep fresh?
Stored in an airtight container at room temperature, they stay fresh and delicious for 3-4 days. Beyond that, they can dry out and lose their texture, so I recommend enjoying them sooner rather than later.
Final Thoughts
This Tombstone Rice Krispies Recipe holds such a special spot in my Halloween repertoire because it’s both nostalgic and refreshingly fun with that Nutella boost. I remember the first time I shaped those chocolatey tombstones and my kids’ eyes lit up — it’s like we created our own little haunted dessert graveyard. I encourage you to try this recipe just as you would share a secret with a friend, knowing it’ll bring smiles, laughs, and sweet bites aplenty. Dive in, get creative, and most importantly — enjoy every sticky, chocolaty moment!
Print
Tombstone Rice Krispies Recipe
- Prep Time: 15 minutes
- Cook Time: 5 minutes
- Total Time: 20 minutes
- Yield: 20 small tombstones
- Category: Dessert
- Method: Microwaving
- Cuisine: American
- Diet: Vegetarian
Description
These Tombstone Rice Krispies are a spooky and delicious Halloween treat made with cocoa-flavored Rice Krispies, Nutella, and mini marshmallows. Perfectly shaped into tombstones and decorated with white chocolate or frosting, they make a fun and festive snack for parties or trick-or-treaters.
Ingredients
Base Ingredients
- 4 cups mini marshmallows
- 3 Tbsp. butter
- 1/2 cup Nutella
- 4 cups cocoa Rice Krispies
Decoration
- 1/3 cup melted white chocolate or white frosting
Instructions
- Melt marshmallows and butter: Add mini marshmallows and butter to a large microwave-proof bowl. Microwave on high for 1 minute, then stir. Continue microwaving in 30-second increments, stirring each time until the mixture is fully melted and smooth.
- Add Nutella: Stir in the Nutella until it is completely melted and well combined with the marshmallow mixture, creating a rich, chocolaty base.
- Mix in cocoa Rice Krispies: Fold in the cocoa Rice Krispies gently until they are evenly coated with the marshmallow and Nutella mixture.
- Shape tombstones: Take small portions of the mixture and mold them into tombstone shapes using your hands. Butter your fingers lightly to prevent sticking. Place the formed tombstones on parchment paper with a flat bottom so they can stand upright.
- Cool and decorate: Allow the tombstones to cool and set completely. Once firm, use melted white chocolate or white frosting to pipe “RIP” or other designs onto the tombstones. A small ziplock bag can be used as a piping bag for precision.
- Serve and enjoy: Your spooky, delicious Tombstone Rice Krispies are ready to enjoy at your Halloween parties or festive gatherings!
Notes
- Using buttered fingers helps prevent sticky hands when shaping the tombstones.
- Cocoa Rice Krispies add a rich chocolate flavor, but you can substitute with regular Rice Krispies if unavailable.
- For decorating, melted white chocolate melts smoother for piping, but white frosting works well as a simple alternative.
- Store the tombstones in an airtight container at room temperature for up to 3 days.
Nutrition
- Serving Size: 1 tombstone
- Calories: 150
- Sugar: 14g
- Sodium: 90mg
- Fat: 7g
- Saturated Fat: 4g
- Unsaturated Fat: 3g
- Trans Fat: 0g
- Carbohydrates: 22g
- Fiber: 1g
- Protein: 2g
- Cholesterol: 10mg


