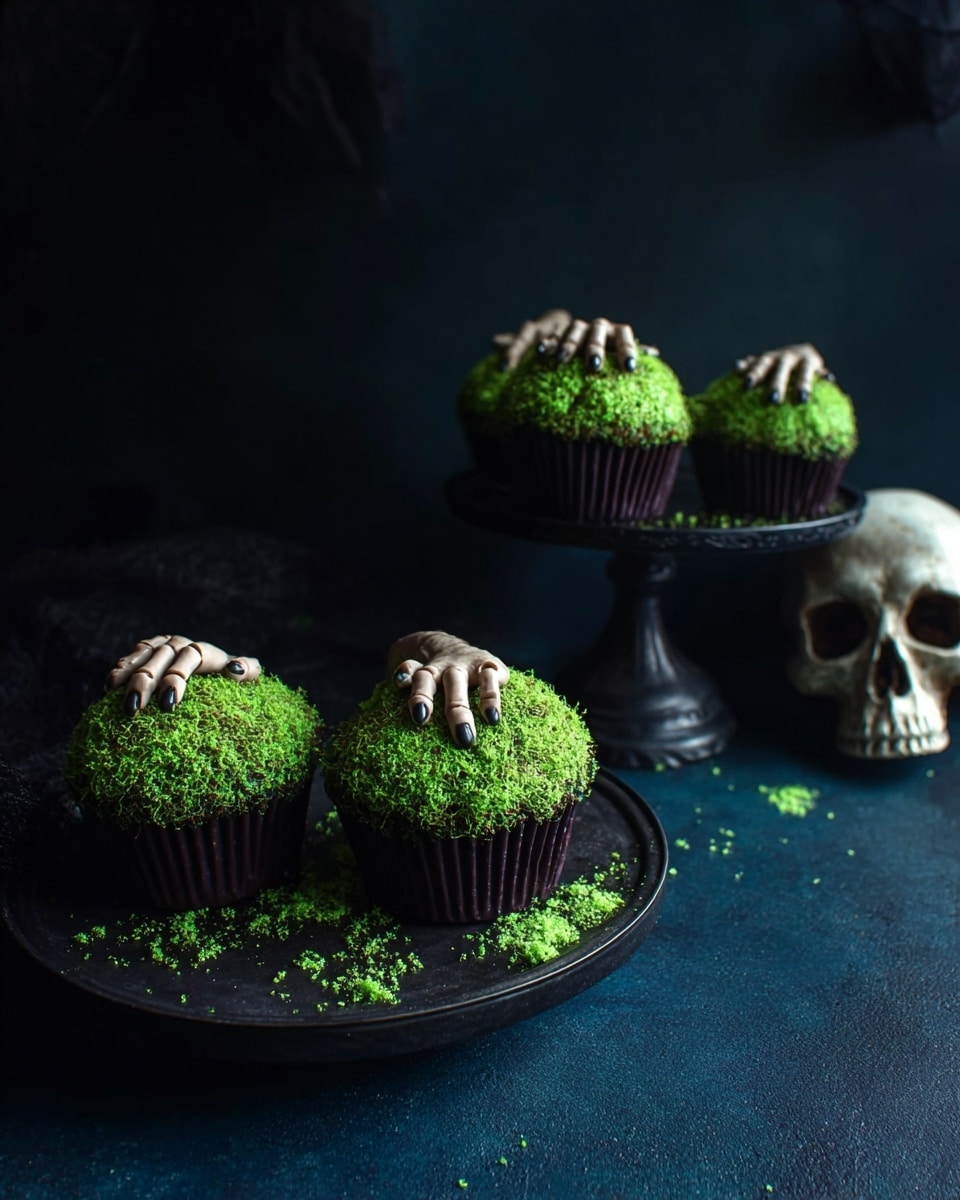
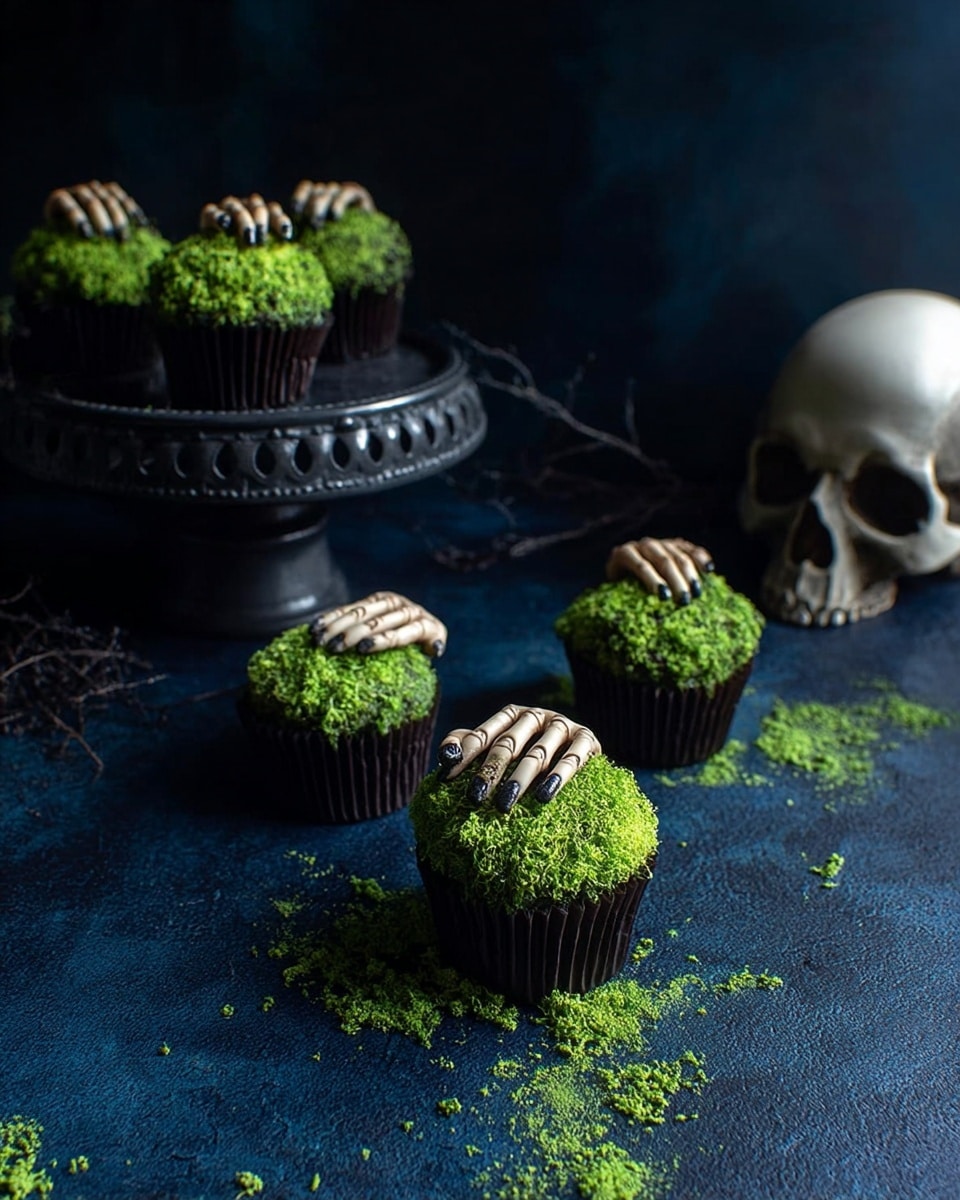
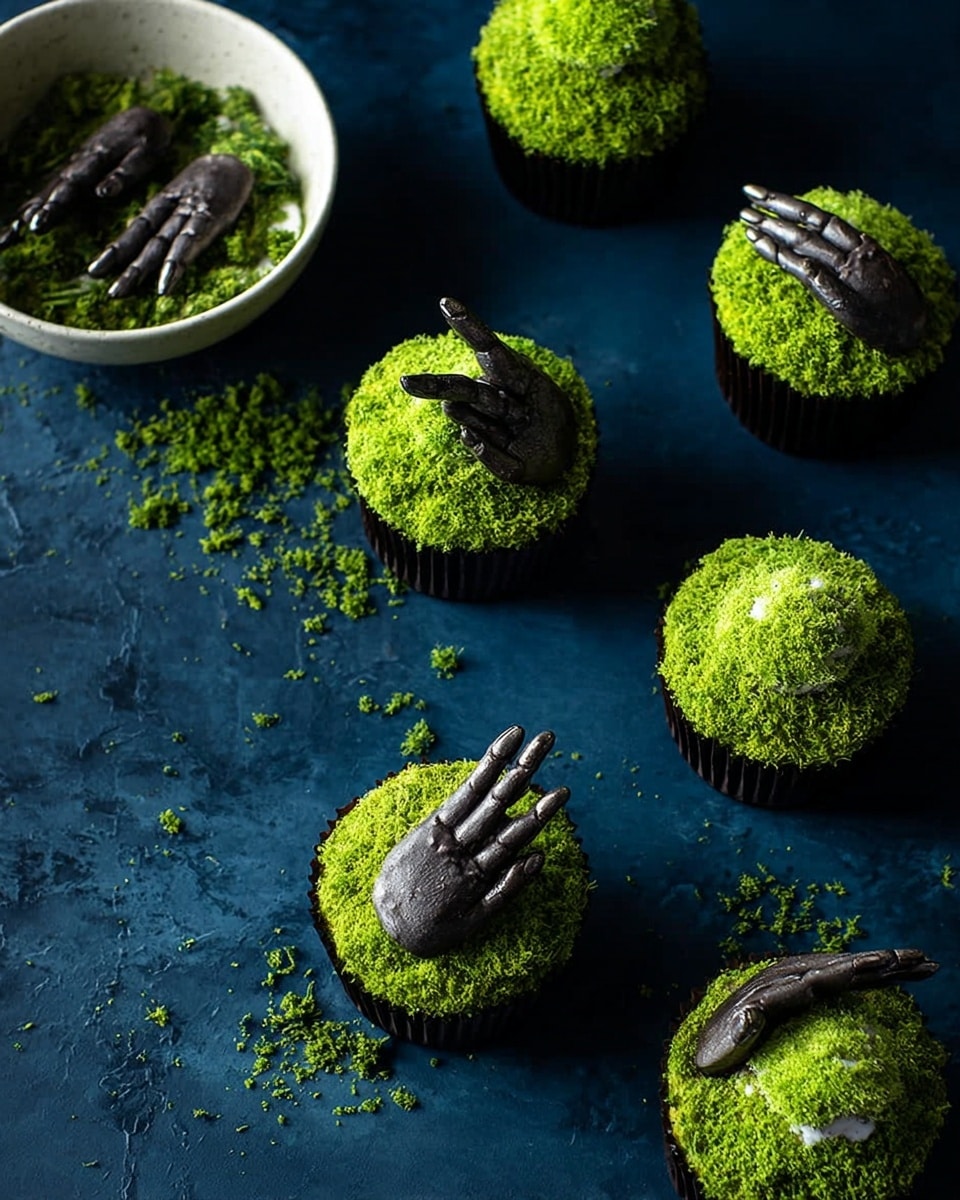
If you’re searching for a whimsical showstopper that’s equal parts spooky and sweet, you’re going to absolutely adore this Forget Me Not Cupcakes Recipe. I first tried making these for a Halloween party and, honestly, they stole the show! The combination of mossy green frosting, crumbly “grass,” and these eerie little fondant fingers just delights everyone — and trust me, they taste as fantastic as they look. Stick with me, and I’ll walk you through how to nail this fan-freaking-tastic recipe right at home.
Why You’ll Love This Recipe
- Unique and Eye-Catching: These cupcakes aren’t just tasty; they’re a total conversation piece with their realistic fondant fingers.
- Fun to Make: I love how crafting the fondant fingers feels like edible art — it’s a great project whether you’re a beginner or a seasoned baker.
- Perfect for Special Occasions: Ideal for Halloween, themed parties, or anytime you want to impress with something a little different.
- Fresh and Flavorful: The green tinted frosting and graham cracker crumbs give these cupcakes a deliciously earthy flavor that balances the sweetness beautifully.
Ingredients You’ll Need
This recipe calls for some playful ingredients that together create both the fun look and delicious flavor. Getting quality fondant and fresh graham crackers really makes a difference here — your fingers will look more realistic, and the crumb coating tastes just right with the mossy frosting.
- Cupcakes: Use your favorite vanilla or chocolate base for a great foundation.
- Frosting: A smooth, white frosting works best since we’ll be tinting it moss green.
- Fondant: Essential for crafting the finger decorations — go for a pliable fondant that’s easy to shape.
- Graham Crackers: Crucial for the crumb “grass” coating — fresh crackers give the best texture and flavor.
- Food Coloring: Blue, yellow, and brown for that perfect mossy green frosting color, and black powdered food coloring for shading the fondant fingers.
- Baking Cocoa: Adds some natural shading to the fondant fingers for a realistic effect.
- Black Thread or Embroidery Floss: To tie tiny bows on the fondant fingers, adding a charming final touch.
Variations
I like to make this Forget Me Not Cupcakes Recipe my own by experimenting with a few toppings and colors depending on the occasion. You should definitely feel free to tweak the colors or decorations to fit your theme — it’s part of the fun!
- Flavor Swaps: I’ve swapped out the vanilla cupcakes for pumpkin spice in the fall — adds extra warmth to the whole vibe.
- Diet-Friendly: You can use gluten-free graham crackers for a GF-friendly version and dairy-free frosting to keep it vegan.
- Color Play: Sometimes I add a touch of purple to the green frosting for an extra creepy, mystical effect.
- Finger Details: I once tried adding tiny edible nails with colored fondant, which got tons of compliments!
How to Make Forget Me Not Cupcakes Recipe
Step 1: Craft the Fondant Fingers
Start by rolling out a small quarter-sized ball of fondant until it’s about the size of your pinky finger. I like to trim the ends if they get too long so the fingers look just right. Then, pinch gently on either side where the knuckle would be — this is what makes them look real! Use a straw that’s been cut in half with rounded edges to press in the fingernail indent, then a ball tool to create an indentation at the thicker end of the finger. Pull the ends slightly to give a frayed, aged effect, which looks so cool. Don’t forget to score the finger repeatedly with short strokes to mimic skin texture. Set each finger aside to harden on something that slightly elevates them, like a straw, so they get a natural bent shape.
Step 2: Add Shading for Realism
Once your fingers are set, brush them lightly with baking cocoa. Then, keep blotting some cocoa away with a damp paper towel to create uneven, organic shading—it’s a trick I learned to avoid the fondant looking too flat. Repeat this step with black powdered food coloring until you reach the spooky, shadowed effect you want. Finally, tie a tiny bow around each finger with black thread or embroidery floss — trust me, this little detail makes your fingers look straight out of a horror movie, in the best way!
Step 3: Prepare the Green “Grass” Crumbs
Put graham crackers in a food processor and pulse until finely ground. If you don’t have a processor, place them in a large plastic bag and crush with a rolling pin — I’ve done it both ways, and both work well. In a small bowl, mix blue and yellow food coloring with vodka or water to thin it out. Stir the colored liquid into the graham cracker crumbs, mixing until the crumbs get a lovely moss green shade. You might need a few rounds of adding color to reach your ideal hue. It’s totally worth the effort for that authentic grassy look.
Step 4: Tint and Pipe the Frosting
Use blue, yellow, and brown food coloring to tint your frosting a mossy green — I always start light and add brown in small amounts to get that earthy tone just right. Fill a piping bag fitted with a large round tip (like an Ateco 809) and pipe swirls of frosting on each cupcake. You want tall, soft peaks because they’ll hold the crumb coating beautifully.
Step 5: Coat with Green Graham Cracker Crumbs
Finally, dip each frosted cupcake into the green crumb mixture until the frosting is fully coated. This step turns the cupcakes into little mossy patches that look like they just sprouted those creepy fondant fingers from the earth. Once coated, gently place a fondant finger on top. Let everything set for a few minutes before serving to let the crumbs adhere properly — this saves you the mess later!
Pro Tips for Making Forget Me Not Cupcakes Recipe
- Fondant Patience: Let your fondant fingers dry completely before decorating to avoid cracking or bending out of shape.
- Color Layering: I discovered that layering the cocoa and powdered food coloring for shading really adds depth, so don’t rush this step.
- Crumb Coating Method: Use a light hand when dipping cupcakes, pressing crumbs gently to avoid breaking your frosting swirls.
- Avoid Oversaturating: When coloring graham cracker crumbs, add liquid slowly to prevent soggy crumbs that won’t stick well.
How to Serve Forget Me Not Cupcakes Recipe
Garnishes
I love keeping the garnish simple so the little fondant fingers are the stars of the show. Sometimes, a sprinkle of edible gold dust on the mossy crumbs adds a magical touch without overwhelming the spooky vibe. A small edible flower or two (like violets) can also bring a fresh pop of color that looks stunning next to the green crumbs.
Side Dishes
These cupcakes stand out on their own, but pairing them with a warm cup of spiced apple cider or a dark roast coffee really completes the experience. For big gatherings, I like serving them alongside hearty pumpkin soup or a platter of mixed nuts and dried fruits to balance the sweet with savory.
Creative Ways to Present
I once set up a creepy “garden patch” by placing the cupcakes on a bed of moss-like green felt with dried twigs and small pumpkins scattered around for a Halloween spread. For a more elegant twist at tea parties, you can serve them on vintage cake stands with delicate doilies underneath to add charm without losing their quirky spirit.
Make Ahead and Storage
Storing Leftovers
After baking, I usually store leftover cupcakes in an airtight container at room temperature for up to two days. Keeping the fondant fingers dry is key, so make sure your container isn’t too humid. If the fingers start to soften, they’re still good to eat but lose some of that crisp detail.
Freezing
I’ve frozen these cupcakes without the fondant fingers on top, wrapping each cupcake individually in plastic wrap first, then placing them in a freezer bag. When ready to eat, thaw overnight in the fridge and add freshly made fondant fingers or decorate fresh for best results. Freezing with fondant fingers isn’t recommended because they get soggy and lose shape.
Reheating
Since these are frosted cupcakes, I don’t recommend reheating. Instead, just let frozen cupcakes thaw fully and enjoy at room temperature. The texture and flavor stay best this way — warm cupcakes can cause frosting to melt and fingers to soften too much.
FAQs
-
Can I make these Forget Me Not Cupcakes Recipe ahead of time?
Absolutely! The cupcakes and frosting can be made a day or two ahead and stored refrigerated. Just add the fondant fingers and crumb coating shortly before serving to keep everything looking fresh and realistic.
-
What if I can’t find black powdered food coloring?
If you don’t have black powdered food coloring, you can substitute with a very small amount of regular black gel food coloring diluted slightly with cornstarch to achieve a powder consistency. Just be gentle with it so your fondant doesn’t get too wet.
-
Can I simplify this recipe for kids to help?
Definitely! Kids love shaping the fondant fingers and painting on cocoa for shading. You might want to prep the crumb coloring and frosting piping ahead of time to keep things manageable, but hands-on fondant work is a fun project for little bakers.
-
What’s the best cupcake flavor to use?
I find that either vanilla or chocolate cupcakes work beautifully as a base—the rich colors help the green frosting and fondant fingers pop. That said, feel free to use any flavor you love!
-
Are there any tips for making the fondant fingers look more realistic?
Yes! The key is texture and shading. Creating small knuckle lines, scoring the surface for skin texture, using cocoa and black powdered coloring for shading, and gently fraying the tips all contribute to a lifelike effect.
Final Thoughts
I absolutely love how this Forget Me Not Cupcakes Recipe turned out the first time I made it—it’s rare that a cupcake combines such fun artistry with genuine tastiness. These cupcakes aren’t just desserts; they’re conversation starters, memory makers, and perfect for any occasion where you want to impress your guests with a little spooky charm. Give this recipe a try and watch the smiles (and maybe a few delighted shrieks) unfold when you serve these unforgettable treats. You’ve got this!
Print
Forget Me Not Cupcakes Recipe
- Prep Time: 1 hr
- Cook Time: 0 min
- Total Time: 1 hr
- Yield: 12 cupcakes
- Category: Dessert
- Method: No-Cook
- Cuisine: American
Description
Forget Me Not Cupcakes are whimsical, creatively decorated cupcakes featuring mossy green frosting coated in tinted graham cracker crumbs and topped with realistic fondant fingers. Perfect as spooky party treats or charming reminders, these cupcakes combine decorative fondant artistry with deliciously moist cake and vibrant frosting.
Ingredients
Cupcakes
- 12 cupcakes (flavor of your choice)
Frosting
- 2 1/2 cups frosting
- Blue food coloring
- Yellow food coloring
- Brown food coloring
Fondant Fingers
- 1/3 lb fondant
- Black powdered food coloring
- Baking cocoa
- Black thread or embroidery floss
Other
- 5 graham crackers, crushed
- Vodka or water (for mixing with food coloring)
Instructions
- Shape Fondant Fingers: Start with a small quarter-size ball of fondant. Roll it out until it matches the length and width of your pinky finger. Trim any excess if it becomes too long.
- Create Knuckles and Nails: Pinch the fondant on either side where the knuckle would be using your thumb and index finger. Use a cut and rounded straw half to indent the fingernail. Use a ball tool to form an indent at the large end of the finger and pull the ends slightly to make a frayed texture at the fingertips.
- Texture and Detail: Carve knuckle joint lines using a scribe tool. Score the finger surface with short, shallow strokes repeatedly to add realistic texture. Repeat these steps for all fingers.
- Set to Harden: Lay the fondant fingers on a slightly elevated surface, such as a straw, to create a natural bent shape. Allow them to harden completely.
- Color Fondant Fingers: Brush each finger lightly with baking cocoa. Use a damp paper towel to selectively blot some cocoa away for uneven coloring. Repeat with black powdered food coloring until the desired natural effect is achieved.
- Add Thread Bows: Tie a bow around each fondant finger using black thread or embroidery floss to resemble tying a string around your finger.
- Prepare Graham Cracker Crumbs: Pulse graham crackers in a food processor until finely ground, or crush them inside a plastic bag with a rolling pin.
- Tint Graham Cracker Crumbs Green: In a small bowl, mix blue and yellow food coloring with vodka or water to thin. Stir the crushed graham crackers with the tinted liquid until they are evenly coated and reach the desired mossy green shade.
- Color Frosting Green: Tint your frosting with blue, yellow, and brown food coloring to create a mossy green color.
- Frost Cupcakes: Scoop the tinted green frosting into a piping bag fitted with a large round tip (such as Ateco 809). Pipe a generous swirl onto each cupcake.
- Apply Graham Cracker Coating: Dip the frosted cupcakes into the tinted graham cracker crumbs until the frosting is completely covered, creating a textured mossy look.
Notes
- Tying a piece of string around your finger as a reminder has debated origins, but these cupcakes will be truly unforgettable!
- They make excellent party invitations or Halloween dessert centerpieces.
- Use vodka to thin the food coloring for quicker drying and less sogginess, but water works as a substitute.
- Allow the fondant fingers ample time to harden for best texture and detail retention.
- Customize cupcake flavors to your preference to complement the decorative elements.
Nutrition
- Serving Size: 1 cupcake
- Calories: 320
- Sugar: 28g
- Sodium: 180mg
- Fat: 18g
- Saturated Fat: 8g
- Unsaturated Fat: 8g
- Trans Fat: 0g
- Carbohydrates: 36g
- Fiber: 1g
- Protein: 2g
- Cholesterol: 45mg

