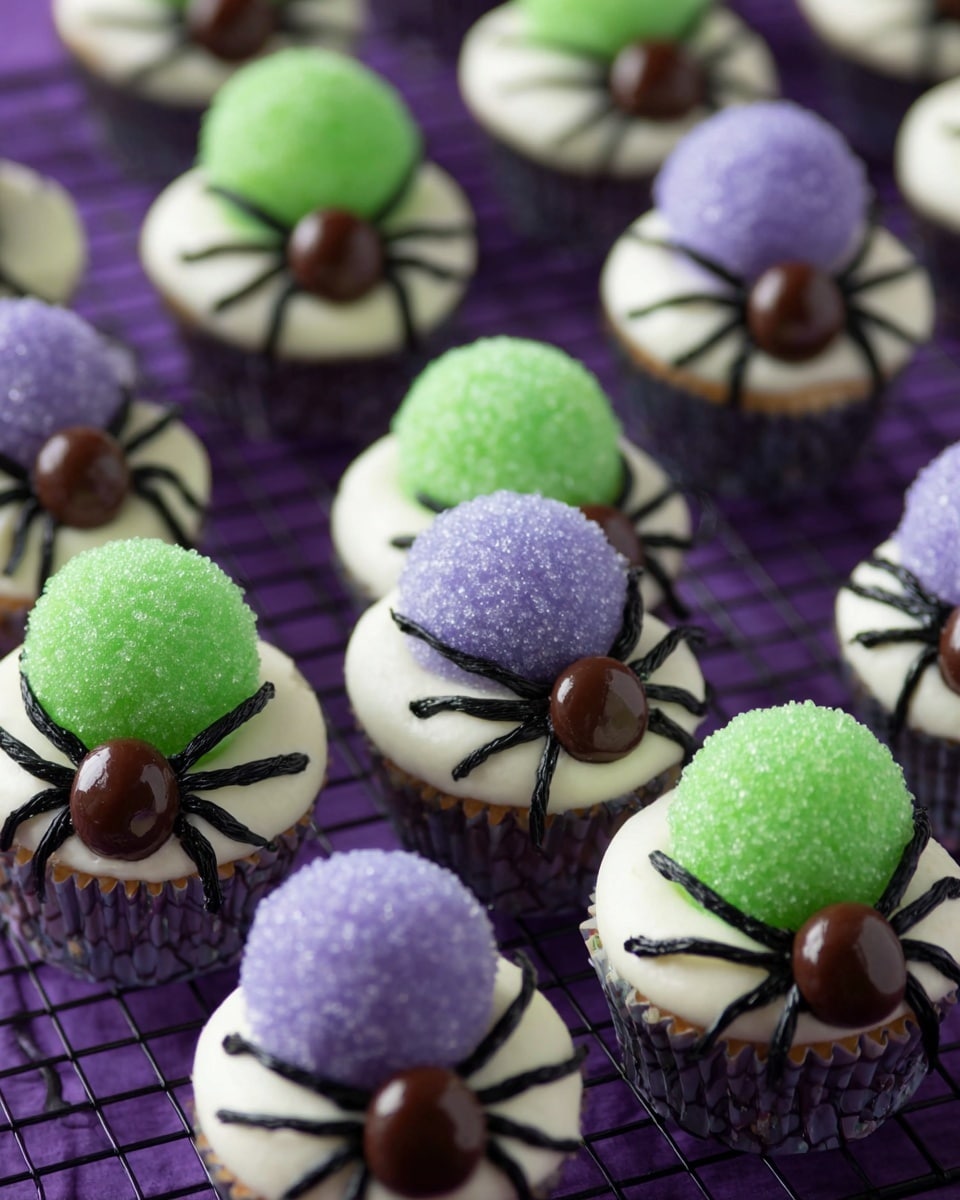
If you’re on the hunt for a fun, festive treat that’s as adorable as it is delicious, I’ve got just the thing for you. This Spider Bites Mini Cupcakes Recipe is one of those gems I stumbled onto that instantly became a family favorite. Whether you’re gearing up for a Halloween party, a creepy-crawly birthday bash, or just craving something cute and chocolatey, these mini cupcakes won’t disappoint. I absolutely love how these little spiders are as much fun to make as they are to eat – trust me, you’re going to want to bake a double batch!
Why You’ll Love This Recipe
- Cute & Creative: You’ll wow your guests with adorable spider designs that are surprisingly easy to pull off.
- Perfect Mini Size: These bite-sized cupcakes are perfect for parties and just the right portion to satisfy that sweet tooth.
- Moist & Flavorful: The combo of cocoa and buttermilk gives every bite a tender crumb and rich taste.
- Fun Decorating Experience: I love that you can get kids involved piping buttercream and shaping spiders – it’s a great hands-on activity!
Ingredients You’ll Need
Let me break down the stars of this Spider Bites Mini Cupcakes Recipe for you. The ingredients are straightforward, easy to find, and each plays an important role in making these cupcakes both tasty and picture-perfect.
- Vanilla candy coating: This gives the spider’s “head” a shiny, sweet shell and acts as glue when attaching chocolate eyes.
- White sanding sugar: Adds texture and helps form the spider’s rounded body shape.
- Purple or green gel icing color: For tinting your buttercream and bringing those creepy spiders to life with fun colors.
- Dark chocolate covered espresso beans: These become the spider’s eyes – a little unexpected but perfect for detailing.
- Butter (room temperature): Helps keep the buttercream smooth and creamy for piping.
- Confectioners’ sugar: Provides sweetness and structure to the buttercream.
- Vanilla extract: Adds warm, comforting flavor to both the cupcake and frosting.
- Milk: Controls buttercream consistency so you can pipe firm spider bodies or delicate legs.
- All purpose flour: The base for a tender crumb in your cupcakes.
- Natural unsweetened cocoa: Gives just enough chocolate flavor without overpowering.
- Granulated sugar: Adds sweetness and moisture balance in the cupcakes.
- Baking powder and baking soda: For that perfect lift and rise.
- Salt: Enhances all the flavors.
- Egg: Gives structure and richness to the batter.
- Buttermilk: It’s the secret weapon for moist, tender cupcakes with a subtle tang.
- Vegetable oil: Keeps the cupcakes soft and helps them stay fresh longer.
- Hot water: Helps bloom the cocoa and makes the batter smooth.
Variations
One of my favorite things about this Spider Bites Mini Cupcakes Recipe is how easy it is to make your own spin on it. Once you get comfortable with the basics, you can start playing around with colors, flavors, and even toppings to match your vibe.
- Flavor Swap: I sometimes mix in a little espresso powder to the batter for a mocha twist – it makes the chocolate even more intense and the espresso beans on top tie it all together perfectly.
- Color Fun: For a Halloween twist, I’ve used glow-in-the-dark gel food colors designed for frostings – it’s a total hit at spooky gatherings.
- Diet-Friendly: You can use dairy-free butter and plant-based milk to make this vegan-friendly; just make sure to check your candy coating and decorations too.
- Sprinkles Instead of Sugar: Whenever I’m short on sanding sugar, I swap with very fine glittery sprinkles for a fun sparkle and crunch.
How to Make Spider Bites Mini Cupcakes Recipe
Step 1: Mix Your Dry Ingredients Just Right
Start by preheating your oven to 350°F and lining a mini cupcake pan with 24 miniature liners—you’ll want every cupcake to shine! Sift together your flour, cocoa, baking powder, baking soda, salt, and granulated sugar in the bowl of your stand mixer. Sifting isn’t just about avoiding lumps—it helps distribute the leavening agents evenly so your cupcakes rise beautifully. I learned this after a batch once got strangely dense, and sifting saved the day every other time since!
Step 2: Bring the Batter Together with Wet Ingredients
Add the egg next and mix everything thoroughly. Then pour in the buttermilk, vegetable oil, and vanilla extract, mixing until combined but making sure not to overbeat — you want the batter smooth, but gentle handling keeps the cupcakes tender. Slowly drizzle the hot water in as you mix; this step blooms the cocoa powder, giving the batter a silky texture and a deeper chocolate flavor. This little trick is why these cupcakes taste so much richer than other mini chocolate treats I’ve tried.
Step 3: Fill and Bake Mini Cups
Use a small scoop to fill each cupcake liner about two-thirds full—this filling level helps the cupcakes rise without overflowing. Bake for 10-12 minutes or until a toothpick comes out clean. Keep an eye on them; mini cupcakes bake fast, so don’t let them dry out. Once out of the oven, cool them completely on a wire rack before frosting.
Step 4: Whip Up That Perfect Buttercream
I love the rich, creamy buttercream in this recipe, and whipping the butter for 3-4 minutes gives you that fluffy base. Gradually add confectioners’ sugar, starting on low so you avoid a sugar cloud, then crank up the speed until all is incorporated. Vanilla makes the buttercream warm and inviting, but milk is the consistency game-changer here — add it slowly to get thick, pipe-ready frosting so your spiders hold their form nicely. I usually add a little milk more at the end when I need the legs to pipe smoother and more fluidly, so have patience and adjust as you go!
Step 5: Time to Decorate Your Spiders
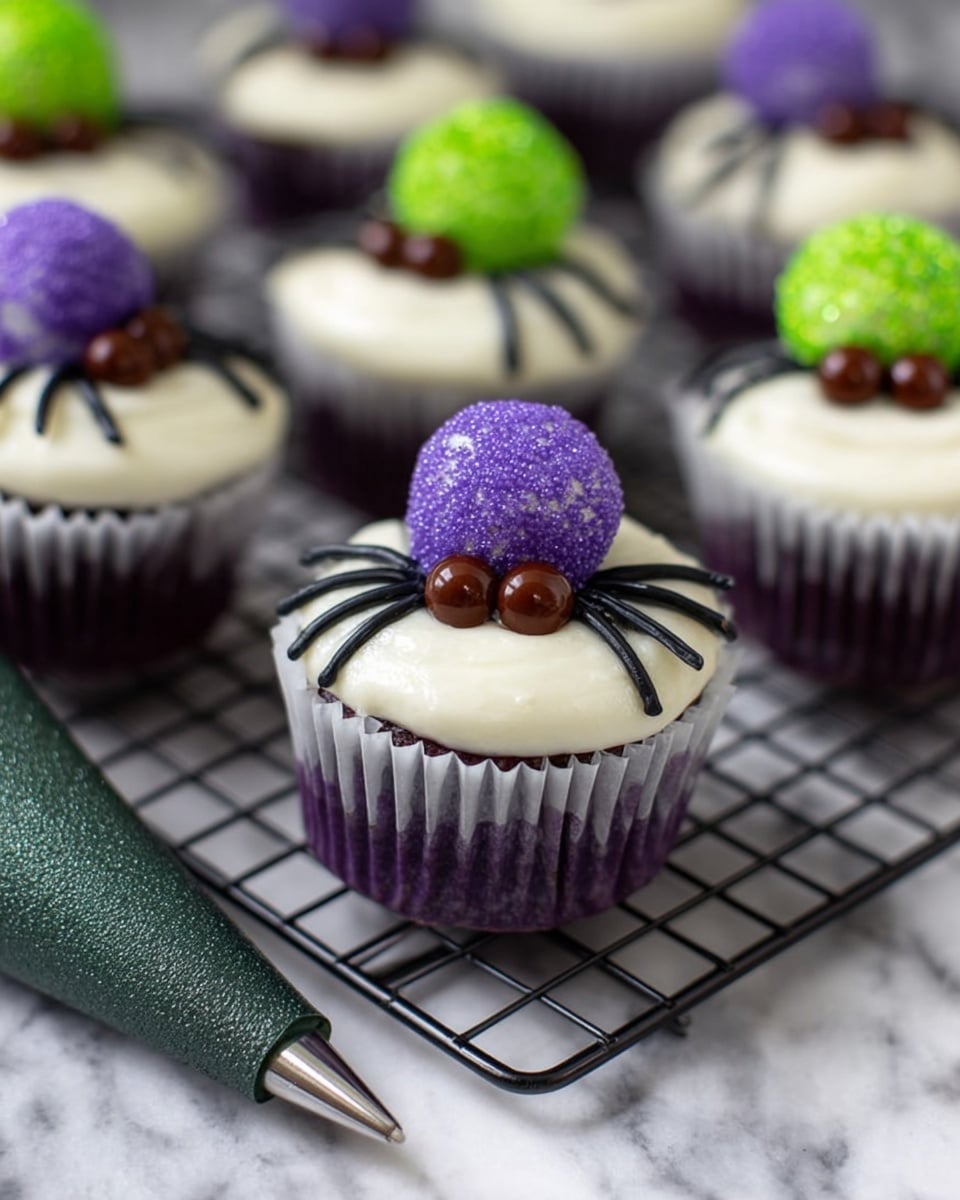
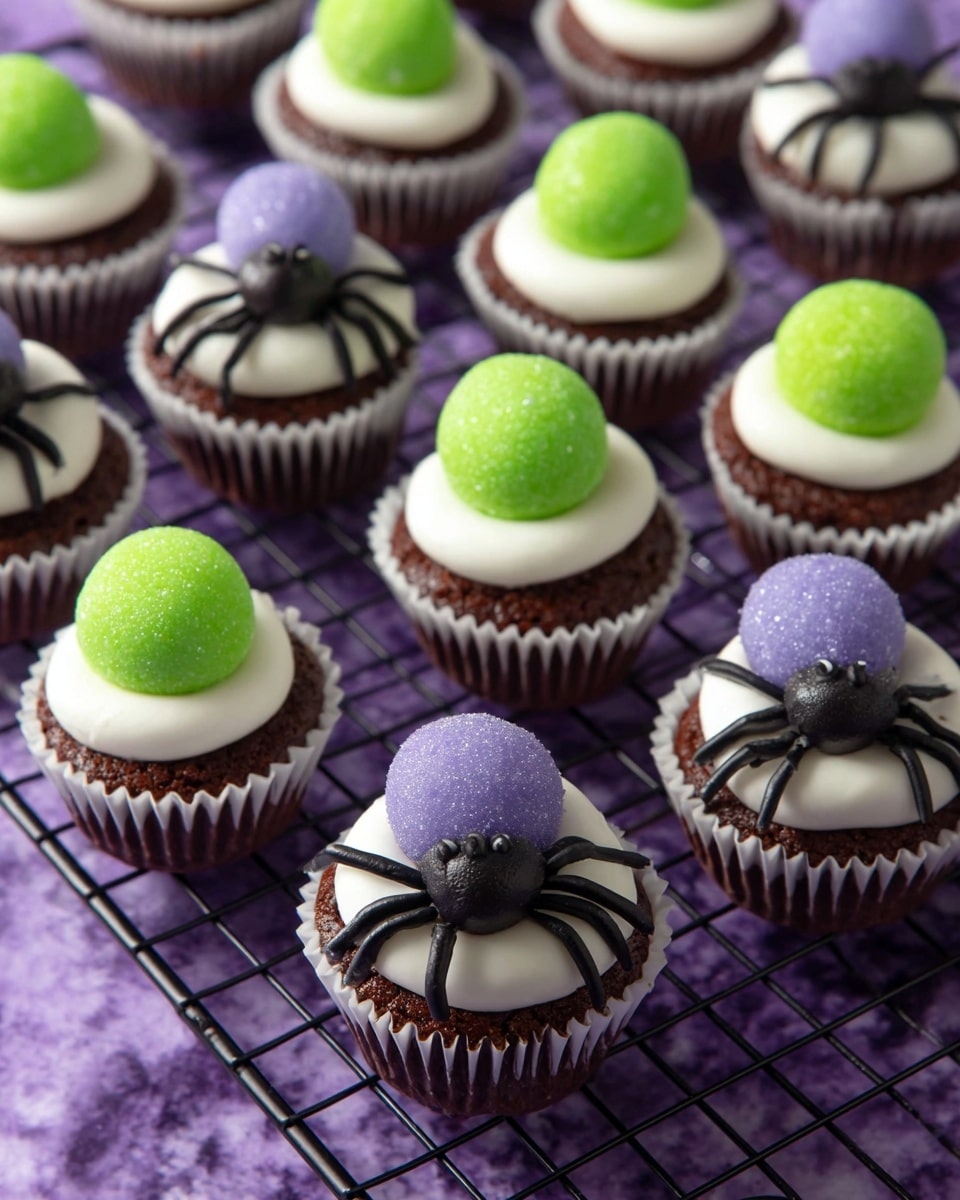
This is honestly my favorite part. Melt your vanilla candy coating until it’s fluid enough to dip, then gently dip the tops of your cooled cupcakes and let the coating set completely. Tint most of your buttercream with purple or green gel icing color — these make fantabulous spider bodies. Using an Ateco #808 tip, pipe big dollops on the center and sides of each cupcake. Take a moment to gently dip each buttercream spider into white sanding sugar – this shapes them into fuzzy little balls and adds a fun texture. Attach dark chocolate covered espresso beans at the front as tiny spider heads, using a dab of melted candy coating to “glue” them right in place. Lastly, tint some buttercream black, load a Wilton #2 piping tip, and carefully pipe on the spider legs—eight per spider, of course!
Pro Tips for Making Spider Bites Mini Cupcakes Recipe
- Don’t Skip Cooling: I learned the hard way that frosting warm cupcakes makes buttercream slide off—always cool completely!
- Consistency Control: Keep milk close by when frosting – a little extra can save a stiff buttercream from being tricky to pipe legs with.
- Use Parchment Paper: When dipping tops in vanilla candy coating, do it over parchment paper for easy cleanup and less mess.
- Attach Heads Before Legs: Gluing the espresso bean heads on before piping legs prevents accidentally breaking those fragile spider legs while handling.
How to Serve Spider Bites Mini Cupcakes Recipe
Garnishes
I love topping the spiders with those crunchy white sanding sugars to give a little sparkle and the perfect bug-like fuzziness. Sometimes I add tiny edible pearls for “eyes” if I want to make the spiders extra expressive. If you’re feeling playful, some colorful gel icing dots around your platter make this spooky party dessert pop visually.
Side Dishes
These mini cupcakes pair beautifully with a simple glass of cold milk or a rich hot chocolate for cooler weather. For party tables, I often set them alongside fruit “webs” made from berries and spun sugar, which pull the Halloween theme together perfectly.
Creative Ways to Present
For Halloween parties, I’ve laid these cupcakes on trays lined with black lace doilies and plastic “spider webs” to amp up the creepy crawlies vibe. Another fun idea is arranging them in a circular pattern around a clear bowl of candy “blood” — like a spider surrounded by its web. Kids love when I set up mini cupcake “beds” with candy grass; it turns them into cute mini spider “homes.”
Make Ahead and Storage
Storing Leftovers
I always store leftover Spider Bites Mini Cupcakes in an airtight container at room temperature if we plan to eat them within a day or two—this keeps the cupcakes tender and buttercream fresh. If you live somewhere warm, the fridge is fine, just let them come back to room temp before serving to soften frosting.
Freezing
I’ve frozen these mini cupcakes before without any frosting, wrapped tightly individually in plastic wrap, then stored in a freezer-safe container. When it’s time to enjoy, just thaw overnight in the fridge and frost as usual. If you freeze with frosting, the texture can shift a bit, especially the decorated legs, so I recommend frosting fresh after thawing whenever possible.
Reheating
These cupcakes are best served chilled or at room temperature, so I don’t usually reheat them. If you want to warm one up, pop it in the microwave for about 8-10 seconds, but honestly, I find the contrast between cool buttercream and warm cake a bit off — so I stick to room temp.
FAQs
-
Can I make these cupcakes without cocoa powder?
Yes, you can leave out the cocoa for a vanilla version, but keep in mind it will change the flavor profile significantly. You might want to add a bit more vanilla or even some almond extract to keep the cupcakes flavorful and not too plain.
-
What if I don’t have gel food coloring?
If you don’t have gel, regular liquid food coloring can work, but you’ll need to use less since it can thin out the buttercream. Start with just a drop or two and add as needed, mixing well each time.
-
Can I use regular-sized cupcake tins instead of mini ones?
Absolutely! Just increase the baking time to about 18-22 minutes, but start checking at 15. The decoration technique still works, though you might want to make larger spider bodies accordingly.
-
How do I keep the spider legs from breaking?
Make sure your black buttercream for the legs is piped with a slightly softer consistency and allow the legs to set completely before moving cupcakes. Also, piped legs are fragile, so handle the cupcakes gently for transport or storage.
-
What’s the best way to melt vanilla candy coating?
I usually melt mine gently in short bursts in the microwave, stirring after every 20 seconds to avoid overheating. Be patient—too hot and it gets grainy or thickens too fast.
Final Thoughts
I remember the first time I tried this Spider Bites Mini Cupcakes Recipe—it felt like such a playful challenge decorating those little spiders. Since then, they’ve become my go-to treat for any occasion that needs a bit of whimsy and a lot of yum. What I love most is how approachable it is: no fancy skills needed, just a little patience and creativity. I can’t wait for you to try them out and start making your own spooky mini spiders—because once you do, you’re going to want to share these delicious bites over and over again.
Print
Spider Bites Mini Cupcakes Recipe
- Prep Time: 15 minutes
- Cook Time: 10 minutes
- Total Time: 2 hours 25 minutes
- Yield: 24 mini cupcakes
- Category: Dessert
- Method: Baking
- Cuisine: American
Description
Spider Bites Mini Cupcakes are adorable and delicious mini treats perfect for Halloween or any spooky occasion. These moist cocoa cupcakes are topped with creamy tinted buttercream piped as spider bodies, decorated with candy-coated espresso bean heads and delicate sugar-dusted legs for a fun and festive look that’s as tasty as it is cute.
Ingredients
Cupcakes
- 1 cup all purpose flour
- 1/4 cup natural unsweetened cocoa
- 1/2 cup granulated sugar
- 1/2 teaspoon baking powder
- 1/4 teaspoon baking soda
- 1/4 teaspoon salt
- 1 egg
- 1/3 cup buttermilk
- 3 tablespoons vegetable oil
- 1/2 teaspoon vanilla extract
- 3 tablespoons hot water
Buttercream
- 1 cup (two sticks) butter, room temperature
- 1 lb. confectioners’ sugar
- 1 teaspoon vanilla extract
- 1-3 tablespoons milk
Decorations
- Vanilla candy coating (melted, for dipping cupcake tops and as glue)
- White sanding sugar
- Purple or green gel icing color (for tinting majority of buttercream)
- Black gel icing color (for tinting remaining buttercream)
- Dark chocolate covered espresso beans (for spider heads)
Instructions
- Prepare Cupcake Batter: Preheat oven to 350°F and line a mini cupcake pan with 24 miniature baking cups. Sift the flour, cocoa, sugar, baking powder, baking soda, and salt into a stand mixer bowl. Add the egg and mix to combine, then add buttermilk, vegetable oil, and vanilla extract, mixing well after each addition. Slowly pour in hot water while mixing until smooth and fully combined.
- Bake Cupcakes: Using a small scoop, fill each cupcake liner about two-thirds full with batter. Bake in the preheated oven for 10 to 12 minutes or until a toothpick inserted into the center comes out clean. Remove from oven and allow cupcakes to cool completely before decorating.
- Make Buttercream: Beat the softened butter on medium speed for 3 to 4 minutes until light and creamy. Gradually add confectioners’ sugar one cup at a time, starting on low speed and increasing to incorporate fully. Mix in vanilla extract. Add milk one tablespoon at a time until the buttercream reaches a thick consistency suitable for piping the spider bodies. Reserve some buttercream for the legs and tint the majority with purple or green gel color.
- Decorate Cupcakes: Dip the tops of the cooled cupcakes into the melted vanilla candy coating and let dry completely to form a smooth, glossy shell. Using an Ateco #808 decorating tip, pipe large oval dollops of the tinted buttercream onto the top and sides of each cupcake to form spider bodies. Gently dip each piped buttercream body into white sanding sugar to create a textured, rounded shape.
- Add Spider Heads: Attach dark chocolate covered espresso beans to the front of each buttercream spider body to serve as spider heads. Use a small dab of melted vanilla candy coating to glue the beans securely in place.
- Pipe Spider Legs: Tint the remaining buttercream black. Using a Wilton #2 decorating tip, pipe 8 thin legs onto each cupcake around the spider bodies to complete the spider design.
- Serve and Enjoy: Let any remaining decorations set, then serve your Spider Bites Mini Cupcakes and enjoy the spooky sweetness!
Notes
- Ensure cupcakes are completely cool before dipping in candy coating to prevent melting.
- Adjust milk quantity in buttercream to achieve the consistency needed for piping; thicker for bodies, more fluid for legs.
- Use gel colors sparingly to achieve the desired vibrant shades without thinning the buttercream.
- Store cupcakes in an airtight container at room temperature for up to 2 days or refrigerate for up to 4 days.
- If desired, substitute espresso beans with black candy pieces for a caffeine-free version.
Nutrition
- Serving Size: 1 mini cupcake
- Calories: 150
- Sugar: 18g
- Sodium: 55mg
- Fat: 7g
- Saturated Fat: 4g
- Unsaturated Fat: 2.5g
- Trans Fat: 0g
- Carbohydrates: 22g
- Fiber: 1g
- Protein: 1.5g
- Cholesterol: 25mg

