If you’re looking for a festive treat that’s as fun to make as it is to eat, you’re going to adore this Christmas Tree Brownies Recipe. It’s simple, playful, and lets you bring that joyful holiday spirit right into your kitchen with minimal fuss. I absolutely love how these brownies turn out — they’re rich, fudgy, and when you decorate them like cheerful little Christmas trees, they become a total crowd-pleaser at any holiday gathering. Keep reading and I’ll walk you through everything, including a few tricks I’ve picked up to make your baking experience smooth and full of smiles!
Why You’ll Love This Recipe
- Super Simple Baking: Using a boxed brownie mix makes this recipe quick and easy, perfect for busy holiday prep.
- Festive and Fun Decorating: The green icing and candy cane trunks turn ordinary brownies into charming Christmas trees that kids love to help with.
- Fudgy and Delicious: These brownies stay moist and fudgy, which is honestly why my family always begs for the recipe.
- Perfect for Parties or Gifts: They’re adorable on the dessert table or wrapped up as sweet homemade gifts.

Ingredients You’ll Need
Each ingredient here works together to create that classic brownie base, topped off with vibrant green icing and a little candy cane whimsy. Using a good quality brownie mix is key since it’s your foundation, and the vanilla icing is the perfect canvas for coloring and decorating.
- Brownie Mix: I always opt for a favorite brand you trust, as it sets the stage for moist, chocolatey brownies.
- White Vanilla Icing: Looks plain but mixes beautifully with food coloring, so don’t skip this sweet topping.
- Green Food Coloring: Go gradual with this to get the perfect Christmas-tree shade!
- Small Round Sprinkles: Adds colorful “ornaments” that bring your trees to life.
- Small Star Sprinkles: These are the crowning touch – a little star on top of each tree just makes them so festive.
- Candy Canes: Using mini candy canes or chopping regular ones works well for creating the “tree trunk.”
Variations
I love that this Christmas Tree Brownies Recipe is super customizable — it really invites you to get creative. Over the years, I’ve played around with different icing colors and toppings to suit my mood or party theme. You’ll find it’s easy to tweak to your taste or dietary needs without losing any of the fun.
- Nut-Free Version: Swap sprinkles for crushed peppermint candies for a crunchy twist that’s safe for everyone I know.
- Chocolate Lovers’ Variation: Add mini chocolate chips inside the batter or sprinkle them on top of the icing to make it extra indulgent — my kids go crazy for this.
- Gluten-Free Option: Use a gluten-free brownie mix — I’ve tested this plenty, and it works wonderfully with the same decorating steps.
- Colorful Icing: Instead of green, try red or even metallic gold food coloring to match your party decor or just shake things up a bit.
How to Make Christmas Tree Brownies Recipe
Step 1: Prep Your Pan and Bake the Brownies
Start by lining your 8″x8″ baking pan with aluminum foil and spraying it with cooking spray — this little trick helps your brownies come out cleanly and keeps the pan easy to clean. Then, prepare the brownie mix right according to the box instructions. Bake exactly as directed; don’t open the oven early because fudgy brownies do better with a steady bake. Once done, let them cool completely. I wait about 1.5 hours, which feels like forever but is totally worth it — cutting warm brownies leads to crumbly pieces!
Step 2: Cut Brownies Into Christmas Tree Triangles
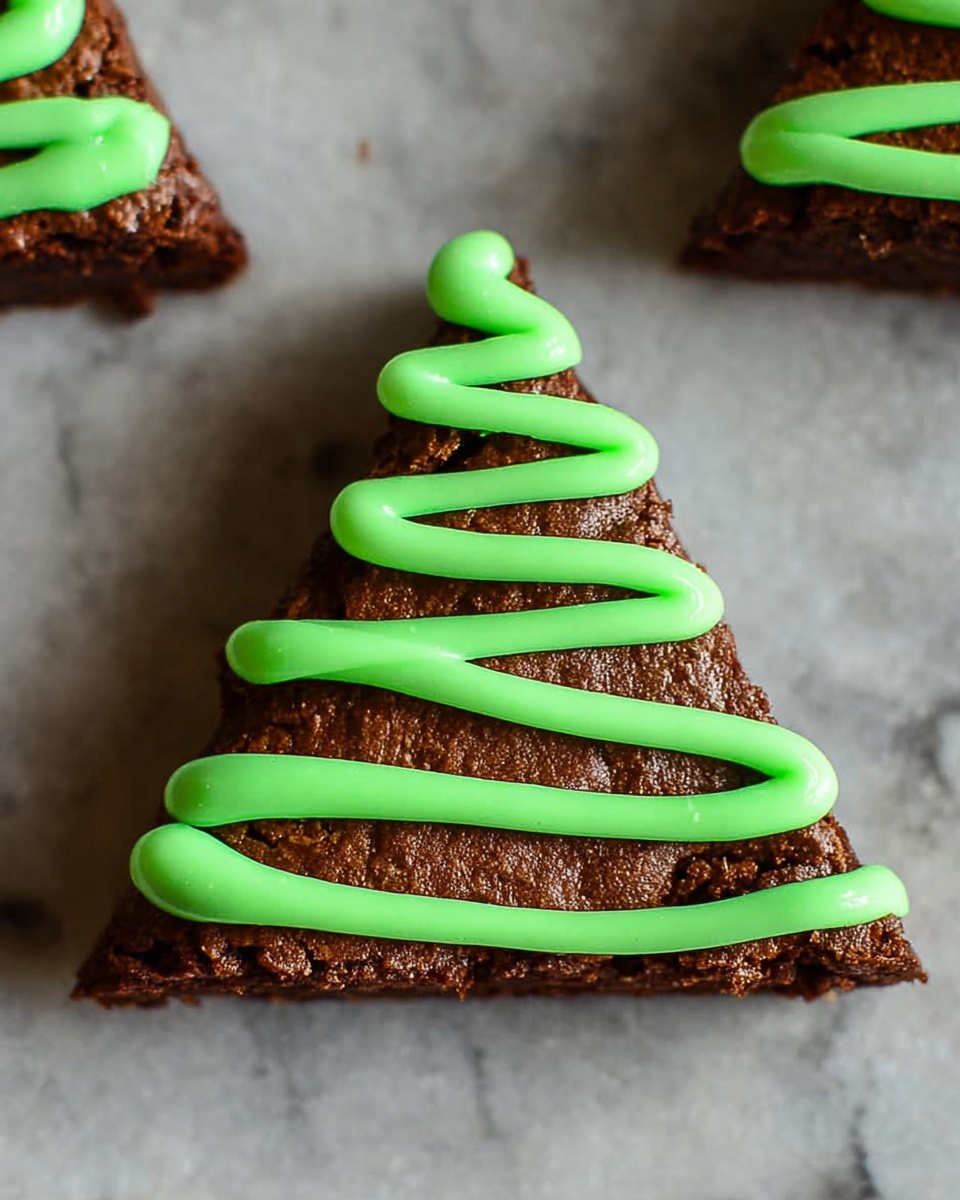
Once cool, carefully lift the brownies out of the pan using the foil edges. Now here’s a simple trick I discovered: instead of just slicing squares, cut your brownies into triangles for that perfect Christmas tree shape. Cut the brownies into three horizontal rows first, then cut those into diagonal triangle shapes, alternating directions each row to create uniform trees. It’s way easier than trying to freestyle and looks so festive!
Step 3: Make the Candy Cane Trunks
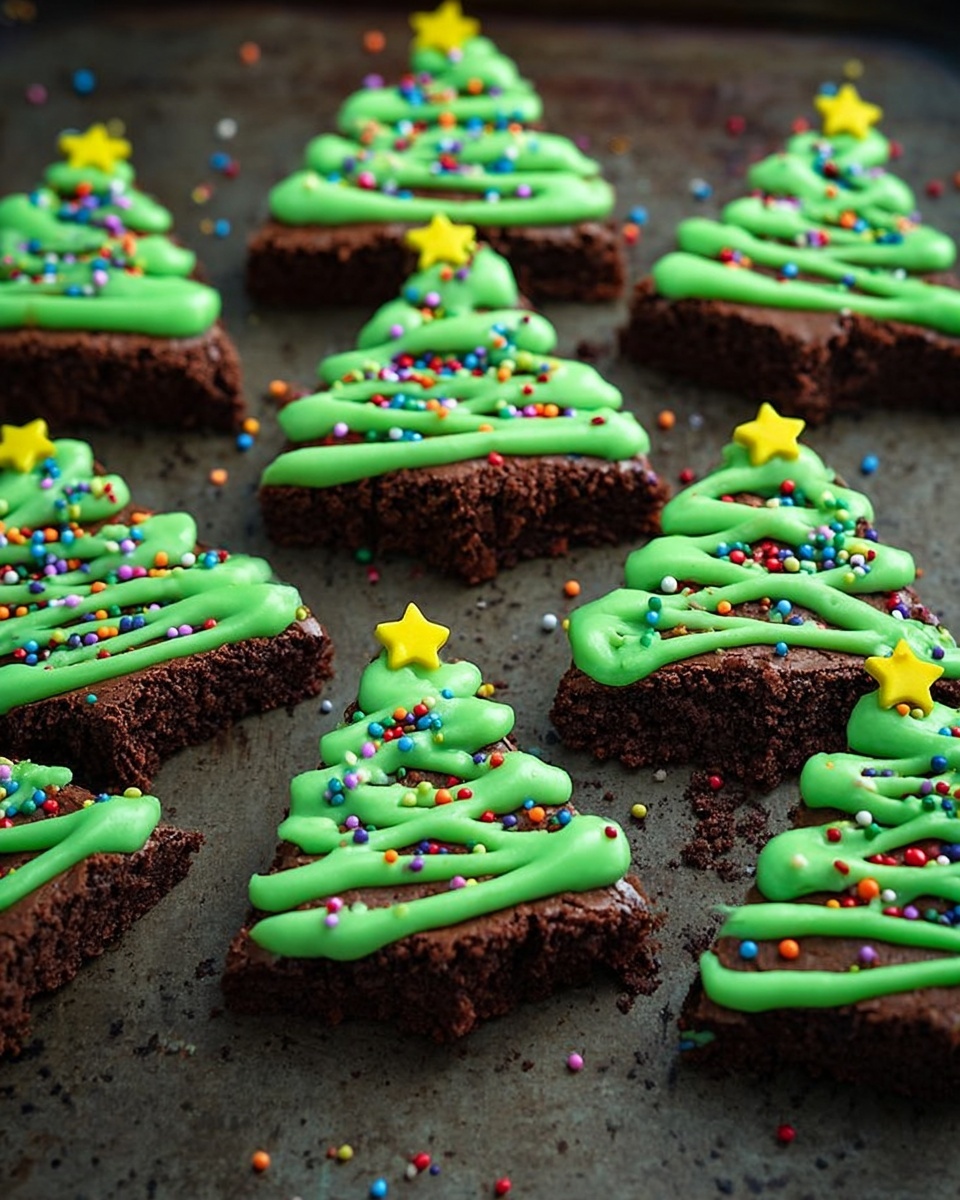
Unwrap your candy canes and carefully cut or break them into 1.5-inch pieces. These act as the tree trunks — just push the sharper end gently into the bottom of each brownie triangle. I always warn my kids to be careful with this step, so maybe handle this one yourself or supervise them closely!
Step 4: Prepare and Pipe the Green Icing
Spoon about half of the vanilla icing into a separate bowl. Stir in green food coloring bit by bit until you get that deep, Christmas-tree green you want. Don’t rush it here — it’s easier to add more food coloring than fix icing that’s too dark. Transfer the green icing into a ziplock bag, seal it tightly, and snip off a tiny corner for piping. Starting at the top, gently squeeze out icing in a whimsical zigzag down to the bottom of each triangle, mimicking the look of tree branches.
Step 5: Decorate With Sprinkles and Stars
Finally, sprinkle your small round sprinkles all over the green icing — these act as adorable little ornaments — and top each tree with a star sprinkle to complete that festive vibe. This is where you can really let your personality shine, so have fun with it! My kids always pick their favorite sprinkle colors, making it a fun family tradition.
Pro Tips for Making Christmas Tree Brownies Recipe
- Don’t Skip Cooling Time: I used to rush cutting, but letting brownies cool fully makes decorating way easier and less messy.
- Pipe Slowly for Neat Trees: Take your time with the zigzag icing — steady pressure gives you those nice “branches” that look professionally done.
- Use a Sharp Knife for Clean Cuts: A sharp knife helps you cut those triangles perfectly without crumbling your brownies.
- Candy Cane Placement Matters: Press candy canes firmly but gently to avoid cracking your brownie triangles.
How to Serve Christmas Tree Brownies Recipe
Garnishes
I usually stick with the classic small round sprinkles and star toppers because they bring the perfect pop of color and that iconic Christmas look. Sometimes, I’ve added edible glitter or even tiny candy pearls for a little extra sparkle when hosting holiday parties — your guests will think you went all out!
Side Dishes
These brownies pair wonderfully with a warm cup of spiced hot chocolate or a cool glass of eggnog if you’re feeling traditional. At parties, I also like to place them alongside a simple cheese platter with some fresh fruit — the rich chocolate cuts well through the savory flavors.
Creative Ways to Present
When I made these last year for our family cookie exchange, I arranged the brownies in a circular wreath shape on a festive platter. A little dusting of powdered sugar on top looked like fresh snow. You might also try stacking a couple trees together to create mini edible Christmas tree “forests” for a centerpiece that’s both cute and delicious!
Make Ahead and Storage
Storing Leftovers
I wrap leftover brownies tightly in plastic wrap and store them in an airtight container at room temperature — they stay fresh for up to 3 days, though honestly, these usually disappear much faster around my house!
Freezing
For longer storage, I freeze cut brownies individually wrapped in plastic, then placed in a freezer bag. When you’re ready for a treat, just thaw them overnight in the fridge. The frosting stays surprisingly well, too, which I was happy to discover after my first batch.
Reheating
If you want to warm up a brownie, a quick 10-15 second zap in the microwave softens it just enough without melting the icing too much, which brings out that fudgy goodness. I always encourage you to test one first because microwaves vary!
FAQs
-
Can I make this Christmas Tree Brownies Recipe from scratch instead of using a boxed mix?
Absolutely! If you prefer homemade brownies, feel free to use your favorite scratch recipe. Just bake in the same sized pan and let them cool completely before cutting and decorating as directed. Using a boxed mix is just my personal shortcut for busy holiday days.
-
What if I don’t have candy canes to make the tree trunks?
No worries! You can use pretzel sticks or even small cookie sticks instead. The goal is to have a sturdy “trunk” to make the brownies look like trees, so anything that can be gently inserted at the bottom will work.
-
How do I prevent the icing from being too runny when coloring it green?
Use gel or paste food coloring instead of liquid to avoid thinning the icing too much. If you only have liquid food coloring, add it sparingly and mix thoroughly to achieve the shade without losing the icing’s thick consistency.
-
Can I decorate the brownies a day ahead?
Yes! You can decorate them a day before your event and store them in an airtight container at room temperature. Just make sure the icing is fully set and the brownies aren’t stacked to avoid smudging your beautiful designs.
Final Thoughts
I truly think this Christmas Tree Brownies Recipe is one of those joyful little traditions that makes holidays extra special. It’s easy enough to whip up after a busy day but still offers that creative spark that feels like festive magic. Whether you’re baking with kids or just want a simple, charming dessert for guests, this recipe delivers every time. So grab your brownie mix and candy canes, put on some holiday tunes, and enjoy making these edible Christmas trees that are almost too cute to eat (but trust me, you’ll want to!).
Print
Christmas Tree Brownies Recipe
- Prep Time: 15 minutes
- Cook Time: 30 minutes
- Total Time: 2 hours 15 minutes
- Yield: 12 brownies
- Category: Dessert
- Method: Baking
- Cuisine: American
Description
These Easy Christmas Tree Brownies are a festive and fun dessert perfect for the holiday season. Made from classic brownie mix and decorated with green icing, sprinkles, and candy canes as tree trunks, they bring a delightful twist to traditional brownies. Simple to prepare and visually appealing, they are great for parties, family treats, or holiday gift-giving.
Ingredients
Brownie Base
- 1 box Brownie Mix
Decorations
- 1 tub white vanilla icing
- Green food colouring (quantity as needed to achieve desired color)
- Small round sprinkles (as desired)
- Small star sprinkles (for topping)
- Candy canes (as tree trunks)
Instructions
- Prepare the Baking Pan: Line an 8″x8″ baking pan with aluminum foil and spray it with cooking spray to prevent sticking.
- Make and Bake Brownies: Prepare the brownie mix following the package directions, pour the batter into the prepared pan, and bake as instructed on the box.
- Cool Brownies: Allow the brownies to cool completely, approximately 1.5 hours, to ensure they set and are easy to handle.
- Cut Brownies into Triangles: Remove the cooled brownies from the pan by lifting the foil, then cut them into triangles by cutting into three rows and then alternating diagonal cuts to mimic the shape of Christmas trees.
- Prepare Candy Cane Trunks: Unwrap the candy canes and, using a sharp knife, carefully cut or break them into 1.5-inch long pieces to serve as tree trunks.
- Attach Candy Cane Trunks: Press the sharper end of each candy cane piece into the bottom of each brownie triangle so that it stands as a trunk.
- Color the Icing: Spoon about half of the tub of white vanilla icing into a bowl and add green food colouring gradually until the desired shade of green is achieved.
- Fill Piping Bag: Transfer the green icing into a zip lock bag, seal it, and cut off a small corner to create a piping bag.
- Decorate the Brownies: Starting at the top of each brownie triangle, gently squeeze the icing in a curved zigzag pattern down the triangle to mimic tree branches.
- Add Sprinkles and Stars: Decorate the iced brownies with your favourite small round sprinkles and place a small star sprinkle at the top to represent the star on the tree.
- Serve and Enjoy: Allow the icing to set slightly, then enjoy your festive Christmas tree brownies!
Notes
- Make sure the brownies are completely cooled before cutting and decorating to avoid crumbling.
- You can adjust the green food coloring amount to get the perfect shade for your icing.
- Use different colored sprinkles to customize your Christmas tree decorations.
- If you prefer, homemade brownies can be used instead of boxed mix.
- Store decorated brownies in an airtight container at room temperature for up to 2 days for best freshness.
Nutrition
- Serving Size: 1 brownie (approximately)
- Calories: 220
- Sugar: 18g
- Sodium: 150mg
- Fat: 10g
- Saturated Fat: 3.5g
- Unsaturated Fat: 5g
- Trans Fat: 0g
- Carbohydrates: 30g
- Fiber: 2g
- Protein: 2g
- Cholesterol: 15mg


