
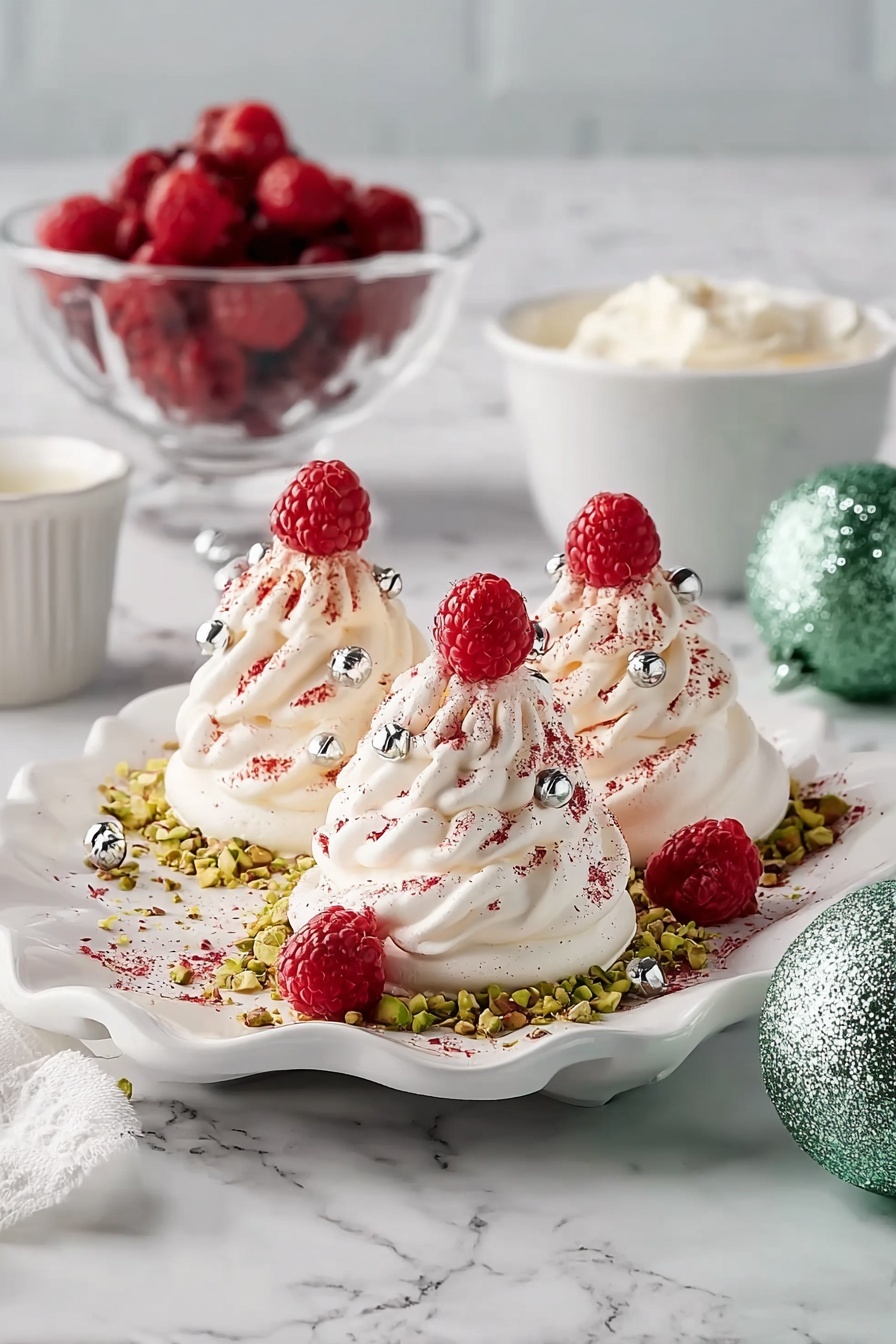
If you’re looking for a stunning yet surprisingly simple dessert to wow your guests this holiday season, these festive little treats are just what you need. The Christmas Mini Pavlova Trees Recipe is one of my absolute favorites to make—it looks utterly charming and tastes like a cloud of sweet, creamy bliss. If you want to add something whimsical and delicious to your Christmas table, keep reading because I’m sharing everything you need to whip up these adorable mini pavlova trees that’ll have everyone asking for seconds.
Why You’ll Love This Recipe
- Festive and Fun: These mini pavlova trees bring instant holiday cheer with their adorable shape and pretty decorations.
- Light and Airy Texture: Crisp on the outside and marshmallow-soft inside, they’re a perfect treat that won’t weigh you down after a big meal.
- Impress Without Stress: Although they look fancy, the steps are straightforward and approachable—even if you’ve never made pavlova before.
- Customizable Decoration: You can get creative with toppings, making each mini tree unique and visually delightful.

Ingredients You’ll Need
This recipe calls for simple, quality ingredients that come together beautifully. The key is using fresh egg whites and a good-quality thickened cream to get the perfect pavlova texture and silky whipped cream topping.

- Free-range Egg Whites: Room temperature egg whites whip up easier and reach those perfect soft peaks for a stable meringue.
- Caster Sugar: Its fine texture dissolves smoothly into the egg whites, giving the pavlova crispness and shine.
- White Vinegar: Helps stabilize the meringue and keeps it from collapsing.
- Cornflour: A classic pavlova secret that ensures the inside stays soft and marshmallow-y.
- Pistachios: Toasted and pulsed into crumbs, they add a lovely nutty crunch and beautiful green flecks.
- Thickened Cream: Whipped to soft peaks with icing sugar and rosewater for a delicately perfumed topping.
- Silver Cachous and Berries: These add sparkle, color, and a fresh burst of flavor to decorate your mini trees.
Variations
I love making these Christmas Mini Pavlova Trees my own depending on the season and my mood. You can mix and match flavors, decorate with whatever’s in your pantry, or tweak the cream flavoring to suit your preferences. Don’t be afraid to experiment—the pavlova is forgiving and flexible!
- Flavor Your Cream: I sometimes swap rosewater for vanilla or orange blossom water, depending on the vibe I want. Each adds a unique floral note that pairs beautifully with the sweet meringue.
- Nut Alternatives: If you’re not a pistachio fan, toasted almonds or finely chopped hazelnuts work just as well for crunch and color.
- Berry Mix: Try decorating with blueberries, blackberries, or even small segments of mandarin for a citrusy twist.
- Chocolate Drizzle: For a decadent holiday touch, drizzle melted dark chocolate over the finished trees right before serving.
How to Make Christmas Mini Pavlova Trees Recipe
Step 1: Prepare Your Oven and Baking Sheets
First things first, preheat your oven to 100°C fan-forced (or 120°C conventional). Grease two large oven trays to prevent your pavlova bases from sticking. Take two sheets of baking paper and on the back side, mark four 4.5cm circles each—these will be your piping guide to keep the meringue consistent and neat. Place the printed side down onto the prepared trays. This prep step helps the pavlovas keep their perfect tree shape without extra guesswork.
Step 2: Beat the Egg Whites to Perfection
Using an electric mixer, beat your room temperature egg whites until soft peaks form—this means when you lift the beaters, the peaks gently flop over rather than standing stiffly. Gradually add caster sugar one tablespoon at a time, ensuring it dissolves completely before adding the next. This slow approach is key to getting that glossy, shiny meringue that holds its structure. Stir in the vinegar and cornflour last to stabilize your mixture.
Step 3: Pipe Your Mini Pavlova Trees
Divide the meringue mixture into two piping bags fitted with different nozzles—a 1cm plain nozzle for the base mounds, and a 0.5cm fluted nozzle for the tree layers. Pipe small mounds directly onto your marked circles with the larger nozzle as the base of your trees. Then, with the fluted nozzle, pipe three rows of vertical layers around these mounds to form the branches of the mini Christmas trees. This part is so fun! Just take your time to keep the layers neat, and don’t worry if they’re not perfect—the charm is in the homemade look.
Step 4: Bake Low and Slow
Bake your piped pavlova trees for 50 minutes to 1 hour, or until the edges feel crisp but without any browning. Baking low and slow is essential to getting that perfect pavlova texture—crisp on the outside, soft inside. Once done, turn off the oven and leave the pavlovas inside with the door slightly ajar to cool gradually. This helps prevent cracks and keeps them light.
Step 5: Prepare the Pistachio Crumbs and Whipped Cream
While your pavlovas cool, pulse your pistachios in a small food processor until they’re finely crumbed but not powdery—you want some texture. Next, whip your thickened cream with icing sugar and rosewater until it reaches just-firm peaks. I love the subtle floral note rosewater adds, but if you’re not a fan, vanilla works like a charm here.
Step 6: Decorate Your Mini Pavlova Trees
Spoon about a quarter of your whipped cream into a piping bag with a small plain nozzle. Pipe tiny little rounds onto the pavlova trees where you want the silver cachous to stick—think of these as edible glue. Then decorate with those shiny silver sugar pearls, fresh raspberries, and sprinkle raspberry powder for a pop of color and festive sparkle. Finish by dusting the pistachio crumbs on top and serve alongside strawberries and extra cream for guests to add as they like.
Pro Tips for Making Christmas Mini Pavlova Trees Recipe
- Use Room Temperature Egg Whites: I’ve learned that colder egg whites just won’t whip up as well, so let them sit out for 30 minutes before beating.
- Slow Sugar Addition: Adding sugar too fast can make your meringue grainy; patience here yields that glossy, smooth finish.
- Cool Pavlovas in Oven: Don’t rush cooling—leaving them in with the door ajar prevents cracking and keeps the texture just right.
- Pipe Neatly but Don’t Stress: Your mini trees don’t have to be perfect; the slightly imperfect layers add a charming homemade feel.
How to Serve Christmas Mini Pavlova Trees Recipe
Garnishes
I always garnish these mini pavlova trees with silver cachous because they look like little Christmas baubles sparkling on the tree. For the fruit, fresh raspberries are my go-to—they add a burst of tartness that balances the sweetness beautifully. I also love sprinkling freeze-dried raspberry powder for a vivid red hue and an extra punch of raspberry flavor. Strawberries on the side are great for guests who want more fresh fruit alongside their dessert.
Side Dishes
Since these pavlova trees are a sweet finale, I usually serve them after a rich main course like roast turkey or ham. For a fresh contrast, a light fruit salad or a chilled glass of sparkling wine pairs perfectly. If you’re hosting a dessert platter, these mini pavlovas stand out alongside chocolate truffles and spiced nuts.
Creative Ways to Present
I’ve found that arranging these mini pavlova trees on a large white platter dusted with icing sugar (to mimic snow) takes presentation to the next level. You can also nestle them on a bed of fresh mint leaves or scatter edible gold leaf flakes for an extra festive flair. If you want to wow the kids, try placing them on a decorated tiered cake stand designed like a winter wonderland scene.
Make Ahead and Storage
Storing Leftovers
Because pavlova can lose its crispness if left out, I store any leftovers in an airtight container at room temperature for up to two days. If it starts to soften, pop them back in a low oven for a few minutes to revive the crisp edges. Just be sure to keep the cream separate since the whipped cream won’t hold well in storage.
Freezing
I usually don’t freeze these mini pavlova trees because the texture doesn’t fare well after thawing—the meringue tends to become chewy. However, you can freeze the baked meringue shells without toppings for up to a month. Thaw completely before decorating and serving.
Reheating
To refresh stored pavlovas, place them on a baking tray and warm in a 120°C oven for 5-7 minutes. This helps restore crispness, but watch carefully so they don’t brown. Remember to add fresh cream and garnishes just before serving for the best taste and texture.
FAQs
-
Can I make the Christmas Mini Pavlova Trees Recipe ahead of time?
Absolutely! You can bake the meringue bases up to a day or two in advance and store them in an airtight container. Keep the whipped cream and decorations separate and assemble just before serving for the freshest taste and best texture.
-
What if I don’t have rosewater?
No worries! Rosewater adds a lovely floral note but isn’t essential. You can substitute with vanilla extract or orange blossom water, or even leave it out entirely—the whipped cream will still be delicious.
-
How do I know the sugar is fully dissolved in the meringue?
A simple way is to rub a little of the meringue between your fingers. If it feels smooth and not grainy, the sugar has dissolved well. Taking your time adding sugar gradually helps avoid gritty meringue.
-
Can I make larger pavlova trees instead of mini ones?
Definitely! Just scale up the sizes of your circles and pipe bigger layers. Keep in mind larger pavlovas take longer to dry out in the oven, so bake until crisp but still light inside. The centerpiece effect is amazing!
-
What can I substitute for caster sugar?
If caster sugar isn’t available, you can pulse granulated sugar in a food processor to make it finer, which helps it dissolve properly in the meringue mixture.
Final Thoughts
I can’t tell you how many times this Christmas Mini Pavlova Trees Recipe has saved the dessert situation around my house. It feels fancy yet is surprisingly simple, making it my go-to when I want to impress without stress. Every time I serve them, they spark joy and smiles—and isn’t that what the holidays are all about? So, grab those egg whites and start piping, because you’re about to create some memorable edible Christmas magic.
Print
Christmas Mini Pavlova Trees Recipe
- Prep Time: 20 minutes
- Cook Time: 1 hour
- Total Time: 1 hour 20 minutes
- Yield: 8 servings
- Category: Dessert
- Method: Baking
- Cuisine: Australian
- Diet: Gluten Free
Description
Mini Pavlova Christmas Trees are a festive and elegant dessert perfect for holiday celebrations. These delicate meringue trees are baked to crisp perfection, decorated with whipped cream, pistachio crumbs, silver cachous, and fresh raspberries, making them a visually stunning and delicious treat that serves eight.
Ingredients
Meringue
- 6 free-range egg whites, at room temperature
- 1 1/2 cups caster sugar
- 1 tsp white vinegar
- 3 tsp cornflour
Decoration
- 1/4 cup Sunbeam Australian Pistachios
- 300 ml thickened cream
- 1 tsp pure icing sugar
- 1 tsp rosewater
- Silver cachous, to serve
- Raspberries, to serve
- Freeze-dried raspberry powder, to serve
- Strawberries, to serve
Instructions
- Preheat and Prepare: Preheat your oven to 100°C fan-forced (120°C conventional) and grease two large oven trays. On two sheets of baking paper, mark four 4.5 cm circles, ensuring space between each. Place the sheets marked side down onto the prepared trays.
- Beat Meringue: Using an electric mixer, beat egg whites until soft peaks form. Gradually add the caster sugar, one tablespoon at a time, beating until the sugar dissolves after each addition. Then add white vinegar and cornflour and beat until the mixture is glossy and combined.
- Pipe Meringue Trees: Transfer a quarter of the meringue mixture into a large piping bag fitted with a 1 cm plain nozzle. Pipe small mounds onto the trays using the circles as guides. Put the remaining meringue into a piping bag fitted with a 0.5 cm fluted nozzle and pipe three rows of small vertical layers around each mound, constructing a tree shape.
- Bake Meringues: Bake the meringues for 50 minutes to 1 hour until the edges are crisp but not colored. After baking, turn off the oven and cool the meringues inside the oven with the door ajar to set.
- Prepare Pistachio Crumbs: Pulse the pistachios in a small food processor until they become fine crumbs, ready for garnishing.
- Whip Cream: Beat thickened cream, icing sugar, and rosewater with an electric mixer until just-firm peaks form. Place a quarter of the whipped cream into a piping bag with a small plain nozzle.
- Decorate Trees: Pipe small rounds of cream onto the meringue trees to act as glue for decorations. Decorate the trees with silver cachous, raspberries, and freeze-dried raspberry powder. Sprinkle with the pistachio crumbs and serve with fresh strawberries and the remaining whipped cream.
Notes
- Ensure egg whites are at room temperature for better volume when whipped.
- Be patient when adding the sugar gradually to dissolve it completely and avoid grainy meringue.
- Cooling the meringue in the oven helps prevent cracking and ensures crisp texture.
- You can replace rosewater with vanilla extract if preferred.
- Store leftover meringues in an airtight container to maintain crispness.
Nutrition
- Serving Size: 1 mini pavlova tree
- Calories: 210 kcal
- Sugar: 25 g
- Sodium: 15 mg
- Fat: 8 g
- Saturated Fat: 5 g
- Unsaturated Fat: 3 g
- Trans Fat: 0 g
- Carbohydrates: 30 g
- Fiber: 1 g
- Protein: 3 g
- Cholesterol: 40 mg
