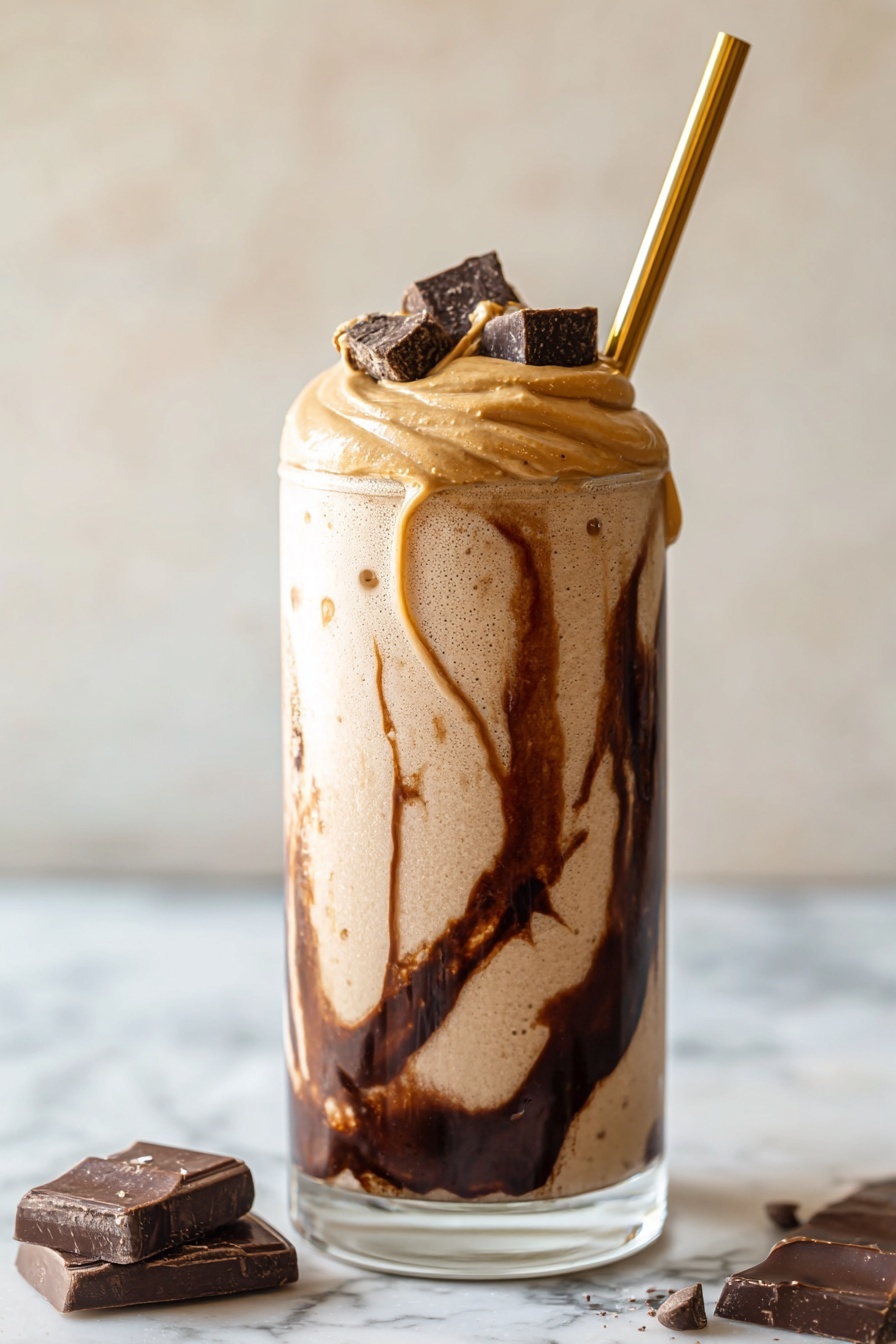
If you’re craving a creamy, delicious treat that’s actually packed with protein and made effortlessly with your Ninja Creami, then you’re in for a real treat! This Protein Milkshake with Ninja Creami Recipe is my go-to when I want something indulgent yet nourishing, and I promise you’ll love how easy it is to whip up. Trust me, once you try this, it might just become your favorite way to enjoy a protein-packed dessert or snack.
Why You’ll Love This Recipe
- High-Protein and Satisfying: It’s packed with vanilla protein powder and peanut butter for a shake that keeps you full.
- So Easy to Make with Ninja Creami: No blender fuss—just set, freeze, and spin for creamy texture you’ll adore.
- Customizable and Delicious: Add your favorite chocolate syrup or swap oat milk for soy for a higher-protein kick.
- Perfect Anytime Treat: Whether post-workout or an afternoon snack, it’s nutritious without skimping on taste.

Ingredients You’ll Need
This Protein Milkshake with Ninja Creami Recipe combines simple yet flavorful ingredients that blend perfectly to create a creamy, protein-rich shake. Grab good-quality protein powder and natural peanut butter to really make it shine.
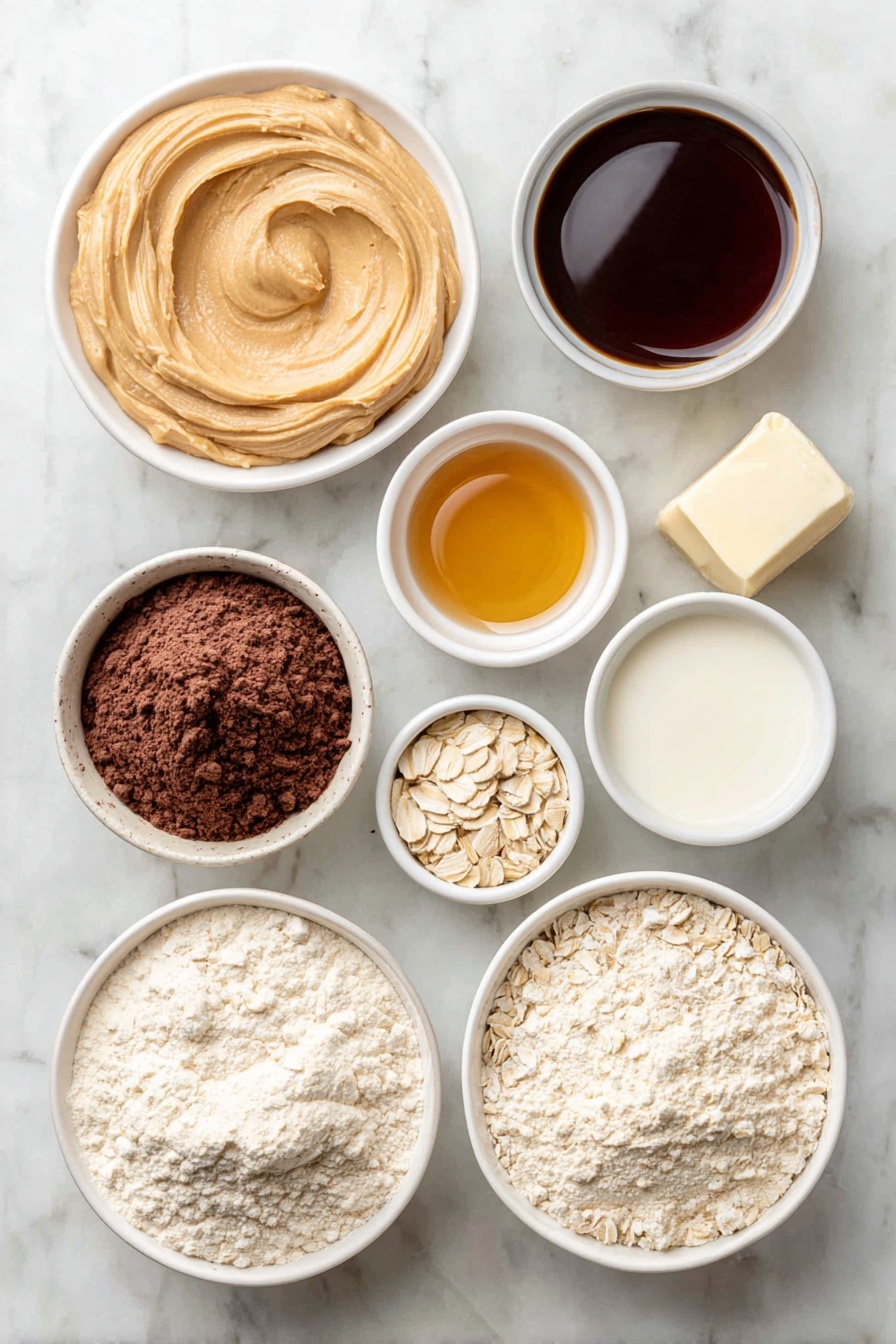
- Oat Milk: I love this for its naturally sweet, creamy texture and plant-based profile.
- Peanut Butter: Adds healthy fats and a rich, nutty flavor that balances sweetness perfectly.
- Maple Syrup: For a natural, gentle sweetness that blends well without overpowering.
- Vanilla Extract: Just a teaspoon to brighten everything and give it that classic milkshake vibe.
- Vanilla Protein Powder: This is the heart of the shake’s protein punch; use your favorite brand.
- Chocolate Syrup: I recommend a lower-sugar or sugar-free option so the protein shines through.
Variations
I like to mix things up depending on my mood or what I have on hand. Don’t hesitate to experiment here—you’ll find that this Protein Milkshake with Ninja Creami Recipe is super versatile!
- Swap Oat Milk for Soy Milk: I discovered this trick when aiming for higher protein without losing creaminess—it works beautifully!
- Flavor Twists: Try swapping chocolate syrup for caramel or berry sauce for different flavor profiles; my family goes crazy for the chocolate, though.
- Nut-Free Option: Use almond or cashew butter instead of peanut butter if you prefer or need to avoid peanuts.
- Boost Veggies: Sneak in a handful of spinach and vanilla protein powder for a green, nutrient-packed shake that tastes surprisingly great.
How to Make Protein Milkshake with Ninja Creami Recipe
Step 1: Whisk Together the Creamy Ice Cream Base
This is where the magic starts. Simply whisk your oat milk, peanut butter, maple syrup, vanilla extract, and vanilla protein powder in a bowl until everything is smoothly incorporated. I usually use a fork or small whisk to avoid lumps, and trust me—it makes a difference. The peanut butter naturally thickens the mixture, so don’t fret if it looks a bit thicker than you expect.
Step 2: Freeze the Mixture in the Ninja Creami Container
Pour your base into the Ninja Creami pint container, making sure it’s level without overfilling (leave a little headspace for expansion). Pop the lid on and freeze for 12 to 24 hours—longer if you want the thickest, creamiest texture. I usually freeze overnight and get just the right firmness by morning.
Step 3: Add Milkshake Add-Ins and Spin on Milkshake Setting
Remove the lid and pour in half a cup of oat milk plus 2-3 tablespoons of your favorite chocolate syrup. I like to start with less syrup and add more after tasting since sweetness is personal. Place the pint in your Ninja Creami, select the milkshake setting, and let it spin until smooth and creamy.
Step 4: Stir and Respin for Ultimate Creaminess
After the first spin, I always give the shake a quick stir with a spoon or spatula to break up any thick bits, then respin it. This double-spin method is my secret to ultra-smooth texture—you’ll find the consistency is thick but melts quickly into a luscious milkshake that you can sip straight away.
Pro Tips for Making Protein Milkshake with Ninja Creami Recipe
- Use Natural Peanut Butter: I noticed that natural peanut butter (without added sugar or oils) blends better and keeps flavors clean and rich.
- Don’t Skip the Double Spin: This extra step ensures a smooth, creamy shake that feels indulgent, just like at a diner.
- Adjust Sweetness Post-Spin: Taste the milkshake after spinning and add a bit more syrup or maple as needed for your perfect balance.
- Avoid Overfilling the Pint: Leave some room in the container for the mixture to expand while freezing, preventing mess and uneven texture.
How to Serve Protein Milkshake with Ninja Creami Recipe

Garnishes
I love topping mine with a sprinkle of crushed peanuts or even a light dusting of cocoa powder for a touch of flair and extra texture. Whipped cream is optional but definitely fun if you want to treat yourself. Fresh berries add beautiful color and a burst of natural sweetness too!
Side Dishes
This shake is perfect on its own, but if you want to pair it, try a slice of whole-grain toast with almond butter or a handful of crunchy granola bars—great for a balanced morning boost or afternoon snack combo.
Creative Ways to Present
For special occasions, I’ve served this shake in clear glasses layered with chocolate drizzle inside before pouring. Add a striped straw and a small cookie on the side for that cafe vibe at home. Kids love this presentation, and honestly, so do I!
Make Ahead and Storage
Storing Leftovers
If you happen to have leftovers, just return them to the Ninja Creami pint container and freeze for up to a week. Because it’s made with simple ingredients, the texture and flavor hold up really well. Just remember to cover tightly to avoid freezer odors.
Freezing
This shake freezes exceptionally well, which is super handy for meal prepping or when you want a ready-made treat. Freeze the base as directed, then spin it fresh whenever you’re ready—it tastes just as good as the first day!
Reheating
Since this is a frozen shake, I don’t reheat it per se but let it sit out at room temperature for about 10–15 minutes before adding a tablespoon of milk and respinning in the Ninja Creami. This brings back the perfect creamy milkshake texture without it melting too quickly.
FAQs
-
Can I use a different milk besides oat milk in this Protein Milkshake with Ninja Creami Recipe?
Absolutely! Soy milk is a great substitute if you want a higher-protein option without losing creaminess. Almond or cashew milk also work but will yield a slightly thinner texture. Just keep the milk unsweetened to control the shake’s sweetness.
-
What if I don’t have a Ninja Creami—can I make this protein milkshake another way?
While the Ninja Creami creates an incredibly smooth and creamy texture that’s hard to beat, you can try blending the base ingredients and then freezing them in an ice cream maker or even a shallow container, stirring every 30 minutes until frozen. The texture won’t be exactly the same, but still delicious!
-
Can I change the flavor of the protein powder in this recipe?
You can! I’ve made this with both vanilla and chocolate protein powders. Using chocolate will give a richer shake and reduce how much chocolate syrup you’ll want to add. Just adjust sweeteners accordingly to keep the shake balanced.
-
How long should I freeze the base before spinning?
Freezing for at least 12 hours is key for a good firm base that your Ninja Creami can turn into a creamy milkshake. I often freeze for about 16–24 hours to be safe, especially if my freezer isn’t ultra cold.
Final Thoughts
I absolutely love how this Protein Milkshake with Ninja Creami Recipe balances indulgence with nutrition; it truly changed the way I think about protein shakes. What started as a fun experiment quickly became a staple—my family and I can’t get enough of it. If you want something that’s creamy, filling, and customizable, give this a try. I can’t wait to hear how you make it your own and enjoy every sip!
Print
Protein Milkshake with Ninja Creami Recipe
- Prep Time: 10 minutes
- Cook Time: 0 minutes
- Total Time: 12 hours 10 minutes
- Yield: 3 Servings
- Category: Beverage
- Method: Blending
- Cuisine: American
- Diet: Vegetarian
Description
This Ninja Creami Protein Milkshake is a delicious, creamy, and healthier alternative to traditional milkshakes, made with oat milk, peanut butter, maple syrup, and vanilla protein powder. Using the Ninja Creami machine, this recipe creates a thick, satisfying milkshake with a rich chocolate twist, perfect as a post-workout treat or a nutritious dessert.
Ingredients
Ice Cream Base
- 2 cups oat milk
- 1/4 cup peanut butter
- 1/4 cup maple syrup
- 1 teaspoon vanilla extract
- 1/4 cup vanilla protein powder
Milkshake Add-Ins
- 1/2 cup oat milk
- 2-3 Tablespoons chocolate syrup (lower-sugar or sugar-free option recommended)
Instructions
- Prepare the Ice Cream Base: In a mixing bowl, whisk together 2 cups of oat milk, 1/4 cup of peanut butter, 1/4 cup of maple syrup, 1 teaspoon of vanilla extract, and 1/4 cup of vanilla protein powder until the mixture is smooth and well combined.
- Freeze the Base: Pour the prepared ice cream base into a Ninja Creami pint container. Secure the lid tightly and place the container in the freezer for 12 to 24 hours until it is completely frozen solid.
- Add Milkshake Add-Ins: Remove the lid from the frozen pint, then add 1/2 cup of oat milk and 2-3 tablespoons of chocolate syrup over the frozen base.
- Process in Ninja Creami: Insert the pint into the Ninja Creami machine and select the milkshake setting to spin the mixture. This will blend the ingredients into a creamy texture.
- Stir and Re-Spin: Remove the pint from the machine, give the milkshake a good stir, then reinsert and spin again on the milkshake setting to achieve a perfect thick and creamy consistency.
- Serve or Store: The milkshake will be thick but will melt quickly into a thick milkshake texture. Enjoy immediately, or return any leftovers to the pint container and store in the freezer for up to one week.
Notes
- Tip: Swap oat milk for soy milk to maintain a creamy texture with higher protein content.
- Storage: Leftovers should be returned to a Ninja Creami pint container and kept in the freezer for up to 7 days.
- Serving Suggestion: Allow leftovers to sit at room temperature for 10-15 minutes, add a tablespoon of milk, and respin on the milkshake setting before serving.
Nutrition
- Serving Size: 1 serving (about 1 cup)
- Calories: 280
- Sugar: 12g
- Sodium: 150mg
- Fat: 12g
- Saturated Fat: 2.5g
- Unsaturated Fat: 8g
- Trans Fat: 0g
- Carbohydrates: 30g
- Fiber: 4g
- Protein: 15g
- Cholesterol: 0mg

