
If you’re a fan of caramel, chocolate, and perfectly soft cookies, you absolutely need to try my Twix Cookie Cups Recipe. This recipe combines all those iconic Twix flavors into one adorable little treat that’s as fun to eat as it is to make. I remember the first time I baked these; the house smelled incredible, and my family went crazy—especially when the gooey caramel layer oozed just right beneath the chocolate topping. Stick with me, and I’ll walk you through every step so you can nail this fan-freaking-tastic cookie cup recipe at home.
Why You’ll Love This Recipe
- Authentic Twix Flavor: It’s like biting into your favorite candy bar, but in cookie form.
- Simple Ingredients: No fancy or hard-to-find items—just pantry staples plus a touch of magic.
- Hands-On Fun: Rolling, cutting, layering caramel, and drizzling chocolate makes baking engaging and rewarding.
- Perfect for All Occasions: Great for parties, gifts, or a cozy weekend treat with the family.

Ingredients You’ll Need
These ingredients come together so beautifully because each plays an important role—the butter brings richness, the caramel adds that iconic ooey-gooey texture, and the chocolate finishes it off with a luscious shine. When shopping, I like to pick quality caramels and sturdy chocolate chips for the best melting and setting results.

- Salted butter: Gives a perfect balance of creamy, slightly salty flavor that enhances the cookie base.
- Granulated sugar: Adds sweetness and helps create a nice tender crumb in the cookie cups.
- Vanilla extract: Elevates the whole flavor profile with warm, aromatic notes.
- Egg white: Helps bind the dough while keeping the cookie crisp yet soft.
- All-purpose flour: The structure for your cookie cups; don’t swap this unless you’re experienced with adjustments.
- Baking powder: Gives your cookies a little lift so they’re puffy but still hold their shape perfectly.
- Caramels: The star ingredient for that classic gooey caramel layer; I highly recommend unwrapped caramels to save prep time.
- Milk: Mixed with caramels for smooth melting and easier spreading over the cookies.
- Milk chocolate chips: Melted to create the glossy chocolate topping—this is what brings the whole Twix look together!
Variations
While I adore the classic version, I’ve experimented with a few variations to keep things fun in my kitchen. Feel free to make this recipe your own—it’s perfect for personalizing to your taste or dietary needs.
- Chocolate Type Swap: I once used dark chocolate chips instead of milk chocolate for a richer taste, and my chocoholic friends went nuts for it.
- Nutty Twist: Adding crushed pecans or almonds on top before the chocolate sets gives a delightful crunch.
- Salted Caramel: Sprinkle a pinch of flaky sea salt on the chocolate layer for that perfect sweet-salty combo.
- Gluten-Free: You can swap all-purpose flour for a gluten-free blend; just watch the dough consistency since it may change a bit.
How to Make Twix Cookie Cups Recipe
Step 1: Cream the Butter and Sugar
Start by preheating your oven to 350°F (175°C). In a large mixing bowl, cream together the salted butter and granulated sugar until the mixture is light and fluffy. I like to use an electric mixer on medium speed for about 2-3 minutes here to really get that creamy texture going. This step is crucial for tender cookies, so don’t rush it!
Step 2: Add Egg White and Vanilla
Next up, add the egg white and vanilla extract to your butter-sugar mixture. Mix well until everything is fully combined. I find that using just the egg white keeps the cookies lighter while still binding the dough nicely. Be sure to scrape down the sides of your bowl so nothing gets left behind.
Step 3: Incorporate Dry Ingredients
Now add the all-purpose flour and baking powder. Mix thoroughly, but don’t overwork the dough, or your cookie cups might turn out tough. The dough should be soft but firm enough to roll without sticking excessively. If it feels too sticky, a light dusting of flour on your rolling surface will help.
Step 4: Roll and Cut Cookie Circles
Roll your dough out to about ¼ to ½ inch thickness on a lightly floured surface. Use a round cookie cutter to cut out circles—these will become the base of your cookie cups. Then, transfer the circles to an ungreased baking sheet. I like to give myself a bit of room between them to make handling easier, but since they won’t spread much, close spacing works too.
Step 5: Bake Until Puffy, Not Glossy
Bake your cookies at 350°F for 6-8 minutes. Here’s a tip: pull them out while they’re still puffy and no longer glossy on top. This ensures the cookie cups are soft with just the right amount of structure. Let them cool completely on a wire rack before moving on to the caramel layer. I always remind myself—as tempting as it is—to resist handling warm cookies to avoid breaking them.
Step 6: Make and Spread the Caramel Layer
While the cookies cool, microwave your unwrapped caramels and milk together for 1 minute, stirring at the 30-second mark. Stir until smooth and creamy. This little step is what creates that signature luscious caramel layer, and it’s worth doing carefully to avoid burnt spots. Gently spoon a few teaspoons of caramel onto each cookie, spreading until the caramel almost covers the cookie base. Then pop the entire pan into the fridge for 10-15 minutes to let the caramel set—it really helps when adding the chocolate on top.
Step 7: Melt and Spread Chocolate
Finally, melt your milk chocolate chips in 30-second intervals, stirring well between each until fully melted and silky smooth. I like to use a glass bowl over a pot of simmering water for better control over melting. Spread a small amount of melted chocolate over each caramel-topped cookie cup. Let the chocolate set completely either at room temperature or briefly chilled before serving. This finishing touch gives you that irresistible Twix shine and snap.
Pro Tips for Making Twix Cookie Cups Recipe
- Don’t Overbake: Remove cookies as soon as they lose their gloss to keep the perfect soft, cup shape.
- Smooth Caramel: Stir caramels carefully when melting; burnt caramel ruins the whole batch, so patience is key.
- Chocolate Tempering Hack: Using shorter melting intervals and stirring keeps chocolate glossy and perfect for snapping.
- Chill Between Layers: Always cool your caramel layer fully before adding chocolate to avoid mixing and soggy cookies.
How to Serve Twix Cookie Cups Recipe

Garnishes
I like to keep it simple because the cookie cups are already packed with flavor, but a light sprinkle of flaky sea salt or finely chopped toasted nuts on the chocolate topping adds a lovely contrast. Sometimes, I even dust a tiny bit of powdered sugar for a festive look when serving at holiday gatherings.
Side Dishes
These cookie cups shine as a standalone treat, but I love pairing them with a scoop of vanilla ice cream or a cup of rich coffee or hot cocoa. They’re also a hit at dessert bars alongside fresh fruit or homemade whipped cream.
Creative Ways to Present
For parties, I’ve presented these on decorative trays lined with parchment paper and separated by mini cupcake liners for a charming touch. Another fun idea is stacking them with a slight offset to mimic layers of a Twix bar. And during cookie exchanges, I like packaging them in small gift boxes with a little ribbon—it makes a sweet, thoughtful gift!
Make Ahead and Storage
Storing Leftovers
I store my leftover Twix Cookie Cups in an airtight container in the fridge to keep the caramel and chocolate firm but still tender. They usually last well for 3-4 days—long enough to enjoy them throughout the week without losing freshness.
Freezing
Freezing these cookie cups works well if you want to prep ahead. I freeze them individually on a baking sheet first and then transfer to a sealed freezer bag to prevent sticking. When you’re ready, thaw them in the fridge overnight—the texture stays just as good as fresh!
Reheating
If I want to warm them slightly, I zap a cookie cup in the microwave for just 10-15 seconds to soften the caramel without melting the chocolate too much. This little trick gives you that gooey “just baked” vibe without compromising the structure.
FAQs
-
Can I use salted butter in the Twix Cookie Cups Recipe?
Absolutely! In fact, salted butter adds a nice balance to the sweetness, enhancing the overall flavor profile of the cookie cups. Just be sure to adjust any extra salt if you customize the recipe.
-
How thick should I roll out the cookie dough?
Rolling the dough between ¼ and ½ inch thick works perfectly—thicker cookies may not hold their shape well, and thinner dough might not create a good cavity for the caramel.
-
Can I make these cookie cups dairy-free?
You can try substituting with dairy-free butter and dairy-free caramel alternatives, but be aware the texture and flavor might vary. Using vegan chocolate chips will complete the dairy-free twist.
-
Why is it important to chill the caramel before adding chocolate?
Chilling sets the caramel layer, which prevents it from mixing into the chocolate. This keeps your cookie cups looking neat with distinct layers and ensures a better bite.
Final Thoughts
I absolutely love how this Twix Cookie Cups Recipe combines the nostalgia of candy bars with the homemade warmth of fresh cookies. Making these is such a fun project, and you’ll notice that the more you make them, the easier and more enjoyable the process becomes. Whether it’s for a special occasion or just a sweet weekend splurge, I wholeheartedly recommend giving these a try—you’ll be so glad you did. Trust me, once you’ve had that first bite into soft cookie, gooey caramel, and silky chocolate, you’ll be hooked too!
Print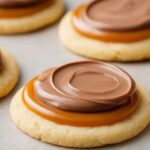
Twix Cookie Cups Recipe
- Prep Time: 10 minutes
- Cook Time: 8 minutes
- Total Time: 40 minutes
- Yield: 24 cookie cups
- Category: Dessert
- Method: Baking
- Cuisine: American
Description
Twix Cookie Cups are a delightful treat combining a buttery cookie base, gooey caramel center, and a rich milk chocolate topping. Inspired by the classic Twix candy bar, this recipe layers simple cookie dough with melted caramel and chocolate to create an irresistible bite-sized dessert perfect for parties or an indulgent snack.
Ingredients
Cookie Dough
- 1/2 cup (111g) salted butter
- 1/2 cup (115g) granulated sugar
- 1 tsp vanilla extract
- 1 egg white
- 1 1/2 cups (228g) all-purpose flour
- 1 tsp baking powder
Caramel Filling
- 20 caramels, unwrapped
- 1 tbsp milk
Chocolate Topping
- 2 cups (400g) milk chocolate chips
Instructions
- Preheat Oven: Preheat your oven to 350°F (175°C) to prepare for baking the cookie bases.
- Cream Butter and Sugar: In a mixing bowl, cream together the salted butter and granulated sugar until the mixture is light and fluffy, ensuring a smooth cookie texture.
- Add Egg White and Vanilla: Mix in the egg white and vanilla extract until well combined to incorporate moisture and flavor into the dough.
- Combine Dry Ingredients: Add the all-purpose flour and baking powder to the wet ingredients. Mix thoroughly until a uniform dough forms without any streaks of flour.
- Shape Cookie Dough: Roll out the dough on a flat surface to about 1/4 to 1/2 inch thickness. Using a round cookie cutter, cut out circles and transfer them onto an ungreased baking sheet.
- Bake Cookies: Bake at 350°F for 6 to 8 minutes, watching closely until the cookies are puffy and no longer glossy, indicating they are set but soft for filling.
- Cool Cookies: Remove the cookies from the oven and transfer them onto a wire rack. Allow them to cool completely to room temperature to prevent melting the caramel and chocolate toppings.
- Prepare Caramel Filling: While the cookies cool, microwave the unwrapped caramels along with milk for 1 minute. Stir halfway through at 30 seconds and continue stirring until the caramel mixture is smooth and creamy.
- Add Caramel to Cookies: Spoon a few teaspoons of warm caramel onto each cooled cookie. Spread the caramel to cover nearly the entire surface of the cookie evenly.
- Chill Caramel Layer: Place the caramel-topped cookies in the refrigerator for 10 to 15 minutes or until the caramel is completely chilled and firm.
- Melt Chocolate: Melt the milk chocolate chips by microwaving in 30-second intervals, stirring between each, until fully melted and smooth.
- Top with Chocolate: Spread a thin layer of melted chocolate over the caramel on each cookie. Allow the chocolate to cool and set completely before serving to create the signature layered Twix effect.
Notes
- Ensure cookies are cooled completely before adding caramel to avoid melting.
- Use room temperature butter for easier creaming with sugar.
- For softer cookies, reduce baking time slightly; for crisper cookies, bake a bit longer.
- You can substitute milk chocolate chips with dark or white chocolate for flavor variations.
- Chilling after adding caramel helps the candy hold its shape and makes chocolate topping easier.
- Store cookie cups in an airtight container at room temperature or refrigerated to maintain freshness.
Nutrition
- Serving Size: 1 cookie cup
- Calories: 150 kcal
- Sugar: 14 g
- Sodium: 70 mg
- Fat: 8 g
- Saturated Fat: 5 g
- Unsaturated Fat: 2.5 g
- Trans Fat: 0 g
- Carbohydrates: 18 g
- Fiber: 0.5 g
- Protein: 2 g
- Cholesterol: 15 mg
