
If you’re on the hunt for a sweet treat that’s charming, creamy, and just downright delightful, you’re in for a treat with this Pink White Chocolate Fudge Recipe. I absolutely love how this fudge turns out with its rich, velvety white chocolate base and that gorgeous soft pink hue that makes it perfect for gifting or special occasions. Whether you’re a seasoned fudge maker or a total novice, you’ll find this recipe refreshingly straightforward and fun to customize.
Why You’ll Love This Recipe
- Simple Ingredients: You only need a few things that you might already have in your pantry.
- Quick and Easy: Ready in just 30 minutes, making it perfect for last-minute desserts.
- Pretty and Customizable: Add sprinkles or dried cherries to make it uniquely yours.
- Fun for All Skill Levels: Foolproof steps mean even beginners can nail it on the first try.

Ingredients You’ll Need
For this Pink White Chocolate Fudge Recipe, I picked ingredients that not only complement each other perfectly but also give you a smooth, creamy texture with a pop of color that’s just so inviting. You’ll want quality white chocolate for that luscious flavor, and the pink gel food coloring really helps the fudge look as good as it tastes.
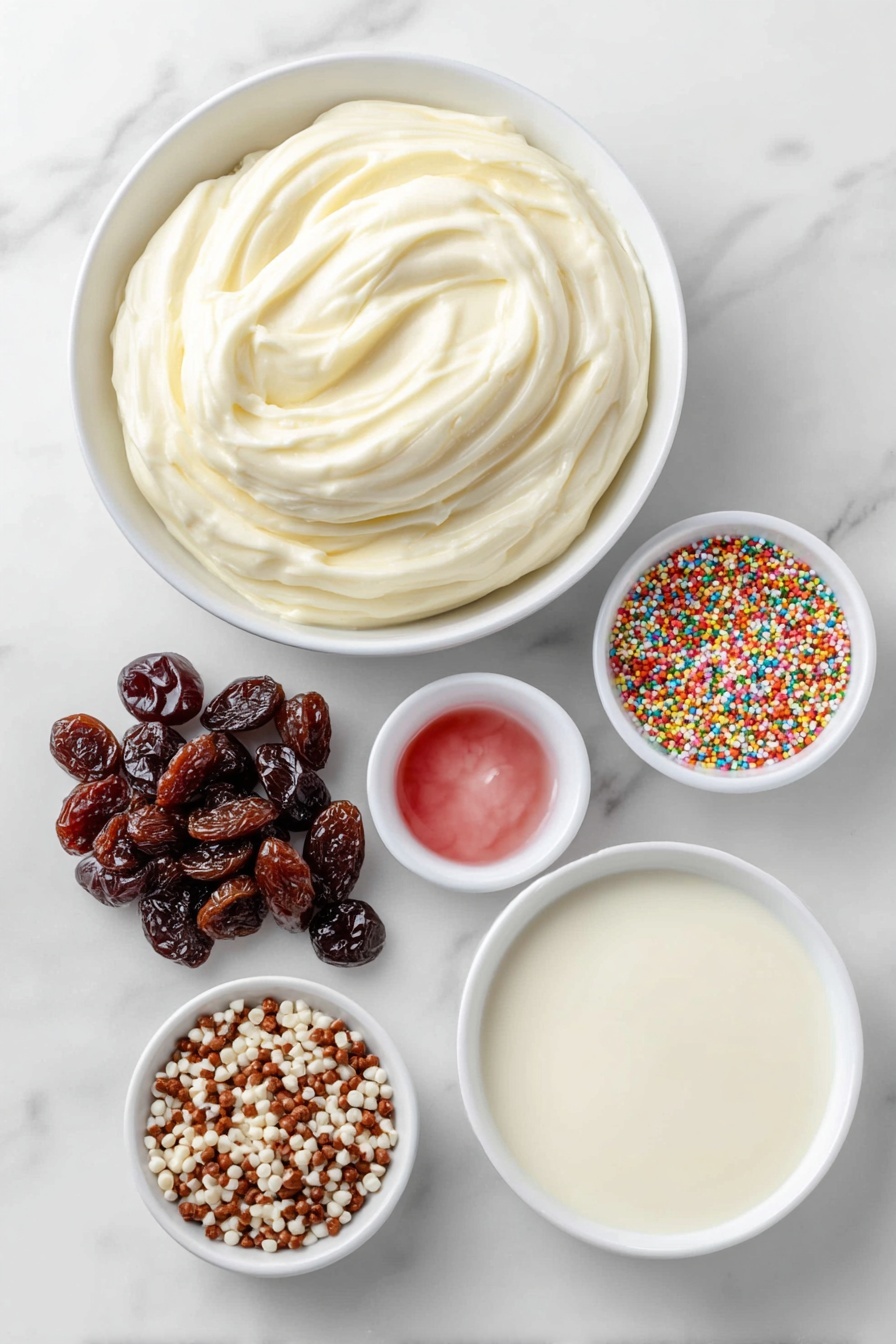
- White chocolate melting wafers or high-quality chopped white chocolate: I prefer wafers for quick melting, but good chopped chocolate works beautifully too.
- Sweetened condensed milk: This is what gives the fudge its creamy richness and smooth texture.
- Pink gel food coloring: Just a few drops will do; gel works best because it won’t thin out your fudge.
- Optional sprinkles: Fun for adding a festive touch.
- Optional dried cherries: They add a delightful tart contrast to the sweet white chocolate—my personal favorite add-in!
Variations
I love how versatile this Pink White Chocolate Fudge Recipe is, and you can easily make it your own by adding different flavors or mix-ins. Sometimes, I switch things up depending on the season or what my family is craving.
- Cherry Almond: I once added chopped toasted almonds along with dried cherries for a crunch and flavor combo that my family absolutely devoured.
- Ombre Effect: By not mixing all the pink coloring in, you get a beautiful two-tone look—great if you want a bit of visual drama with minimal effort.
- Nut-Free and Allergy-Friendly: Simply skip nuts or cherry add-ins and stick to the base recipe for a safe treat everyone can enjoy.
- Festive Sprinkles: Perfect for holidays or birthdays, sprinkles add a playful burst of color and texture.
How to Make Pink White Chocolate Fudge
Step 1: Prep Your Pan for Easy Removal
Start by lining a 9×9 inch pan with parchment paper, making sure the paper hangs over two sides. This is a small but crucial step—it makes lifting out the fudge much easier later on, and you won’t risk breaking it trying to pry it out.
Step 2: Prepare Your Chocolate
If you’re using chopped white chocolate instead of melting wafers, chop it finely so it melts evenly without clumping or burning. I learned this the hard way after trying to melt big chunks and ending up with a grainy mess. It’s not fun, so trust me on this one!
Step 3: Melt Chocolate and Condensed Milk Together
Place the chocolate and sweetened condensed milk in a large microwave-safe bowl. Microwave in 20 to 30-second intervals, stirring really well after each. The trick here is to stir thoroughly—you’ll notice the residual heat will melt the last bits without overheating. Overheating white chocolate can cause it to seize up, and that’s not what any of us want.
Step 4: Add That Gorgeous Pink Color
Once your mixture is silky smooth, add a few drops of pink gel food coloring. For an ombre effect, resist the urge to stir it all in. Leaving some white chocolate uncolored next to the pink swirl creates a visually stunning result that’s so much fun to serve.
Step 5: Mix in Extras (Optional)
This is where you can get creative. I recently tried mixing in dried cherries, and I was thrilled with the tangy burst they added against the creamy fudge. Sprinkles are another great option if you want a little sparkle and crunch.
Step 6: Chill and Set
Pour your fudge mixture into the prepared pan and smooth the top with a spatula. Pop it in the fridge for at least an hour to set firmly. I usually plan this step when I need a little break—like when I start craving fudge, it’s the perfect reward after waiting!
Step 7: Cut Into Shapes and Serve
Once set, lift the fudge out using your parchment paper ‘handles.’ For a special touch, use a heart-shaped cookie cutter. To avoid hurting your hands pressing down, I like to cover the cutter with a kitchen towel for a more comfortable and cleaner cut. Then, just serve and watch everyone go crazy for this sweet treat.
Pro Tips for Making Pink White Chocolate Fudge
- Use High-Quality Chocolate: It really makes a difference in flavor and smoothness, so don’t skimp here.
- Patience with Melting: Stirring between microwave intervals prevents burning and ensures even melting.
- Gel Food Coloring Only: Liquid food colors can thin the fudge and affect texture, so stick with gel.
- Cutting the Fudge: Using a kitchen towel over your cookie cutter avoids finger pain and gives cleaner cuts.
How to Serve Pink White Chocolate Fudge Recipe

Garnishes
I like to add a few dried cherries or a sprinkle of sea salt right on top before chilling. It adds a fancy touch that makes the fudge feel extra special. If you want something more playful, colorful sprinkles are always a hit—especially with kids.
Side Dishes
This fudge pairs wonderfully with a cup of hot coffee, chai tea, or even sparkling rosé if you’re celebrating. On a dessert table, I like to serve it alongside fresh berries or lemon shortbread cookies for a refreshing balance.
Creative Ways to Present
For holiday gifting, I arrange the fudge hearts in a pretty tin with tissue paper. I’ve also packaged them in small cellophane bags tied with pastel ribbons for baby showers or birthdays—everyone loves receiving these little bites of sweetness.
Make Ahead and Storage
Storing Leftovers
I keep leftover fudge in an airtight container in the fridge. It stays fresh and firm for up to two weeks. When you’re ready to enjoy it, just let it sit at room temperature a few minutes before serving so it’s nice and creamy.
Freezing
Freezing fudge works wonderfully if you want to prep ahead. I wrap pieces individually in parchment or wax paper and then place them in an airtight container or freezer bag. It freezes well for up to 3 months and thaws quickly on the counter.
Reheating
This fudge is best enjoyed chilled or at room temp, so I don’t recommend reheating. If it’s a bit too firm from the fridge, just letting it warm up naturally for 10-15 minutes brings back that perfect creamy texture.
FAQs
-
Can I use regular liquid food coloring instead of gel for the Pink White Chocolate Fudge Recipe?
While you can use liquid food coloring, I recommend sticking to gel because liquid tends to thin out the fudge mixture and can affect how it sets. Gel food coloring gives you vibrant color with no change in texture.
-
How long does this fudge stay good?
Stored in an airtight container in the fridge, your Pink White Chocolate Fudge Recipe will stay fresh for up to two weeks. Just make sure it’s well covered to avoid picking up other odors.
-
Can I skip the condensed milk?
The sweetened condensed milk is key to getting that creamy, fudge-like texture and sweetness. Skipping it would change the consistency and sweetness level quite a bit, so I don’t recommend it.
-
What if my fudge doesn’t set properly?
If your fudge isn’t firm after chilling, sometimes giving it more time in the fridge helps. Also, make sure you’re using the right type of chocolate – high-quality white chocolate or melting wafers work best.
Final Thoughts
Honestly, this Pink White Chocolate Fudge Recipe holds a special place in my dessert repertoire because it’s simple, charming, and endlessly adaptable. Every time I make it, whether for family gatherings or just because, it brings smiles around the table. I hope you’ll enjoy making it as much as I do — and trust me, once you try it, you’ll find yourself coming back to this recipe time and again for that perfect little sweet moment.
Print
Pink White Chocolate Fudge Recipe
- Prep Time: 10 minutes
- Cook Time: 5 minutes
- Total Time: 1 hour 15 minutes
- Yield: 12 servings
- Category: Dessert
- Method: Melting
- Cuisine: American
Description
This Pink White Chocolate Fudge is a delightful and easy-to-make treat featuring creamy white chocolate combined with sweetened condensed milk and a splash of pink gel food coloring for a festive touch. Perfect for special occasions or gifting, this fudge can be customized with optional sprinkles and dried cherries, and cut into charming heart shapes for a lovely presentation.
Ingredients
Main Ingredients
- 20 ounces white chocolate melting wafers or high-quality chopped white chocolate
- ½ cup plus 1 tablespoon sweetened condensed milk
- A few drops of pink gel food coloring
Optional Add-ins
- Sprinkles
- Dried cherries
Instructions
- Prepare the Pan: Line a 9×9 inch baking pan with parchment paper, allowing the paper to overhang on two sides for easy removal of the fudge later. Set the pan aside.
- Chop Chocolate (if needed): If using block white chocolate instead of wafers, chop the chocolate into small, uniform pieces to ensure even melting in the microwave.
- Combine Ingredients: Place the white chocolate pieces or melting wafers and sweetened condensed milk into a large microwave-safe bowl.
- Melt Chocolate Mixture: Microwave the mixture in 20 to 30-second intervals, stirring thoroughly after each interval to evenly melt the chocolate without burning. Typically, two intervals are sufficient. The residual heat helps finish melting the chocolate as you stir.
- Add Color: Once melted and smooth, add a few drops of pink gel food coloring. For an ombré effect, stir some of the mixture thoroughly while leaving some white, uncolored portions.
- Add Optional Ingredients: Gently fold in dried cherries and sprinkles if desired, which complement the sweetness and add texture.
- Refrigerate: Pour the fudge mixture into the prepared pan and smooth the surface. Refrigerate for at least one hour to allow the fudge to set firmly.
- Cut and Shape: After the fudge has cooled and hardened, remove it from the pan using the parchment overhang. Use a heart-shaped cookie cutter to cut the fudge into heart shapes. To make cutting easier and protect your hands, place a kitchen towel over the cookie cutter and press gently but firmly.
- Serve: Arrange the fudge pieces on a platter, serve, and enjoy this sweet, creamy treat.
Notes
- Be careful not to overheat the chocolate as it can seize or burn; stirring frequently between microwave intervals prevents this.
- Use high-quality white chocolate for the best flavor and texture.
- The fudge must be fully chilled to cut cleanly into shapes.
- Dried cherries add a pleasant tartness and chewy texture that balances the sweetness.
- This fudge can be stored covered in the refrigerator for up to one week.
- For a different look, try other food colorings or mix-ins like nuts or coconut flakes.
Nutrition
- Serving Size: 1 piece (approx. 1.5 oz)
- Calories: 190
- Sugar: 18g
- Sodium: 25mg
- Fat: 11g
- Saturated Fat: 7g
- Unsaturated Fat: 3g
- Trans Fat: 0g
- Carbohydrates: 22g
- Fiber: 0.5g
- Protein: 2g
- Cholesterol: 10mg


