
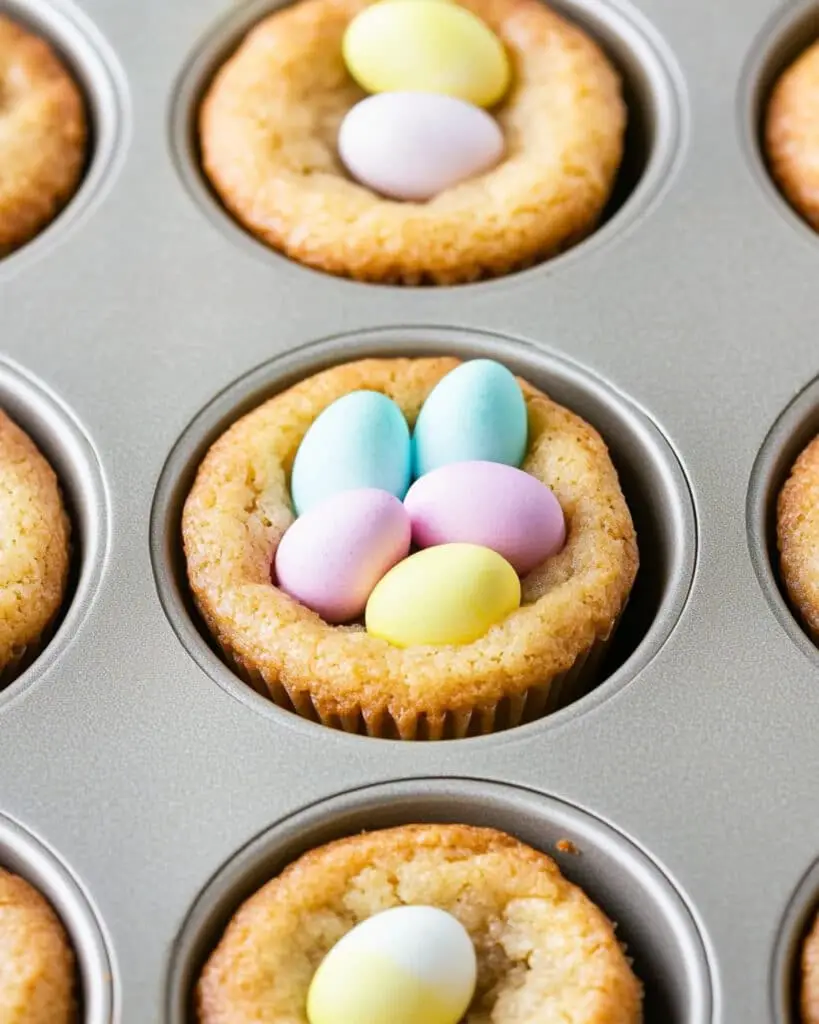
These Easter Egg Chocolate Chip Cookie Cups are the perfect treat to brighten up your spring celebrations! Imagine your favorite chocolate chip cookie transformed into an adorable cup shape, creating the perfect nest for colorful mini eggs. These delightful treats combine the classic comfort of homemade cookies with a festive Easter twist that will have everyone reaching for seconds.
Why You’ll Love This Recipe
- Festive and Fun: These cookie cups instantly add holiday charm to any Easter gathering – they’re as delightful to look at as they are to eat!
- Quick to Make: With just 20 minutes from start to finish, you can whip these up even when you’re short on time but want something special.
- Family-Friendly: Kids absolutely love helping press the mini eggs into the warm cookies, making this a perfect family baking project.
- Versatile: These cookie cups work beautifully as dessert, snacks, or even as edible decorations for your Easter table setting.

Ingredients You’ll Need
- Unsalted Butter: The foundation of any good cookie, providing richness and that signature buttery flavor. Make sure it’s properly softened for the best texture.
- Brown Sugar: Adds moisture and a deep caramel flavor that makes these cookies irresistibly chewy.
- Granulated Sugar: Provides sweetness and helps create those slightly crisp edges that contrast beautifully with the soft centers.
- Vanilla Extract: A flavor enhancer that rounds out the sweetness with warm, aromatic notes.
- Eggs: Act as binders that give structure to the cookies while adding richness.
- All-Purpose Flour: The structural backbone of our cookie cups – measure by spooning into measuring cups for the perfect amount.
- Baking Soda: Creates the perfect rise and texture in the cookie cups.
- Salt: Enhances all the flavors and balances the sweetness – don’t skip it!
- Chocolate Chips: Choose semi-sweet for the perfect balance of sweet and slightly bitter notes that complement the candy eggs.
- Mini Eggs: The star decoration that transforms these from regular cookies into Easter treats. Their candy shell adds a delightful crunch against the soft cookie.
Note: You’ll find the complete list of ingredients, along with their exact measurements, in the printable recipe card at the bottom of this post.
Variations
Different Chocolate Options
Swap the standard chocolate chips for white chocolate chips, peanut butter chips, or a mix of different chocolates for a unique flavor combination.
Flavor Twists
Add 1/2 teaspoon of almond extract along with the vanilla for a more complex flavor profile, or mix in 2 tablespoons of orange zest for a bright, citrusy note.
Cookie Cup Fillings
Instead of just pressing mini eggs on top, create a deeper indentation and fill with Nutella, peanut butter, or chocolate ganache before adding the mini eggs.
Seasonal Adaptations
Replace mini eggs with other seasonal candies like candy corn for Halloween, peppermint candies for Christmas, or conversation hearts for Valentine’s Day.
How to Make Easter Egg Chocolate Chip Cookie Cups
Step 1: Prepare Your Pans
Preheat your oven to 350°F. Give two muffin pans a light coating of cooking spray to ensure your cookie cups will release easily after baking.
Step 2: Create the Cookie Base
In a large bowl, beat the softened butter with both sugars until the mixture becomes notably lighter in color and fluffy in texture – about 2-3 minutes with an electric mixer. This step incorporates air for a better texture.
Step 3: Add Wet Ingredients
Mix in the vanilla extract, then add the eggs one at a time, ensuring each is fully incorporated before adding the next. The mixture should look smooth and well-combined.
Step 4: Combine Dry Ingredients
In a separate bowl, whisk together the flour, baking soda, and salt. Gradually add this mixture to your wet ingredients, mixing just until combined. Over-mixing can make your cookies tough.
Step 5: Add Chocolate Chips
Gently fold in the chocolate chips until they’re evenly distributed throughout the dough.
Step 6: Fill and Bake
Using a cookie scoop, portion the dough into the prepared muffin pans. Gently press down on each mound of dough with the back of a spoon to create a slight indentation. Bake for 13-15 minutes until the tops are golden brown and just set.
Step 7: Add the Easter Touch
Allow the cookies to cool in the pan for 1-2 minutes, then press three mini eggs into the center of each cookie cup. Let them sit for another 2-3 minutes before carefully transferring to wire racks to cool completely.
Pro Tips for Making the Recipe
- Proper Butter Temperature: The butter should be soft enough to leave a slight indentation when pressed, but not so soft that it appears greasy or melted.
- Room Temperature Eggs: Using eggs at room temperature helps them incorporate better into the dough, creating a more consistent texture.
- Don’t Overmix: Once you add the flour, mix just until combined. Overmixing develops the gluten, resulting in tougher cookies.
- Cookie Scoop: Using a cookie scoop ensures uniform-sized cookie cups that will bake evenly.
- Timing is Everything: Don’t wait too long to add the mini eggs – they need the warm cookies to slightly melt their bottoms and stick, but if the cookies are too hot, the candy colors might melt too much.
How to Serve
Perfect Pairings
These cookie cups are delightful alongside a glass of cold milk, a cup of coffee, or even with a scoop of vanilla ice cream for an extra special dessert.
Holiday Presentation
Arrange them on a pretty platter surrounded by fresh spring flowers or decorative Easter grass for a festive table centerpiece that doubles as dessert.
Gift Giving
Pack a few cookie cups in cellophane bags tied with pastel ribbons for adorable homemade Easter gifts or additions to Easter baskets.
Make Ahead and Storage
Storing Leftovers
Keep these cookie cups fresh by storing them in an airtight container at room temperature for up to 5 days. Place parchment paper between layers to prevent sticking.
Freezing
The cookie cups freeze beautifully for up to 3 months. Freeze them on a baking sheet until solid, then transfer to a freezer bag or container. The mini eggs may lose some of their vibrant color when frozen, so consider freezing the cookie cups without them and adding fresh ones after thawing.
Make-Ahead Options
Prepare the cookie dough up to 3 days in advance and keep refrigerated. Let it come to room temperature for about 20 minutes before scooping and baking. You can also freeze portioned dough balls for quick baking whenever you need them.
FAQs
-
Can I make these cookie cups in a mini muffin pan instead?
Absolutely! Mini muffin pans work wonderfully for bite-sized versions. Reduce the baking time to about 8-10 minutes and use just one mini egg per cookie cup. They make adorable two-bite treats perfect for parties!
-
My cookie cups are sticking to the pan. What can I do?
Make sure to spray the muffin cups generously with cooking spray. If they’re still sticking, let them cool for an extra minute in the pan, then run a butter knife around the edges to gently loosen them before removing.
-
Can I use regular-sized chocolate eggs instead of mini eggs?
Yes, but I recommend chopping larger eggs into pieces first. Alternatively, use one regular-sized egg in the center of each cookie cup for a different look. Just be aware that larger eggs may sink deeper into the warm cookie.
-
How can I tell when the cookie cups are perfectly baked?
Look for golden edges and a set center that’s just barely firm to the touch. The centers might look slightly underdone when you remove them from the oven, but they’ll continue cooking from residual heat. This ensures your cookie cups stay soft and chewy.
Final Thoughts
These Easter Egg Chocolate Chip Cookie Cups bring together the nostalgia of classic chocolate chip cookies with the joy and color of Easter celebrations. They’re simple enough for baking beginners but special enough to become a holiday tradition. Whether you’re hosting an Easter gathering or simply want to brighten someone’s day with a homemade treat, these festive cookie cups are sure to bring smiles all around!
Print
Easter Egg Chocolate Chip Cookie Cups Recipe
- Prep Time: 7 minutes
- Cook Time: 13 minutes
- Total Time: 20 minutes
- Yield: 12 cookie cups
- Category: Desserts
- Method: Baking
- Cuisine: American
- Diet: Vegetarian
Description
These delightful Easter Egg Chocolate Chip Cookie Cups are the perfect festive treat! With a rich, buttery cookie base, melty chocolate chips, and topped with mini eggs, these cookie cups are simple to make but packed with indulgent flavor. They’ll be a hit for any Easter gathering or spring celebration.
Ingredients
- 1 cup unsalted butter, softened
- 3/4 cup brown sugar
- 3/4 cup granulated sugar
- 1 tsp vanilla extract
- 2 large eggs
- 2 1/4 cups all-purpose flour
- 1 tsp baking soda
- 1 tsp salt
- 2 cups chocolate chips
- Mini eggs
Instructions
- Preheat the Oven:
Begin by preheating the oven to 350°F. Prepare two muffin pans by lightly spraying them with cooking spray. This will prevent the cookie cups from sticking. - Cream the Butter and Sugars:
In a large mixing bowl, cream together the softened butter, brown sugar, and granulated sugar. Beat the mixture until it’s light and fluffy to ensure a smooth and creamy base for the cookies. - Add Wet Ingredients:
Mix in the vanilla extract and then add the eggs one at a time, ensuring that each is fully incorporated before adding the next. This helps build the structure of the batter. - Mix Dry Ingredients:
In a separate bowl, combine the all-purpose flour, baking soda, and salt. Slowly mix the dry mixture into the wet ingredients until a cohesive dough forms. This gradual mixing prevents overworking the batter. - Fold in Chocolate Chips:
Gently fold in the chocolate chips, ensuring they’re distributed evenly throughout the dough. This step ensures that every bite is packed with chocolatey goodness. - Prepare and Bake:
Using a cookie scoop, divide the batter evenly among the prepared muffin pans. Press down each portion with the back of a spoon to form a cup shape. Bake the cookie cups in the preheated oven for 13-15 minutes, or until the tops turn golden brown. - Add Mini Eggs:
Allow the cookie cups to cool for 1-2 minutes after baking, then press 3 mini eggs into the center of each cookie while they’re still warm. Let the cookies cool for an additional 2-3 minutes in the pan before transferring them to wire racks to cool completely.
Notes
- To prevent the cookie cups from sticking to the pan, make sure to use a non-stick muffin pan or line with paper liners.
- If you’d like a gooey center, bake for the shorter end of the time range (13 minutes). For firmer cookie cups, bake for the full 15 minutes.
- Store the cookie cups in an airtight container at room temperature for up to 5 days or freeze for up to 3 months.
- Mini eggs can be substituted with other chocolate candies if desired.
Nutrition
- Serving Size: 1 cookie cup
- Calories: 310
- Sugar: 25G
- Sodium: 200mg
- Fat: 16g
- Saturated Fat: 10g
- Unsaturated Fat: 6g
- Trans Fat: 0g
- Carbohydrates: 38g
- Fiber: 1g
- Protein: 4g
- Cholesterol: 55mg


