
If you’re craving the ultimate comfort food without spending hours in the kitchen, this Hot Dog Grilled Cheese recipe will become your new weeknight hero. Imagine the classic hot dog and beloved grilled cheese coming together in a buttery, cheesy masterpiece. Every bite is both gooey and crisp, packed with sharp cheddar, tangy mustard, and a hint of smoky seasoning. Whether you’re feeding the family or just want a treat after a long day, this dish delivers maximum flavor with minimal fuss—ready in under 30 minutes and infinitely customizable!
Why You’ll Love This Recipe
- Ridiculously Easy: Minimal steps, simple ingredients, and everything cooks up in one pan. Anyone can master it.
- Fun and Creative: You get that nostalgic hot dog experience, but with a unique grilled cheese twist.
- Flavor Explosion: From the tang of mustard to melty cheddar and zippy jalapeños, every bite pops with textures and tastes.
- Crowd-Pleaser: Perfect for kids and adults, picky eaters and foodies alike.
- Endlessly Adaptable: Mix up the cheese, seasonings, or toppings to suit your mood and whatever’s in the fridge.
- Weeknight Wonder: Quick and hearty, this recipe is tailor-made for those evenings when you want big flavor without a big effort.

Ingredients You’ll Need
Here’s what makes this Hot Dog Grilled Cheese really special:
- Hot Dogs: Choose firmer, high-quality hot dogs for the best bite. Slicing them adds flavor and texture.
- Classic Yellow Mustard: Brushed over the hot dogs for a tangy, bright kick.
- BBQ or All Purpose Seasoning: Adds savory depth and a hint of smokiness. All Purpose is saltier, so use less if you go that route.
- Butter: For toasting the hot dogs and buns, giving everything golden, crispy edges.
- Hot Dog Buns: Halved but kept intact to cradle all the melted cheese and toppings.
- Cheddar Cheese (grated): The main star—choose sharp cheddar for strong, tangy flavor and top melting quality.
- Pickled Jalapeños: Optional, but highly recommended for heat and acidity that cuts through the richness.
- Grilled or Pan-Fried Onions (optional): Add a touch of sweetness and umami for those who love extra flavor.
- Note: Slicing the hot dogs is totally optional, but it helps those flavors soak in and makes every bite more exciting!
Note: You’ll find the complete list of ingredients, along with their exact measurements, in the printable recipe card at the bottom of this post.
Variations
Ready to make it your own? Here’s how:
- Spicy: Swap cheddar for pepper jack, or add a drizzle of sriracha with the mustard.
- Double Cheese: Mix in mozzarella or Monterey Jack for an even gooier bite.
- Veggie Boost: Add sautéed peppers or mushrooms inside the bun for extra color and nutrition.
- Different Proteins: Try chicken sausages, turkey dogs, or even plant-based hot dogs for a twist.
- Bun Swap: Use brioche hot dog buns—or, for a serious grilled cheese feel, sandwich the dogs between regular bread with plenty of cheese.
How to Make Hot Dog Grilled Cheese
Step 1: Prep the Hot Dogs
Slice each hot dog on one side in a shallow crisscross pattern (don’t cut all the way through—this just maximizes those crispy edges and lets the flavor soak in). Brush them all over with classic yellow mustard, then sprinkle generously with your chosen seasoning.
Step 2: Sear the Hot Dogs
Melt butter in a large nonstick pan over medium heat. Add the prepared hot dogs and cook for a couple of minutes, flipping so all sides heat up and the seasoning sticks. No need to char—just a little color and warmth is perfect.
Step 3: Toast the Buns
Remove the hot dogs. In the leftover butter, toast your hot dog buns until the outsides are beautifully golden. You may need to do this in batches depending on your pan size.
Step 4: Assemble the Buns
In each bun, layer about a third of your grated cheese. Add pickled jalapeños and grilled onions to taste, pop the hot dog in, and gently press it all together.
Step 5: Add a Cheese Blanket (The Game-Changer)
Wipe out the pan if needed and turn the heat to medium. Sprinkle half of the remaining cheese into two piles, roughly the size of your buns. Lay each assembled hot dog, dog-side down, right on top of the melting cheese. As the cheese begins to bubble and crisp around the edges, use your spatula to gently fold any runaway cheese back toward the bun.
Step 6: Flip and Finish
Let the cheese cook until it attaches to the bun and hot dog—don’t rush this! Carefully flip the whole thing and toast the other side briefly. This step not only binds the cheese but gives you a golden, crispy cheese crust that’s magical.
Step 7: Serve and Savor
Allow them to cool just long enough for the cheese to set and crisp a bit more. Serve with your favorite dipping sauce—think classic ketchup, creamy ranch, or garlicky aioli.
Pro Tips for Making the Recipe
- Don’t Over-Stuff the Bun: Leave a little space so nothing spills out when you flip in the pan.
- Quality Cheese Matters: Pre-shredded is convenient, but freshly grated gives you the best melt.
- Keep Toppings Dry: Pat jalapeños and onions dry to avoid soggy buns.
- Monitor the Heat: Too high and the cheese may burn; medium is the sweet spot for perfect melt and crispness.
- Cheese Barrier Trick: The layer of cheese under the hot dog helps prevent the bottom of your bun from getting soggy and adds crazy flavor.
How to Serve

This Hot Dog Grilled Cheese is delicious all on its own, but there are plenty of ways to turn it into a full meal:
Garnishes:
- Pickles, fresh chopped herbs, or a drizzle of extra mustard.
Perfect Pairings:
- Serve with classic potato chips, a crisp green salad, or a tangy coleslaw to balance out the richness.
Dipping Sauces:
- Ketchup, barbecue sauce, ranch, or even a spicy chipotle mayo on the side.
Party Platter:
- Halve the grilled cheeses and serve as finger food for game nights or casual get-togethers.
Make Ahead and Storage
Storing Leftovers
Wrap leftover hot dog grilled cheeses tightly in foil or store in an airtight container in the refrigerator for up to 2 days. They’re still tasty reheated!
Freezing
It’s best to enjoy these fresh for the ultimate cheese pull and crunch, but you can freeze them tightly wrapped for up to 1 month. Allow to thaw fully in the fridge before reheating for best results.
Reheating
Re-crisp on a nonstick skillet over medium-low heat, flipping until hot and the cheese inside is melted again. Avoid microwaving, as the bread can go rubbery.
FAQs
-
Can I use veggie dogs for this recipe?
Absolutely! Any plant-based or turkey hot dogs work just as well—just make sure they’re firm and hold their shape, so you get that great bite. Adjust seasonings to taste, since some alt-proteins soak up more flavors.
-
Should I slice the hot dogs or keep them whole?
Slicing is totally optional, but it helps the seasoning, butter, and mustard penetrate every bite. Plus, it creates more nooks for the crispy cheese to cling to. If you’re in a rush, leaving them whole works, too.
-
Which cheese is best for melting?
Sharp cheddar is classic for its bold flavor and great melt. You can mix in mozzarella for extra gooeyness or use another favorite melting cheese like Monterey Jack or gruyere—never American slices though; they’re too soft for that crispy base.
-
Can I prep these ahead for a party?
You can assemble the buns in advance and store them in the fridge. Toast and add the cheese crust right before serving to keep everything crisp and fresh. They’re a showstopper right off the skillet!
Final Thoughts
This Hot Dog Grilled Cheese is pure comfort food magic—simple, fast, and outrageously delicious. It’s perfect for busy nights or when you just want a little nostalgic fun on your plate. The crazy-good combo of juicy hot dog, tangy mustard, spicy jalapeños, and that golden cheese crust will have everyone coming back for seconds. Roll up your sleeves, give it a try, and discover your new favorite easy meal!
Print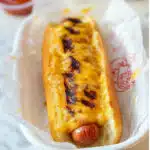
Hot Dog Grilled Cheese Recipe
- Prep Time: 10 minutes
- Cook Time: 15 minutes
- Total Time: 25 minutes
- Yield: 4 hot dogs
- Category: Snacks
- Method: Stovetop
- Cuisine: American
- Diet: Halal
Description
Hot Dog Grilled Cheese is a creative twist on the classic grilled cheese and hot dog combo. Juicy hot dogs are sliced and seasoned, pan-fried, and then nestled inside butter-toasted hot dog buns with melty cheddar cheese, jalapeños, and optional grilled onions. Pan-frying additional cheese onto the outside turns the buns crispy and extra cheesy, giving you the ultimate gooey, flavor-packed comfort food that’s perfect for a satisfying lunch or casual dinner.
Ingredients
For the Hot Dogs
- 4 hot dogs (see notes for brand/type suggestions)
- Classic yellow mustard, as needed
- BBQ or all-purpose seasoning, as needed
For the Buns
- 4 hot dog buns, halved but kept intact
- 2 tbsp butter
For the Cheese Filling & Topping
- 240g / 2 1/2 cups / 8.5oz grated cheddar cheese (see notes)
- Pickled jalapeños, to preference
- Grilled or pan-fried onions, optional
Instructions
- Slice and Season the Hot Dogs: Slice the hot dogs on one side in a crisscross pattern, ensuring you don’t cut all the way through. Brush with mustard and sprinkle your chosen seasoning all over.
- Fry the Hot Dogs: Melt the butter in a large non-stick pan over medium heat. Add the hot dogs and fry for a couple of minutes to heat through and lock in the flavors. The cut side cooks a bit more, so avoid charring them too much. Once done, remove from the pan.
- Toast the Buns: In the leftover butter, toast your hot dog buns (do this in two batches if necessary) until golden and slightly crisp.
- Assemble the Buns: Layer about 1/3 of the grated cheddar cheese into each bun, then top with pickled jalapeños and grilled or pan-fried onions if desired. Place a cooked hot dog in each bun, so it sits just below the top edge of the bun.
- Pan-Fry with Extra Cheese: In the same pan, make two piles of the remaining cheese in the shape of the buns and turn the heat to medium. Place the hot dogs (open side down) onto the cheese piles. As the cheese melts, it will start to attach to the buns and hot dogs. Use a spatula to nudge the cheese inwards as it melts away from the edges.
- Flip and Crisp: Once the cheese has attached and crisped on the underside, carefully flip the buns and crisp up the bottom for another couple of minutes. Work in batches as needed. When finished, remove and let the cheese set and crisp for a few moments.
- Serve: Serve immediately—cheese will get crispier as it cools. Serve with extra sauce if desired.
Notes
- Slicing the hot dogs is optional but increases flavor absorption. Use a hot dog slicer for ease.
- A firmer hot dog, such as ‘Bunlimited classic hot dogs’, works best for grilling and handling.
- All-purpose seasoning is saltier than BBQ—adjust the quantity to your taste, or experiment with your favorite seasoning blends.
- Dedicate about 60g/2oz of cheese per hot dog (1/3 inside the bun, 2/3 for the pan).
- Nutrition facts are for one hot dog grilled cheese.
Nutrition
- Serving Size: 1 hot dog grilled cheese
- Calories: 665 kcal
- Sugar: 4.04 g
- Sodium: 1948 mg
- Fat: 47.11 g
- Saturated Fat: 22.441 g
- Unsaturated Fat: 20.345 g
- Trans Fat: 0.941 g
- Carbohydrates: 26.95 g
- Fiber: 1.8 g
- Protein: 32.45 g
- Cholesterol: 116 mg


