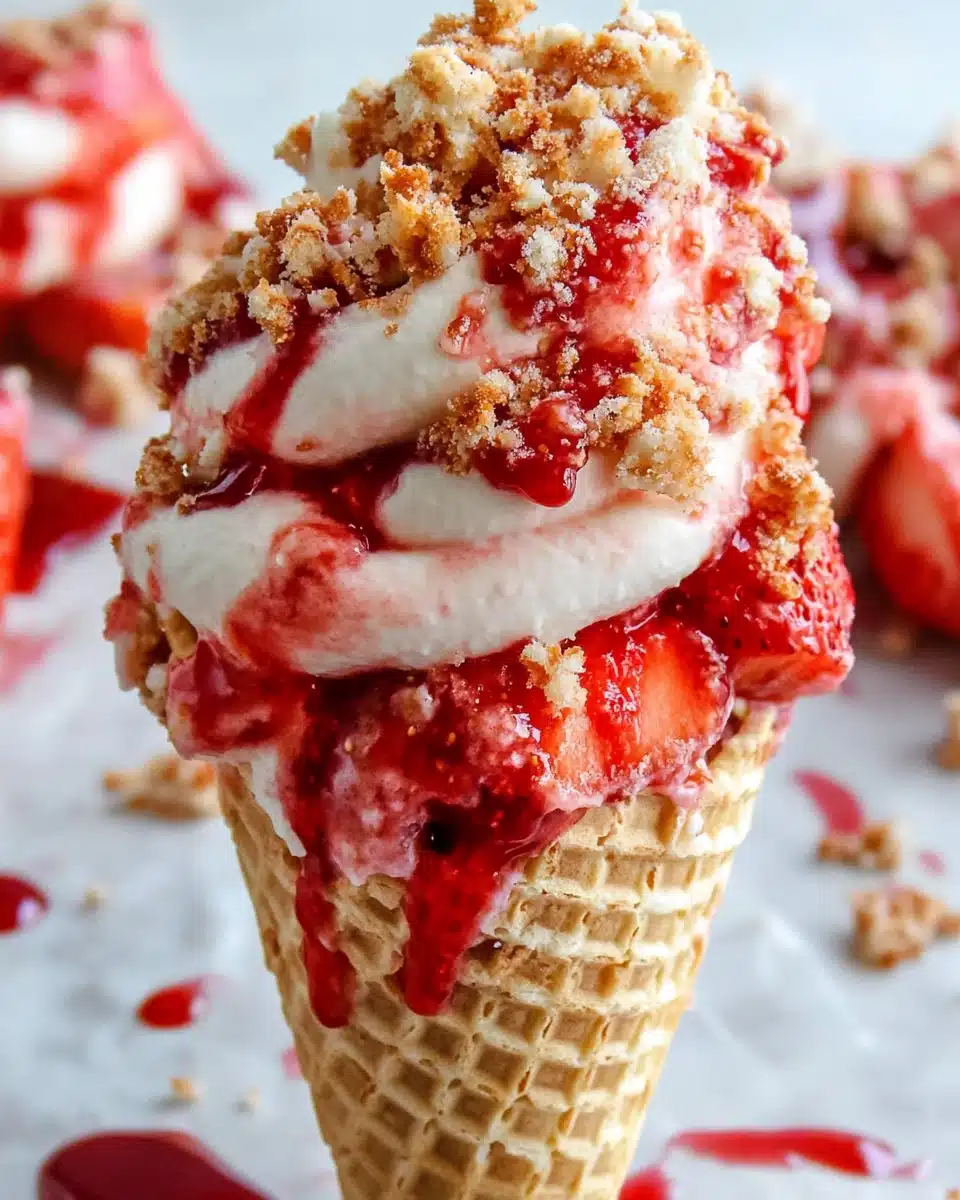
If you’re ready to fall head-over-heels for the sweetest summer treat, meet your new obsession: Strawberry Crunch Cheesecake Cones! Imagine crisp waffle cones dipped in strawberry crunch, piled high with creamy cheesecake filling, fresh strawberries, and drizzled with a luscious strawberry glaze. Every bite is bliss—crunchy, creamy, fruity, and downright addictive.
Why You’ll Love This Recipe
- Showstopping Visuals: The playful layers of strawberry, creamy cheesecake, and golden crunch make these cones truly eye-catching at any gathering.
- No-Bake Simplicity: Skip the oven! These come together fast—perfect for last-minute parties or a sweet craving on a summer afternoon.
- Crunch + Creamy Bliss: That snap of coated cone paired with luxuriously smooth cheesecake filling hits every crave-worthy texture note.
- Totally Customizable: Switch up the flavors, fillings, and toppings to create a cone that’s uniquely yours (or the kids’ new favorite).

Ingredients You’ll Need
These Strawberry Crunch Cheesecake Cones are built on a lineup of ingredients that are simple yet absolutely essential. Each one brings something special to the party—whether it’s sweet flavor, irresistible crunch, or a burst of fruity color.
- Waffle or Sugar Cones (6): The crispy, golden base that holds everything together and adds the perfect crunch.
- Strawberry Crunch Topping (1 cup): This gives the cones that nostalgic strawberry shortcake bar vibe and adds glorious color.
- White Chocolate (5 oz, melted): Acts as a “glue” for the crunch topping while bringing creamy sweetness in every bite.
- No Bake Cheesecake Filling (24 oz premade or homemade): Luxuriously smooth and tangy, this filling is the superstar that makes each cone dreamy.
- Fresh Strawberries (6–8, diced): Chopped strawberries add juicy freshness, giving each bite a burst of summer.
- Strawberry Glaze or Sauce: For extra berry flavor and gorgeous drips down the cone—store-bought or homemade both work beautifully.
Variations
The beauty of Strawberry Crunch Cheesecake Cones is how easy they are to personalize! Whether you’re working around allergies, mixing up flavors, or just using what you have on hand, there’s plenty of room to play.
- Chocolate Lovers’ Twist: Swap the white chocolate for milk or dark chocolate for a decadent coating and a richer flavor.
- Berry Blast: Add blueberries, raspberries, or a mixed berry glaze for colorful variety and over-the-top fruity flavor.
- Gluten-Free: Use gluten-free cones and crunch topping for a treat everyone can enjoy worry-free.
- Mini Dessert Cones: Make adorable bite-sized cones with mini waffle cones—perfect for parties and little hands.
How to Make Strawberry Crunch Cheesecake Cones
Step 1: Dip and Crunch the Cones
Melt your white chocolate according to package instructions until it’s silky smooth. Dip the top part of each waffle cone into the chocolate, let the extra drip off, and then immediately roll the coated part in the strawberry crunch topping. Set the cones on a parchment-lined baking sheet so the chocolate and crunch can firm up—about 5-10 minutes is all it takes.
Step 2: Create the Cheesecake Filling Layers
Transfer your cheesecake filling into a piping bag or a large zip-top bag with the corner snipped off. Fill the cone halfway with filling, then add a generous spoonful of strawberry glaze and a scattering of fresh strawberry chunks. This middle layer gives every bite a juicy surprise!
Step 3: Top Off and Finish with Flair
Continue piping cheesecake filling to the top of each cone. Spoon on more strawberry glaze and extra fresh strawberries for that gorgeous, tempting look. Shower the tops with more strawberry crunch topping, then drizzle over any remaining melted white chocolate. Add another sprinkle of crunch topping while the chocolate sets for ultra-luxe texture.
Step 4: Chill and Serve
Arrange your finished Strawberry Crunch Cheesecake Cones back on the baking sheet and place them in the fridge for 10–20 minutes. This helps everything firm up beautifully and makes serving (and eating!) less messy. Once chilled, they’re ready to wow.
Pro Tips for Making Strawberry Crunch Cheesecake Cones
- Cone Prep Alert: Make sure your cones are totally dry and at room temperature before dipping; moisture can keep the chocolate from sticking properly.
- Cheesecake Filling Consistency: If your filling feels too thick to pipe easily, stir in a splash of milk or cream to loosen it up (but don’t make it runny!).
- Speedy Assembly: Set up a filling “station” with all your toppings ready to go—work quickly to keep cones crisp and the white chocolate perfectly set.
- Strawberry Crunch Hack: If you don’t have store-bought crunch, combine freeze-dried strawberries with crushed golden cookies for a spot-on homemade version.
How to Serve Strawberry Crunch Cheesecake Cones

Garnishes
For the ultimate finish, garnish your cones with extra diced strawberries, a sprig of fresh mint for color, or a cheerful dusting of powdered sugar. If you’re feeling extra fancy, a tiny wedge of strawberry perched on top seals the deal!
Side Dishes
Serve Strawberry Crunch Cheesecake Cones alongside fresh fruit salad, a tall glass of lemonade, or even a bowl of vanilla ice cream for outrageous decadence. They’re also fantastic with coffee or a bubbly mimosa at brunch gatherings.
Creative Ways to Present
Set your cones in tall glasses or a cone holder for an ice cream shop effect, or wrap each cone in parchment and tie with bakers’ twine for a delightful picnic treat. At parties, assemble in a cupcake stand or display them upright in a vase lined with dried beans—adorable and practical!
Make Ahead and Storage
Storing Leftovers
If you have leftovers (which is rare!), place the filled cones upright in a tall container and cover loosely. Keep them in the refrigerator, but know that the cones will begin to soften after a few hours. For best texture, enjoy within 2–3 hours of assembling.
Freezing
It’s best not to freeze the assembled cones, as the cones may turn soggy and the filling’s texture can suffer. However, you can freeze portions of cheesecake filling and strawberry crunch topping separately, then thaw and assemble fresh cones when you’re ready to serve.
Reheating
No reheating needed! Strawberry Crunch Cheesecake Cones are served chilled for maximum refreshment and texture. If your cones have softened, refresh the crunch by sprinkling on a bit more topping before serving.
FAQs
-
Can I make Strawberry Crunch Cheesecake Cones in advance?
You can prepare all the components up to a day ahead—just keep the cheesecake filling and strawberry glaze refrigerated, and store the cones and crunch topping in airtight containers at room temperature. Assemble them right before serving to keep the cones perfectly crisp.
-
What’s the best way to transport Strawberry Crunch Cheesecake Cones to a party?
For easy travel, transport the cones and all their fillings separately, then assemble on-site. Or, place finished cones upright in a deep container, carefully pack with paper towels for support, and keep chilled until you arrive.
-
Can I use homemade cheesecake filling instead of store-bought?
Absolutely! A homemade no-bake cheesecake filling gives fantastic flavor and allows you to control the sweetness—just make sure it’s thick enough to pipe or spoon easily into the cones.
-
How do I make the strawberry crunch topping at home?
To make it from scratch, pulse golden sandwich cookies (like Golden Oreos) and freeze-dried strawberries in a food processor until you have bright pink crumbs. Add a bit of melted butter if you want the mix to cling together a bit more—it’s delicious!
Final Thoughts
Strawberry Crunch Cheesecake Cones are that rare dessert everyone falls for in one bite—bright, joyful, and totally delicious. If you’re craving a treat that’s as much fun to make as it is to eat, give these a try. You might just find they become your new signature celebration sweet!
Print
Strawberry Crunch Cheesecake Cones Recipe
- Prep Time: 20 minutes
- Total Time: 20 minutes
- Yield: 6 cones
- Category: Dessert
- Method: Assembly
- Cuisine: American
- Diet: Vegetarian
Description
These Strawberry Crunch Cheesecake Cones are a delightful dessert that combines the creamy richness of cheesecake with the sweet crunch of strawberries in a fun, portable cone form.
Ingredients
For the Strawberry Crunch Topping:
- 1 cup Strawberry Crunch Topping
For the Cheesecake Filling:
- No Bake Cheesecake Filling (24 oz container or homemade)
- 6-8 strawberries, diced
- 5 oz white chocolate, melted
- Strawberry Glaze or Sauce
- 6 Waffle or Sugar Cones
Additional Ingredients:
Instructions
- Melt white chocolate: Melt white chocolate according to package directions.
- Prepare cones: Dip the top part of a waffle cone into melted chocolate, tap off excess, then roll in strawberry crunch topping.
- Set: Place on parchment-lined sheet to harden for 5-10 minutes.
- Fill cones: Pipe cheesecake filling into cone, add strawberry glaze, fresh strawberries, more filling, and toppings.
- Decorate: Drizzle with melted chocolate, sprinkle with strawberry crunch topping.
- Chill: Chill for 10-20 minutes before serving.
Notes
- You can prepare components up to 1 day in advance.
- Store strawberry glaze and cheesecake filling in the fridge.
- Keep strawberry crunch topping and cones airtight.
- Best when eaten immediately to prevent sogginess.
Nutrition
- Serving Size: 1 cone
- Calories: Approx. 320
- Sugar: Approx. 22g
- Sodium: Approx. 150mg
- Fat: Approx. 18g
- Saturated Fat: Approx. 10g
- Unsaturated Fat: Approx. 6g
- Trans Fat: 0g
- Carbohydrates: Approx. 35g
- Fiber: Approx. 2g
- Protein: Approx. 5g
- Cholesterol: Approx. 20mg


