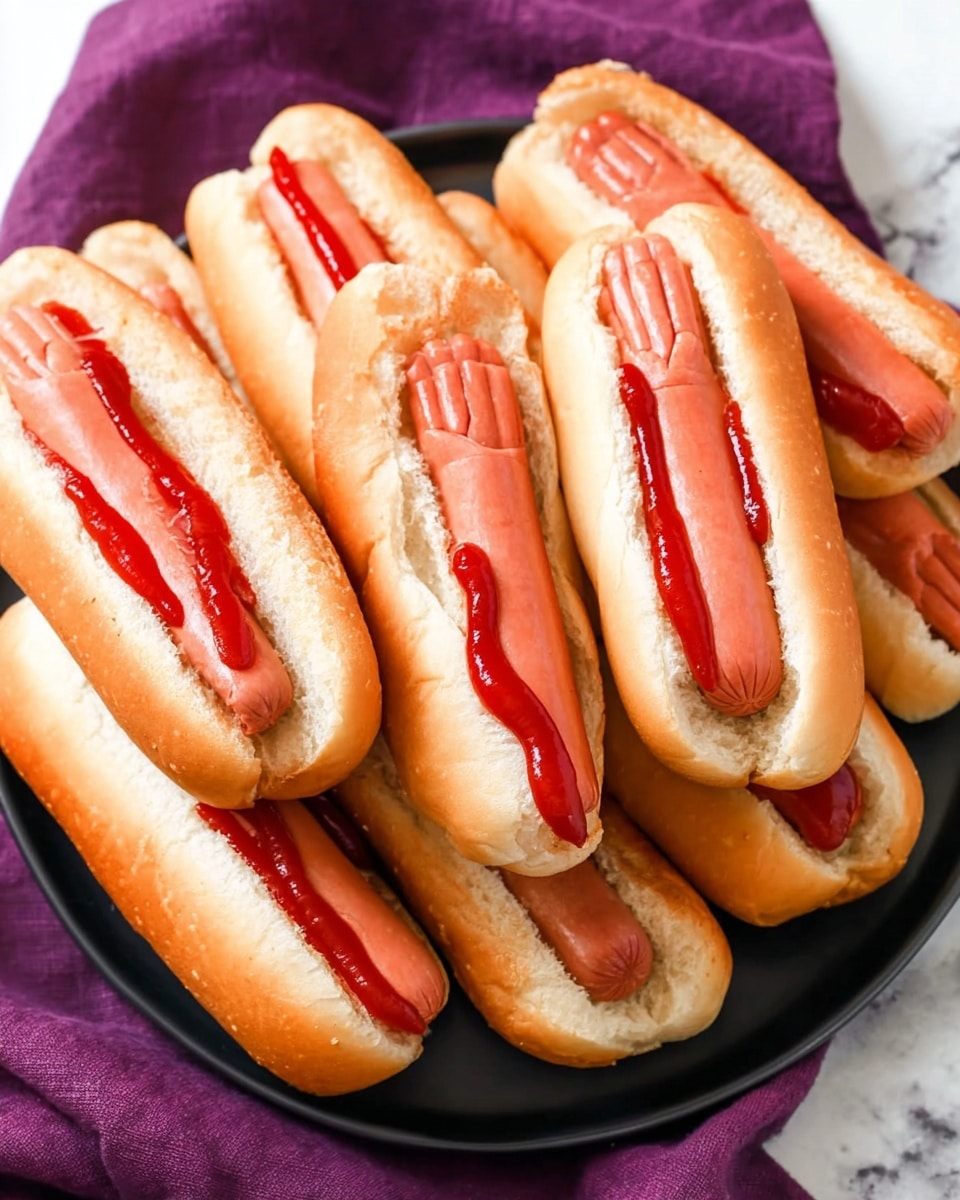
If you’re on the hunt for a spooky yet super fun treat for your Halloween bash, you’ve got to try my Bloody Finger Hot Dogs for Halloween Recipe. Trust me, this isn’t your average hot dog—I absolutely love how these creepy “fingers” come to life with just a few clever cuts and the perfect splash of ketchup “blood.” Whether you’re feeding a crowd of little ghouls or just want to impress your friends, this recipe is wildly simple but wildly effective. Keep reading and I’ll walk you through everything you need to recreate this creepy-cool classic!
Why You’ll Love This Recipe
- Super Easy to Make: Just a few cuts and boiling, and you’re done—perfect for busy Halloween prep.
- Great for All Ages: Kids get a kick out of the “eew” factor while adults appreciate the cleverness.
- Customizable & Fun: Add your own spin with fake nails, different sauces, or spooky garnishes.
- Perfect Party Starter: These bloody fingers are sure to be the star of any Halloween spread.
Ingredients You’ll Need
These simple ingredients combine to make a delightfully gory snack that’s as tasty as it is spooky. When you shop, pick plump hot dogs since they make the best “fingers,” and fresh buns that will hold all the delicious ketchup “blood.”
- Hot dogs: Choose your favorite brand—thicker ones work best for carving the nail and knuckle details.
- Hot dog buns: Soft, fresh buns help cradle your bloody fingers perfectly.
- Ketchup: This is your “blood,” so don’t be shy—look for thick, rich ketchup that stays put.
- Water: For boiling the hot dogs, keep it simple with plain water.
- Optional thinly sliced onion: Use this if you want to make little fingernails—adds extra realism but totally optional.
Variations
I love that this Bloody Finger Hot Dogs for Halloween Recipe is super versatile. I’ve played around with toppings and presentation, so feel free to make it your own and really get creative. It’s one of those recipes where a little tweak makes a big difference in the spook factor!
- With Mustard “Warts”: I once added tiny dots of yellow mustard for a gross wart effect—it cracked up my guests!
- Spicy Blood: Swap ketchup for spicy BBQ sauce or add a few dashes of hot sauce if you like a little kick.
- Vegetarian Version: Try veggie dogs and a vegan-friendly ketchup to keep it meat-free.
- Fingernail Alternatives: Instead of onions, you can use a sliver of almond or even a small dollop of cream cheese dyed with food coloring.
How to Make Bloody Finger Hot Dogs for Halloween Recipe
Step 1: Prepare the “Fingernails” and Knuckles
First things first: carve those nails on your hot dogs to get that eerie finger look. Start by slicing along the two sides of where the nail will be, then cut straight across the top. Next, make a slight curved cut at the bottom of the nail bed to lift that piece off—this is your “fingernail.” When it comes to the knuckle details, cut one slit down the middle of the finger, then add two crescent slits just above and below to mimic knuckles. Don’t forget to add a few more crescent-shaped slits near the nail and at the base of the finger to really bring it to life. This step makes all the difference, so take your time—for me, watching YouTube examples really helped nail this technique.
Step 2: Boil the Hot Dogs
Bring a large pot of water to a boil, then pop in the carved hot dogs. Boil them for 4-5 minutes; this softens the cuts so your fake fingers look just right—not too stiff, not too mushy. I usually keep an eye on them and give one a gentle poke with a fork to test when they’re perfectly tender.
Step 3: Assemble Your Bloody Finger Hot Dogs
Now comes the fun part: slather some ketchup inside each hot dog bun and on the freshly boiled “fingers.” This is your luscious “blood,” so I don’t skimp here. Place the hot dog in the bun, add an extra dollop of ketchup on top to look like fresh blood, and if you’re feeling fancy, add a thin square of onion as the fingernail. My family usually skips the onions because it’s a bit of extra work, but if you want that extra creepy detail, it definitely amps up the realism.
Pro Tips for Making Bloody Finger Hot Dogs for Halloween Recipe
- Sharp Knife is Your Best Friend: A good, sharp paring knife makes carving the nails and knuckles so much easier and safer.
- Don’t Overboil: Overcooking makes your hot dogs too soft, and the details will blur—aim for that perfect 4-5 minute boil.
- Use Thick Ketchup: Thin ketchup runs everywhere and ruins the look; thicker brands or even a quick reduction will stay put better.
- Avoid Sloppy Cuts: Take your time cutting the knuckles and nails. Rushing leads to jagged edges which can look less realistic.
How to Serve Bloody Finger Hot Dogs for Halloween Recipe

Garnishes
I love adding a few spooky garnishes alongside. For me, a sprinkle of fresh chopped parsley gives a nice “mossy” graveyard vibe. If you want to keep it simple, extra ketchup on the side for dipping works wonders. Sometimes I set out a bowl of little eyeball candies nearby just to keep the creepy mood going—you can never have too much Halloween atmosphere!
Side Dishes
Pair these bloody fingers with some classic party sides like crunchy carrot sticks and ranch dip, or spooky black bean dip with tortilla chips. I’ve also served these with sweet potato fries sprinkled with smoked paprika for a nice balance of sweet, smoky, and savory—it’s unexpectedly delicious next to the ketchup “blood.”
Creative Ways to Present
One Halloween, I laid out the bloody finger hot dogs on a tray of crushed ice with fake cobwebs and plastic spiders for full haunted-house vibes. Another time, I used little “graves” made from black sandwich papers next to each finger with names like “Severed Sam” or “Bloody Betty”—kids loved the story behind each! Don’t be afraid to turn this into an interactive display; it’s half the fun.
Make Ahead and Storage
Storing Leftovers
If you happen to have leftovers (sometimes it happens!), wrap each hot dog tightly in plastic wrap and store them in an airtight container in the fridge. I keep them no longer than 2 days because the buns can get soggy and the hot dog texture shifts, but they reheat well if you handle them gently.
Freezing
Freezing assembled bloody finger hot dogs isn’t the best idea because buns get tough when frozen. However, you can freeze the carved hot dogs before boiling them. Just lay them on a tray, freeze until solid, then transfer to a bag and use within 1 month. When ready to use, boil straight from frozen—just add a minute or two to cooking time.
Reheating
To reheat, I pop the hot dogs in simmering water for a minute or two—don’t overcook here or you’ll lose those neat carved details. Toast the buns separately in the oven or toaster for a few minutes so they don’t get soggy. Add ketchup just before serving to keep that fresh “blood” look.
FAQs
-
Can I use pre-cooked hot dogs for this recipe?
Absolutely! Most hot dogs you buy in the store are pre-cooked, so boiling them again is mostly to warm them up and soften the edges for carving the nails and knuckles. Just keep the boiling time short, about 4-5 minutes, to avoid overcooking.
-
Is it necessary to add the onion “nails”?
Nope! The onion nails add an extra realistic touch, but the hot dogs already look convincing without them. If you’re short on time or want to keep things simpler, skipping this step works just fine.
-
How do I make the knuckle slits without the hot dog falling apart?
Using a sharp knife and making shallow, precise cuts is key. Don’t cut too deep—think of scoring the surface rather than slicing all the way through. This way, the knuckles stay intact but still look detailed and creepy.
-
Can I bake these instead of boiling?
You can, but boiling is best for this recipe because it softens the hot dogs nicely, making them easier to cut and giving that squishy, realistic finger texture. Baking might dry them out or toughen the edges, so boiling wins for this effect.
Final Thoughts
This Bloody Finger Hot Dogs for Halloween Recipe is one of those delightfully creepy yet approachable dishes that always steals the show. I still remember the first time I made these for a neighborhood get-together and how everyone’s eyes lit up (and a few squeals too!). It’s such a fun way to bring a little playful spookiness to the table without spending hours in the kitchen. Seriously, if you want a Halloween snack that’s quick, clever, and sure to get laughs (and maybe a little squeamish delight), give this a try—I promise you’ll have as much fun making them as you do eating them!
Print
Bloody Finger Hot Dogs for Halloween Recipe
- Prep Time: 10 minutes
- Cook Time: 10 minutes
- Total Time: 20 minutes
- Yield: 4 servings
- Category: Snack
- Method: Stovetop
- Cuisine: American
Description
Delightfully spooky and fun, these Bloody Finger Hot Dogs are a perfect Halloween treat that transforms ordinary hot dogs into creepy severed fingers. Boiled and carved with knuckle details, then served in buns with ketchup ‘blood’ and optional onion ‘fingernails,’ they bring a playful thrill to any Halloween party or trick-or-treat snack.
Ingredients
Hot Dogs and Buns
- 4 hot dogs
- 4 hot dog buns
Toppings and Extras
- Enough ketchup for smearing and filling buns (about 1/4 cup)
- Optional: thinly sliced white onion for fingernails
- Water for boiling hot dogs (enough to fill pot)
Instructions
- Boil Water: Start by filling a large pot with water and bring it to a rolling boil on the stovetop.
- Prepare Fingernails: Slice the sides of the hot dog’s tip where the fingernail will be, then cut straight across the top. Next, make a slight curved slice under this to form the nail bed. Carefully cut off this small piece to create a fingernail shape. Refer to photos for sizing guidance.
- Carve Knuckles: On the main hot dog ‘finger,’ make one straight slit along the middle to represent the knuckle crease, then create two crescent-shaped slits above and below this slit. Midway between this knuckle and the nail, add two more crescent slits, plus two additional crescent slits near the bottom to simulate knuckle wrinkles.
- Boil Hot Dogs: Place the carved hot dogs into the boiling water and cook for 4-5 minutes until heated through and slightly softened.
- Assemble ‘Bloody Fingers’: Spread ketchup liberally on the inside bottom of each hot dog bun. Smear some ketchup on the carved ‘finger’ to mimic blood, then place the hot dog inside the bun.
- Add Fingernails (Optional): Top each ‘finger’ with a thin square slice of white onion to simulate a fingernail for extra spooky detail, if desired.
Notes
- These Bloody Severed Finger Hot Dogs take “finger food” to an extreme and are perfect for Halloween parties or pre-trick-or-treat snacks.
- Be cautious when slicing the hot dogs to avoid injury.
- The ketchup mimics blood, so use as much as you like for a more dramatic effect.
- The onion fingernails add detail but are optional and a little more work.
Nutrition
- Serving Size: 1 hot dog with bun
- Calories: 280
- Sugar: 4g
- Sodium: 700mg
- Fat: 14g
- Saturated Fat: 6g
- Unsaturated Fat: 7g
- Trans Fat: 0g
- Carbohydrates: 26g
- Fiber: 1g
- Protein: 11g
- Cholesterol: 30mg


