
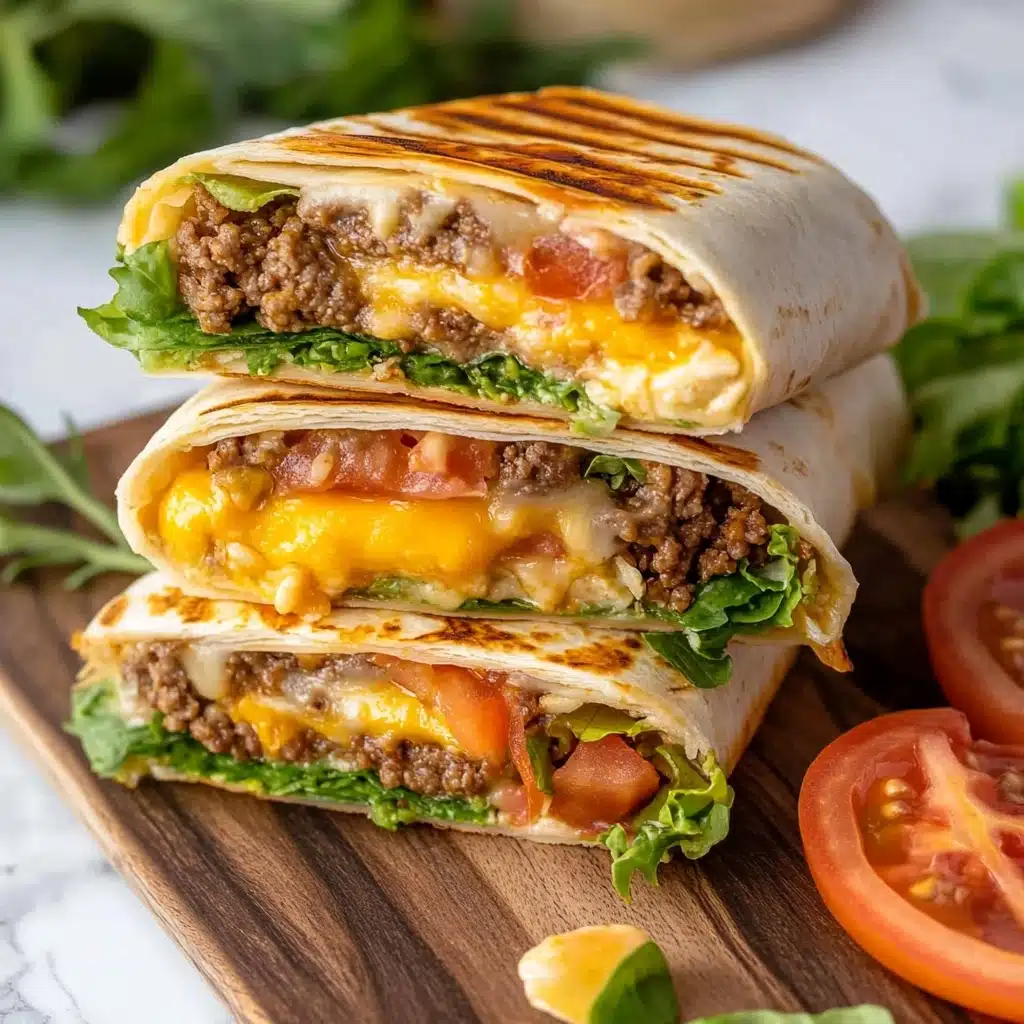
If you’re craving big cheeseburger flavor but want something hand-held, portable, and just a little bit fun, this Cheeseburger Wrap is going to be your new obsession. Imagine classic burger taste—juicy, cheesy, loaded with all the good stuff—rolled up in a toasted tortilla and ready to go in about 30 minutes!
Why You’ll Love This Recipe
- Ultimate Burger Flavor, No Grill Required: You get everything you love about a cheeseburger, without firing up the barbecue—just easy stovetop magic!
- Ready in a Flash: From start to finish, these wraps come together in just about 30 minutes, which makes them perfect for busy weeknights.
- Family-Friendly and Customizable: Everyone can pick their fillings and sauces, making dinner interactive, fun, and totally tailored to each eater.
- Less Mess, More Fun: Roll up the goodness for a meal that’s portable and picnic-ready—with zero burger drips!

Ingredients You’ll Need
These ingredients are simple but play an essential role in building all the beloved flavors of a cheeseburger, while keeping this wrap juicy, satisfying, and bursting with color and texture in every single bite.
- Lean ground beef (1 pound): The heart of this recipe—juicy, meaty, and packed with savory flavor when browned just right.
- Worcestershire sauce (1 tablespoon): Adds a subtle, smoky depth that brings out the burger vibes.
- Ketchup (1 tablespoon): Sweet and tangy, it ties together the seasonings and adds classic burger flavor.
- Grated parmesan (1 tablespoon): A flavorful surprise—adds umami, a hint of salt, and helps the beef mixture bind together.
- Onion powder (1 teaspoon): Gives you that savory, classic burger aroma even if you skip the diced onions!
- Garlic powder (1 teaspoon): For a gentle, warm, garlicky kick that rounds out the filling.
- Salt & black pepper (1/8 teaspoon each): A must for balancing all the other flavors and making the beef extra craveable.
- Tortilla wraps (5 medium): Soft, pliable, and perfect for rolling—choose flour tortillas for best results.
- American cheese (5 slices): Melty, creamy, and totally nostalgic—always the best “cheeseburger” cheese!
- Roma tomatoes (2, sliced): Juicy and vibrant for a bit of cool, fresh contrast.
- Romaine lettuce (1 cup): Crunchy, leafy, and a classic burger topping.
- Diced onions (optional): If you love a stronger onion taste and a little extra crunch, toss them in!
- Condiments (ketchup, mustard, mayo, relish—optional): For drizzling, dunking, or boosting that restaurant-style flavor your way.
Variations
The beauty of a Cheeseburger Wrap is how easy it is to make it your own, whether you’re looking to lighten things up, make it vegetarian, or just use up what’s in your fridge. Here are some of my favorite twists:
- Turkey or Chicken Wrap: Swap the ground beef for ground turkey or chicken for a lighter, leaner protein hit.
- Vegetarian Cheeseburger Wrap: Try a plant-based ground meat substitute and your favorite vegan cheese for a totally veggie-friendly spin.
- Bacon Explosion: Add a few strips of crispy bacon to the filling before wrapping for a smoky, indulgent treat.
- Spicy Kick: Stir some pickled jalapeños or a drizzle of sriracha into the beef mixture for heat-lovers.
- Low-Carb Option: Make it gluten-free with low-carb or spinach tortillas, or even wrap in hearty lettuce leaves instead of tortillas.
How to Make Cheeseburger Wrap
Step 1: Brown the Beef
Heat a large skillet over medium, coat lightly with cooking spray, and add the ground beef. Let it cook for about 7-10 minutes, breaking the meat apart as you go, until it’s mostly cooked through but still just slightly pink in the center. This helps keep the beef juicy and not overdone before adding all the seasoning goodness.
Step 2: Season and Finish the Filling
Mix in Worcestershire sauce, ketchup, parmesan, onion powder, garlic powder, salt, and pepper directly into the skillet with the beef. Stir until everything is beautifully combined, and cook for another minute or two, until the beef is fully cooked and no pink remains. Taste for seasoning—this is when you’ll start smelling those burger shop aromas!
Step 3: Layer the Fillings
Lay a tortilla flat on your work surface and place a slice of American cheese in the center. Spoon about 1/3 cup of the beef mixture on top, then add slices of tomato, handfuls of lettuce, and any diced onions you love. For that true cheeseburger wrap experience, dollop on ketchup, mustard, mayo, or relish—whatever says “burger night” to you!
Step 4: Wrap and Grill
Roll up the tortilla nice and snug, folding in the sides like a burrito. Place seam side down on a preheated indoor grill or skillet over medium-high heat. Grill each wrap for 3-4 minutes, until golden with gorgeous grill marks, then flip and grill the other side another 3-4 minutes. This extra step crisps up the wrap and ensures everything’s melty and delicious inside.
Step 5: Serve and Enjoy!
Once the Cheeseburger Wrap is grilled and golden, take it off the heat, let it sit for a minute (you don’t want molten cheese burns!), then cut in half. Repeat with the remaining wraps and you’re ready for a seriously satisfying meal.
Pro Tips for Making Cheeseburger Wrap
- Tortilla Warm-Up: Warm your tortillas before assembling—either a quick zap in the microwave or on a dry skillet—so they’re pliable and won’t tear when you roll.
- Don’t Overfill: Resist the urge to pile in too much filling; about 1/3 cup of beef mixture per wrap is perfect for rolling and grilling with no spillage.
- Double Cheese Layer: If you’re a cheese lover, add an extra half-slice of American cheese below the beef for ooey-gooey melt in every bite.
- Batch Prep for Busy Nights: Make the beef filling ahead and stash it in the fridge—then just assemble, grill, and eat when hunger strikes!
How to Serve Cheeseburger Wrap
Garnishes
A sprinkle of sesame seeds around the plate, extra diced onions, or a pickle spear tucked alongside will bring out those old-school diner vibes and give each Cheeseburger Wrap a fun finishing touch. If you want to get fancy, drizzle some “special sauce” (just mix ketchup, mayo, and a touch of relish) over the cut halves before serving!
Side Dishes
Classic crinkle fries, sweet potato fries, homemade potato chips, or even a crisp side salad are right at home next to these wraps. Pair with a crunchy pickle, some carrot sticks, or air-fried onion rings for that real burger-joint feel—don’t forget plenty of napkins!
Creative Ways to Present
For parties, cut each Cheeseburger Wrap into pinwheel slices and skewer with toothpicks for a fancier, bite-sized take. Or, slice wraps diagonally and stack them on a platter, jazzed up with small bowls of dipping sauces for a family-style feast. Even lunchboxes get an upgrade when you wrap these in parchment and add a “burger bar” of toppings on the side!
Make Ahead and Storage
Storing Leftovers
Leftover wraps should be cooled, then wrapped tightly in foil or plastic wrap and stored in the fridge. They’ll stay perfect for up to 3 days—just keep any fresh toppings separate until ready to reheat so you don’t lose that lettuce crunch!
Freezing
The beef filling for Cheeseburger Wraps freezes beautifully. Cool it fully, portion into airtight bags or containers, label, and freeze for up to 2 months. Thaw overnight in the fridge and reheat before assembling—super meal-prep friendly!
Reheating
To reheat assembled wraps, pop them on a skillet or grill pan over medium until heated through and re-crisped—about 3 minutes per side. Avoid the microwave if possible, as it tends to make tortillas rubbery; if you must, use short bursts and a damp paper towel to keep things soft.
FAQs
-
Can I make Cheeseburger Wraps ahead of time?
Absolutely! Prepare the beef filling in advance and store it in the refrigerator for up to 3 days. When ready to serve, reheat the filling, assemble the wraps with your toppings, and grill to order for fresh, melty goodness every time.
-
What tortillas work best for Cheeseburger Wraps?
Medium-sized flour tortillas are your best bet—they’re flexible, soft, and hold all the fillings perfectly. Avoid corn tortillas, which tend to break; for a gluten-free option, choose a gluten-free or low-carb flour-style wrap.
-
How do I prevent the wrap from getting soggy?
Let the beef filling cool slightly before assembling, and always keep the lettuce and tomatoes between the cheese and beef to act as a barrier. Add sauces right before serving, and grill the wrap to seal in the filling and keep things crisp!
-
What’s the best way to add more vegetables to Cheeseburger Wraps?
Feel free to pile in extras like sliced pickles, sautéed mushrooms, grilled bell peppers, or baby spinach for more color, crunch, and nutrition. This wrap is the perfect place to get creative with your favorite burger-friendly veggies!
Final Thoughts
Give these Cheeseburger Wraps a try the next time a burger craving hits or you need a dinner everyone will love. They’re quick, customizable, and every bite packs all the coziness of “burger night” with a fun, crowd-pleasing twist. Gather your favorite people, pile up your toppings, and enjoy—you’re about to earn hero status at the dinner table!
Print
Cheeseburger Wrap Recipe
- Prep Time: 15 minutes
- Cook Time: 15 minutes
- Total Time: 30 minutes
- Yield: 5 wraps
- Category: Main Course
- Method: Grilling
- Cuisine: American
- Diet: None
Description
These Cheeseburger Wraps are a fun twist on a classic cheeseburger, with all the flavors you love wrapped up in a convenient tortilla. Perfect for a quick and satisfying meal!
Ingredients
For the beef mixture:
- 1 pound lean ground beef
- 1 tablespoon Worcestershire sauce
- 1 tablespoon ketchup
- 1 tablespoon grated parmesan
- 1 teaspoon onion powder
- 1 teaspoon garlic powder
- 1/8 teaspoon salt
- 1/8 teaspoon pepper
Additional Ingredients:
- 5 medium tortilla wraps
- 5 slices American cheese
- 2 Roma tomatoes, sliced
- 1 cup romaine lettuce
- Diced onions (optional)
- Condiments (ketchup, mustard, mayonnaise, relish) (optional)
Instructions
- Cook the beef: In a large skillet coated with cooking spray, cook the beef on medium heat until almost cooked through but still slightly pink (about 7-10 minutes). Break beef up as it cooks.
- Season the beef: Stir in Worcestershire sauce, ketchup, grated parmesan, onion powder, garlic powder, salt, and pepper. Mix until well combined.
- Finish cooking: Continue cooking the meat mixture until the beef is fully cooked through.
- Assemble the wraps: Place a slice of cheese and beef mixture in the center of each wrap. Add tomato, lettuce, and optional onions. Top with condiments.
- Grill the wraps: Roll up the wraps and grill seam side down for 3-4 minutes. Flip and grill for another 3-4 minutes until grill marks appear.
- Serve: Remove from the grill and serve immediately. Enjoy!
Notes
- Storage Tips:
- For the week: Make the beef filling ahead and store in the fridge. Warm up before making wraps.
- For the freezer: Freeze cooled filling in an airtight container. Thaw before use.
Nutrition
- Serving Size: 1 wrap
- Calories: 396 kcal
- Sugar: 6g
- Sodium: 662mg
- Fat: 17g
- Saturated Fat: 7g
- Unsaturated Fat: 8g
- Trans Fat: 0g
- Carbohydrates: 33g
- Fiber: 7g
- Protein: 26g
- Cholesterol: 71mg


