If you’re on the hunt for an irresistible, crowd-pleasing appetizer, you have to try this Cheesy Chili Dip Recipe. It’s one of those simple yet wildly flavorful dishes that turns any gathering into a party. I absolutely love how this dip combines the creamy tang of cream cheese with the rich, spiced goodness of Cincinnati-style chili and melty cheddar cheese on top. Trust me, once you whip this up, you’ll find yourself reaching for Fritos or tortilla chips a little more often because it’s just that good!
Why You’ll Love This Recipe
- Incredible Flavor Contrast: The creamy base with spicy chili and melted cheddar creates a perfect balance that’s addictively delicious.
- Super Quick and Easy: You’ll have this dip ready in just about 30 minutes—perfect for last-minute guests or game day cravings.
- Family Favorite: This recipe has been a hit at every party and potluck I’ve brought it to, making it a guaranteed crowd-pleaser.
- Versatile and Customizable: You can easily tweak it to fit your taste buds or dietary needs without losing any of the amazing flavor.

Ingredients You’ll Need
The ingredients in this Cheesy Chili Dip Recipe are simple but perfectly complementary. Each one plays a key role: the cream cheese gives it that rich smooth texture, the Skyline chili delivers its unique spiced punch, and the cheddar cheese melts into a bubbly, golden topping. Shopping tip: grab a good-quality cream cheese and a chili you love, since their flavors really shine here.
- Cream Cheese: Make sure it’s softened to room temperature for easy spreading and smooth layering.
- Skyline Chili (or Cincinnati-style chili): This is the star spice component; if you can’t find Skyline brand, choose a similar spiced chili for best results.
- Cheddar Cheese: Freshly shredded cheddar melts best—avoid pre-shredded if you can for a luscious, gooey finish.
Variations
I love personalizing this Cheesy Chili Dip Recipe to suit different occasions or cravings. Don’t hesitate to experiment with adding a few twists based on what you have at home or your heat preference—making a dip your own is half the fun!
- Spicy Kick: When I want a little extra zing, I add a handful of diced jalapeños or a dash of hot sauce to the chili layer—it gives the dip a welcomed surprise!
- Cheese Blend: Instead of just cheddar, mixing in some pepper jack or mozzarella cheeses offers a fantastic melty texture and flavor complexity.
- Meatless Option: Use a vegetarian chili for a meat-free dip that still packs loads of flavor.
- Extra Creamy: Stir in a little sour cream or cream cheese into the chili for an even richer texture.
How to Make Cheesy Chili Dip Recipe
Step 1: Prep and Layer the Base
First things first, preheat your oven to 350°F. While it warms up, grab an 8 or 9-inch pie plate and spread the softened cream cheese evenly across the bottom. You want a nice, smooth layer since this creamy base balances the chili’s bold flavor. I find using room-temp cream cheese makes this step much easier—no stubborn lumps!
Step 2: Add the Chili Layer
Next, spoon the Skyline chili over the cream cheese layer. Spread it gently to cover the surface evenly—you won’t want any gaps because every bite should have that signature chili goodness. A little tip I learned: drain any excess liquid from the chili so your dip doesn’t get watery as it bakes.
Step 3: Top with Shredded Cheese and Bake
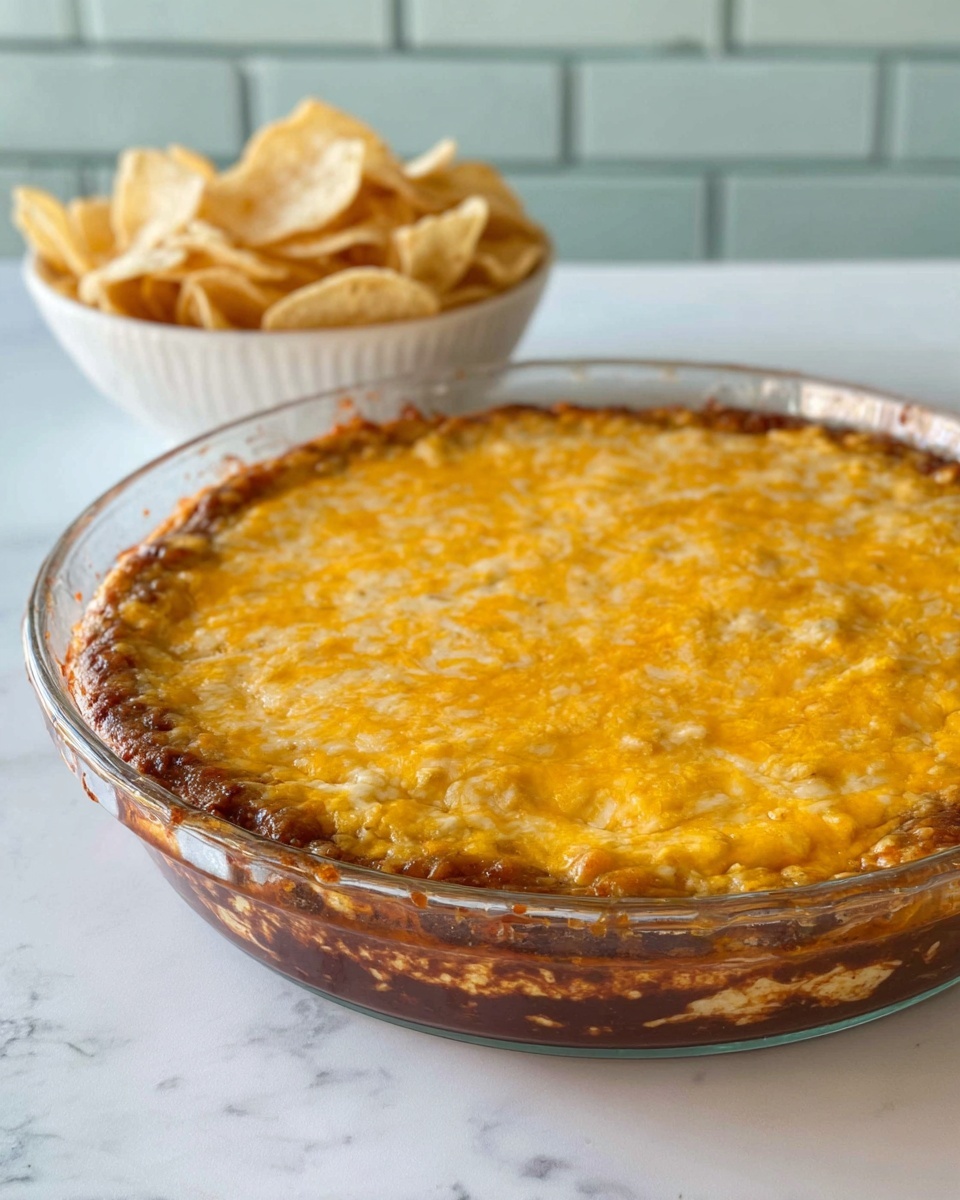
Finally, sprinkle 1 ½ cups of shredded cheddar cheese over the chili. I joyfully pile it on because that cheesy crust is the best part! Pop it into your preheated oven for about 20 minutes until the cheese is melted, bubbly, and lightly golden around the edges. You’ll want to watch it carefully near the end to avoid burning, but don’t rush—this baking time is key for perfect gooeyness.
Step 4: Let It Rest and Serve
Once out of the oven, let the dip stand for 5 minutes—this helps it set just enough so it’s easy to scoop but still warm and melty. Serve right away with Fritos scoops or your favorite tortilla chips for dunking. I remember the first time I brought this to a potluck; my family and friends literally fought over the last scoop!
Pro Tips for Making Cheesy Chili Dip Recipe
- Room Temperature Cream Cheese: Always let your cream cheese sit out for 30 minutes before spreading; it smooths layering and prevents lumps.
- Drain Excess Chili Liquid: Too much liquid will make your dip watery—draining it before layering creates a thicker, creamier dip.
- Use Freshly Shredded Cheese: It melts better and gives you that irresistible gooey texture compared to pre-shredded.
- Rest Before Serving: Don’t skip the 5-minute rest after baking; it lets the layers set just enough to make scooping easier without cooling off too much.
How to Serve Cheesy Chili Dip Recipe

Garnishes
I like to top this dip with a sprinkle of chopped green onions or fresh cilantro just before serving—it adds a fresh, vibrant pop and balances the rich, cheesy layers. Sometimes I also add a few diced tomatoes or a dollop of sour cream for an extra creamy touch.
Side Dishes
This dip pairs perfectly with crunchy Fritos scoops or sturdy tortilla chips, which are sturdy enough to hold a good scoop. I also love serving it alongside sliced veggies like bell peppers and cucumbers for a lighter option, or with a simple green salad to round out the snack table.
Creative Ways to Present
For parties, I sometimes serve the dip in a hollowed-out bread bowl for a fun, rustic look that doubles as extra dipping goodness once your friends finish the dip. You can also layer it in a clear glass casserole dish so everyone can admire those beautiful layers before digging in!
Make Ahead and Storage
Storing Leftovers
Leftover Cheesy Chili Dip keeps well in an airtight container stored in the fridge for up to 3 days. I usually cover it tightly with plastic wrap or a lid and give it a good stir before reheating to bring those layers back together.
Freezing
I’ve frozen this dip a couple of times, especially when I made too much for a party. Wrap it well and store it in a freezer-safe container for up to 2 months. When thawed slowly in the fridge overnight, it maintains its texture and flavor pretty well after reheating.
Reheating
To reheat, I prefer the oven or toaster oven at 350°F for about 10 minutes until warm and bubbly again—microwaving works but sometimes makes the texture a bit rubbery. Stirring halfway through reheating helps the cheese melt evenly.
FAQs
-
Can I use a different type of chili for this dip?
Absolutely! While Skyline chili gives this dip its signature Cincinnati flavor, you can use any chili you like—just choose one that’s not too watery to prevent sogginess. A thicker, well-seasoned chili works best for flavor and texture balance.
-
Is it necessary to bake the dip, or can it be served cold?
Baking is definitely key here since it melts the cheese perfectly and warms the chili, bringing out those vibrant flavors. Serving it cold would leave the cream cheese layer too firm and the cheese unmelted, which changes the texture and overall experience.
-
How spicy is this Cheesy Chili Dip Recipe?
The heat level depends mostly on the chili you use. Skyline chili is mildly spiced but packed with flavorful seasonings. If you prefer milder or spicier dips, you can adjust by choosing a chili with less or more heat, or adding jalapeños and hot sauce as you like.
-
Can I make this dip ahead of time?
Yes! You can assemble the dip up to a day before and refrigerate it, then bake it right before serving. Just cover tightly to prevent drying out, and bring it to room temperature before baking for best results.
Final Thoughts
This Cheesy Chili Dip Recipe has quickly become one of my all-time favorite dips because it’s effortless, practical, and seriously delicious. It’s perfect for any casual get-together or whenever you need a little comfort food fix. I love how simple ingredients come together to make something so comforting and satisfying. If you’re looking to impress with minimal effort, this dip should definitely be on your recipe list—you’ll thank me later when everyone’s reaching for seconds!
Print
Cheesy Chili Dip Recipe
- Prep Time: 5 minutes
- Cook Time: 20 minutes
- Total Time: 30 minutes
- Yield: 8 servings
- Category: Appetizer
- Method: Baking
- Cuisine: American
Description
Skyline Dip, also known as Chili Cheese Dip, is a delicious layered appetizer featuring a smooth cream cheese base topped with flavorful Cincinnati-style Skyline chili and melted cheddar cheese. Baked until bubbly and perfect for serving with Fritos scoops or tortilla chips, this dip is a crowd-pleaser ideal for gatherings or casual snacking.
Ingredients
Ingredients
- 1 (8 oz) block cream cheese, softened
- 1 (15 oz) can Skyline Chili
- 1 1/2 cups cheddar cheese, shredded
Instructions
- Preheat Oven: Preheat your oven to 350 degrees Fahrenheit to prepare for baking the dip.
- Layer Cream Cheese: Spread the softened cream cheese evenly in the bottom of an 8 or 9-inch pie plate, creating a smooth base layer.
- Add Chili Layer: Pour the entire can of Skyline Chili over the cream cheese layer, spreading it evenly.
- Top with Cheese: Sprinkle the shredded cheddar cheese evenly over the chili layer to cover it completely.
- Bake: Place the pie plate in the preheated oven and bake for 20 minutes until the cheese is melted and bubbly.
- Let Stand: Remove from the oven and let the dip sit for 5 minutes before serving to allow it to set slightly and cool.
- Serve: Enjoy the Skyline Dip warm with Fritos scoops, tortilla chips, or your favorite dippers.
Notes
- Skyline dip is a fan favorite in many households, known for its combination of creamy cheese and Cincinnati-style chili.
- Using softened cream cheese ensures that the base layer spreads easily and blends well with the chili.
- For best flavor, use authentic Skyline chili, but any Cincinnati-style chili can work as a substitute.
- Adjust the amount of cheese to your liking for a cheesier or lighter topping.
- This dip pairs wonderfully with Fritos scoops, tortilla chips, or even fresh vegetables for dipping.
Nutrition
- Serving Size: 1/8 of recipe (approx. 1/2 cup)
- Calories: 210
- Sugar: 3g
- Sodium: 520mg
- Fat: 16g
- Saturated Fat: 10g
- Unsaturated Fat: 5g
- Trans Fat: 0g
- Carbohydrates: 7g
- Fiber: 1g
- Protein: 8g
- Cholesterol: 45mg


