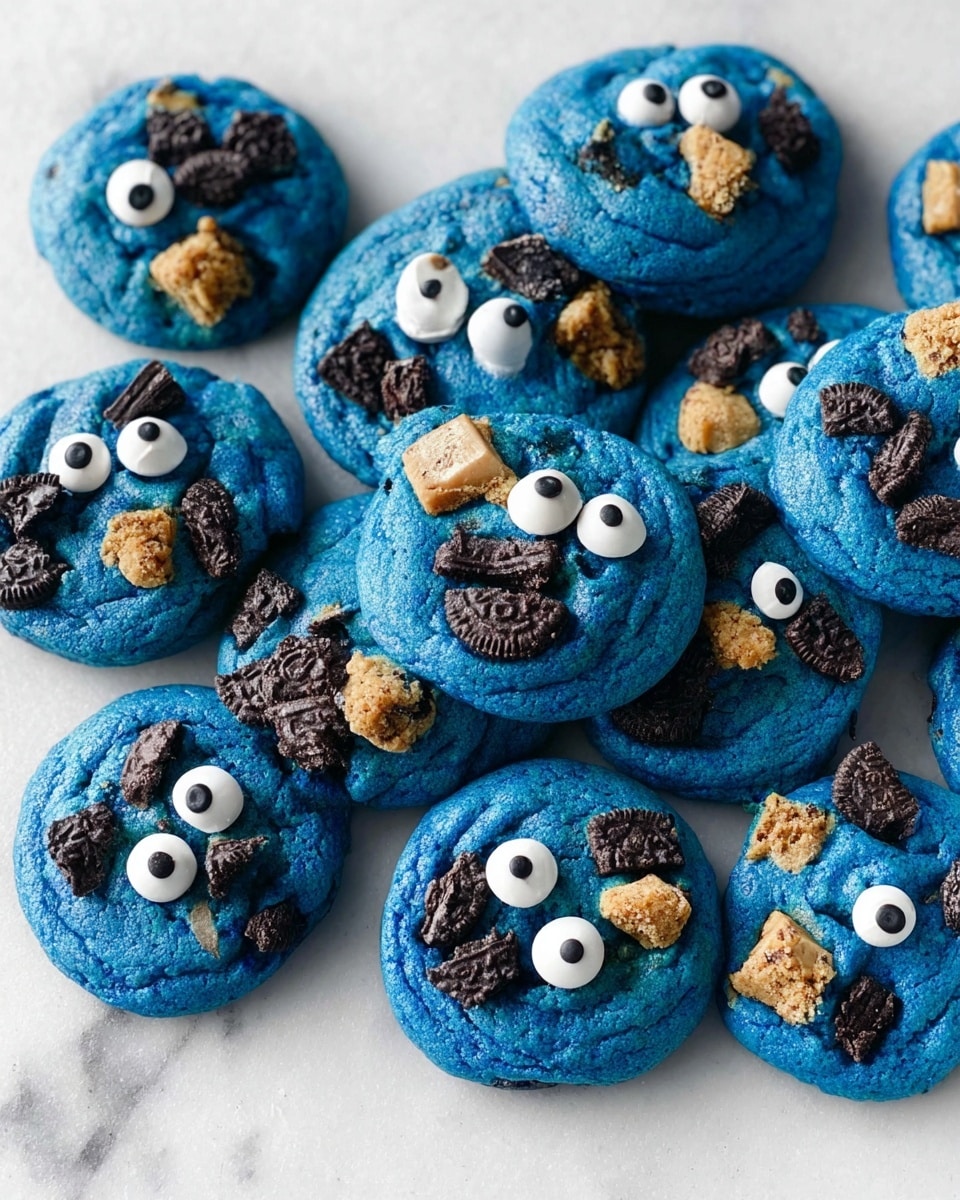
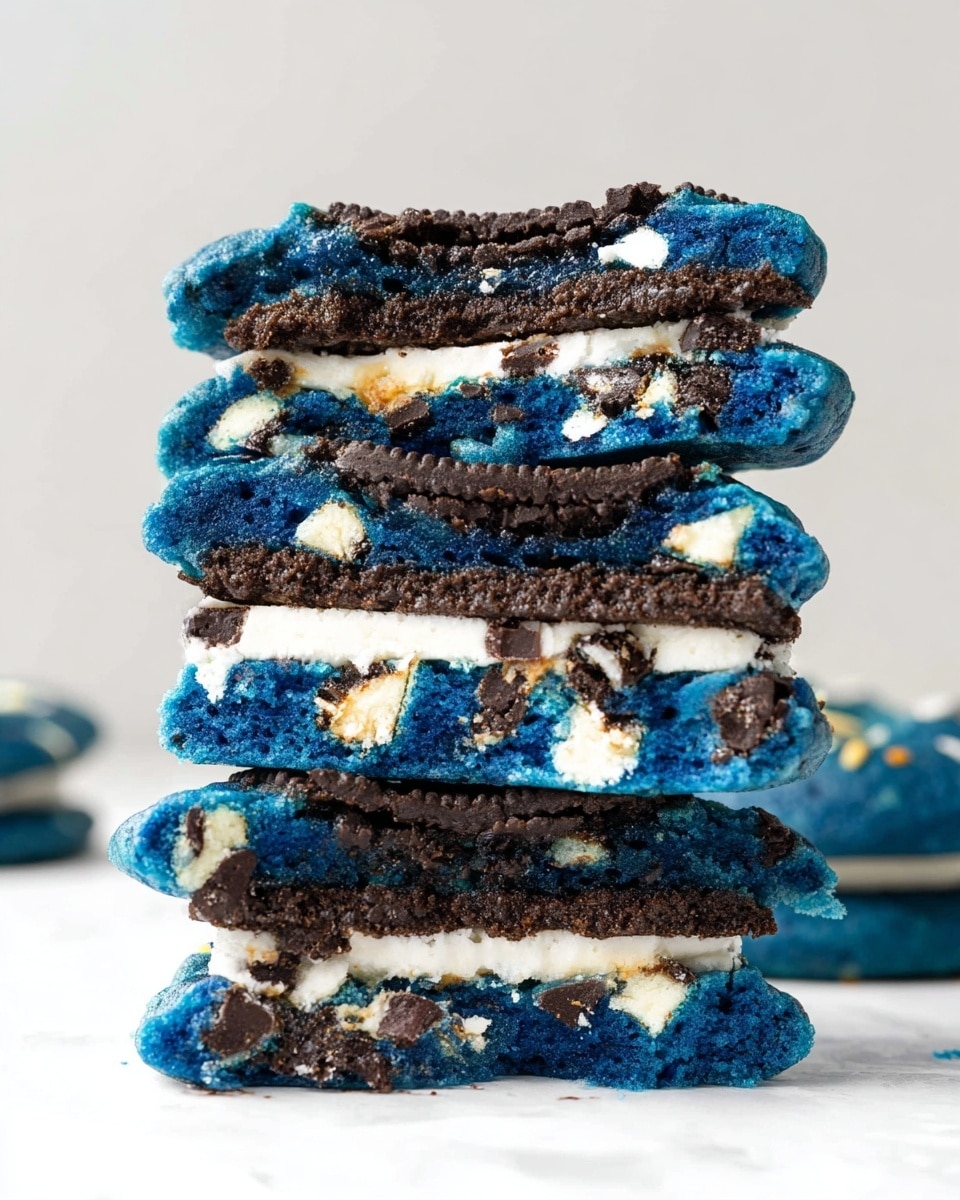
I absolutely love this Cookie Monster Cookies with Stuffed Chocolate and Cookie Fillings Recipe because it’s like the ultimate cookie indulgence wrapped up in one colorful bite. When I first tried these, the combination of the soft, chewy cookie dough with that molten milk chocolate or crunchy cookie center had me hooked immediately. You’ll find that these cookies bring so much fun to any party or just a cozy night in—they’re as playful as they are delicious.
What makes this Cookie Monster Cookies with Stuffed Chocolate and Cookie Fillings Recipe truly special is how customizable it is and how perfectly that bright blue dough sets the mood for cookie magic. Whether you’re stuffing them with milk chocolate bars or whole Oreo cookies, every bite offers a surprise. Trust me, once you master these, they become your go-to recipe whenever you want something that’s extra impressive yet totally doable at home.
Why You’ll Love This Recipe
- Fun and Vibrant: The bright blue dough brings playful flair, making the baking experience joyful and kid-approved.
- Melty Surprises Inside: Stuffed with chocolate bars or whole cookies that ooze or crunch with every bite.
- Chewy and Satisfying Texture: Using bread flour gives these cookies that perfect chewiness you’ll crave again and again.
- Flexible & Easy to Make: Whether you’re making smaller or larger cookies, this recipe adapts well to your needs.
Ingredients You’ll Need
The magic of this Cookie Monster Cookies with Stuffed Chocolate and Cookie Fillings Recipe starts with familiar ingredients that come together in a fun new way. Using bread flour is a game-changer here—it gives the cookies a dense, chewy texture that you won’t get with regular flour. Don’t skimp on the vanilla and food coloring — they really bring the flavor and visual punch.
- Butter: Use softened butter for easy creaming, which creates a tender cookie base.
- Brown Sugar: Adds that deep caramel note and moisture for chewiness.
- Granulated Sugar: Balances sweetness and helps with structure.
- Vanilla Extract: A quality vanilla makes the flavors pop beautifully.
- Eggs: Acts as a binder and adds richness.
- Royal Blue Gel Food Coloring: More concentrated than liquid, this gives that perfect Cookie Monster blue.
- Bread Flour (or All-purpose Flour): Bread flour ups the chew, but all-purpose works if that’s what you have.
- Baking Powder & Baking Soda: Together, these help the cookies rise with a light crumb.
- Salt: Brings out the sweetness and balances the flavors.
- Crushed Cookies (Oreo/Chips Ahoy): Adds texture and cookie chunks inside.
- White Chocolate Chips: For pockets of creamy sweetness.
- Milk Chocolate Chips: Classic melty goodness.
- Stuffing Options (Milk Chocolate Bars or Whole Cookies): These are the stars you stuff inside for that delightful surprise.
- Topping (More Crushed Cookies and Candy Eyeballs): For crunch and that iconic Cookie Monster charm.
Variations
I love how customizable this Cookie Monster Cookies with Stuffed Chocolate and Cookie Fillings Recipe is—over time, I’ve played around with fillings and toppings to keep things fresh and exciting. Feel free to get creative and swap out the stuffing or add your favorite mix-ins; you can make it your very own signature cookie!
- Swapping Fillings: I once used salted caramel-filled chocolates instead of milk chocolate for a gooey, salty-sweet surprise that blew everyone away.
- Nut-Free Version: Using allergy-friendly cookie fillings and skipping chocolate chips is a great way to keep it safe for all guests.
- Seasonal Colors: For holidays, I substitute the blue with red or green gel food coloring to match the season.
- Smaller Bite Sizes: Using a tablespoon scoop with mini cookies inside makes cute, bite-sized treats perfect for kids’ lunchboxes.
How to Make Cookie Monster Cookies with Stuffed Chocolate and Cookie Fillings Recipe
Step 1: Cream the Butter and Sugars
Start by combining the softened butter, brown sugar, granulated sugar, and vanilla in a large mixing bowl. Beat these on medium speed for about 6 to 8 minutes until the mixture is soft, fluffy, and lightened in color. Trust me, taking the time here is key for that perfect cookie texture. Don’t forget to stop halfway through and scrape the sides of your bowl—that ensures everything mixes evenly and you get that smooth, airy base.
Step 2: Add the Eggs and Blue Color
Next, add your eggs one at a time, mixing well between each addition so the batter doesn’t curdle. Once blended, pour in the Royal Blue gel food coloring and mix until the color is even and vibrant. I discovered the gel coloring holds up much better during baking, so your cookie monster will really pop. If you don’t have gel coloring, double the liquid food coloring, but be careful not to add too much or the dough might get too watery.
Step 3: Mix in Dry Ingredients
Now it’s time for the dry ingredients. I like using a metal sifter to sift the bread flour, baking powder, baking soda, and salt directly over the wet mixture—that way, no lumps sneak in. Alternatively, whisk the dry ingredients together first, then stir gently into the batter. Mix on low speed only until combined; overmixing here can make your cookies tough, and no one wants that.
Step 4: Stir in the Cookie Crumbles and Chocolate Chips
Fold in the crushed cookies along with both white and milk chocolate chips. I love that crunch and melty combo—it makes each cookie feel extra special. You can use Oreos, Chips Ahoy, or any cookie you like for the crumbles, which adds a wonderful variety of texture inside.
Step 5: Stuff and Shape Your Cookies
Grab a large cookie scoop (about 2 tablespoons in size) to portion out the dough. Press each dough ball down and place either a milk chocolate square or a whole cookie right in the center. I like making some smaller cookies with 1-tablespoon scoops using miniature cookies for stuffing to have a mix of fun sizes. Then scoop more dough on top, press down, and pinch the edges carefully to seal the filling inside completely—no peeking fillings! Finally, press some extra crushed cookies and chocolate chips on top, then add a couple of candy eyeballs to each cookie for that iconic Cookie Monster look.
Step 6: Chill and Bake
This is a crucial step: refrigerate your stuffed dough balls for at least 3 hours to let flavors develop and to make sure the cookies hold their shape while baking. When you’re ready, preheat your oven to 350°F and line baking sheets with parchment paper. Arrange your cookies at least two inches apart. Bake smaller cookies for 10-12 minutes, and larger ones for 20-22 minutes. Once out of the oven, let them cool on the baking sheet for about 10 minutes before transferring to a cooling rack. Patience here pays off—the cookies firm up beautifully and you’ll avoid any breakage.
Pro Tips for Making Cookie Monster Cookies with Stuffed Chocolate and Cookie Fillings Recipe
- Use Bread Flour for Chewiness: I’ve found that swapping in bread flour instead of all-purpose takes these cookies to the next level with a perfect chewy texture.
- Don’t Skip the Chill: Chilling the dough for at least 3 hours helps the cookies hold their shape and makes the flavors bloom—definitely worth the wait.
- Seal the Filling Well: Pinching edges tightly around your chocolate or cookie filling prevents leaks and keeps your centers gooey or crunchy just as intended.
- Add Candy Eyeballs Last: I put candy eyes on just before baking so they stick well without melting or falling off—adds that fun Cookie Monster personality!
How to Serve Cookie Monster Cookies with Stuffed Chocolate and Cookie Fillings Recipe
Garnishes
Personally, I keep it simple and adorable with candy eyeballs—the little faces are half the fun! Sometimes I sprinkle a few more crushed cookies or chocolate chips on top before baking for extra texture and visual appeal. You can even dust a tiny bit of powdered sugar to make them look like they just came out of Sesame Street’s bakery.
Side Dishes
These cookies are rich and satisfying enough to be a dessert star, so I like pairing them with a glass of cold milk or a scoop of vanilla ice cream to balance out the sweetness. For a fun twist, try serving alongside a simple fruit salad or fresh berries to cut through the richness.
Creative Ways to Present
For birthday parties or themed events, I’ve arranged these cookies on a bright blue platter with matching napkins and decorations to lean into the Cookie Monster theme. I also once packaged them in clear boxes tied with blue ribbons as gifts—it was a total hit! Another idea is stacking the cookies like little cookie towers and using a Cookie Monster figurine to crown the display.
Make Ahead and Storage
Storing Leftovers
I usually store leftover Cookie Monster Cookies in an airtight container at room temperature. They stay nicely chewy for about 3 days. After that, I pop them in the fridge to extend their life and prevent drying out. Just bring to room temp or warm them slightly before enjoying leftover goodness.
Freezing
One of the best things I learned is that you can freeze the dough balls after assembling them stuffed and ready to bake. I wrap each ball tightly in plastic wrap and store them in a freezer-safe bag for up to a month. When it’s cookie time, I thaw them in the fridge overnight and bake as usual—almost no compromise on freshness or texture!
Reheating
If you have leftover baked cookies, warming them for 10-15 seconds in the microwave revives the melty chocolate center beautifully. Just don’t overdo it or the cookie can get too soft. Alternatively, a quick 5-minute warm-up in a 300°F oven brings back a fresh-baked vibe and keeps the edges crisp.
FAQs
-
Can I use all-purpose flour instead of bread flour in the Cookie Monster Cookies with Stuffed Chocolate and Cookie Fillings Recipe?
Yes, you can! Using all-purpose flour will still produce great cookies, but they won’t be quite as chewy or dense as when you use bread flour. If you prefer a softer, lighter cookie, all-purpose flour is perfectly fine and still delicious.
-
How do I prevent the stuffed filling from leaking out during baking?
The key is to properly seal the cookie dough around your chocolate or cookie filling by pinching the edges firmly together. Chilling the dough balls for at least 3 hours before baking also helps the shape hold up in the oven without the filling escaping.
-
Can I substitute the blue gel food coloring with a natural alternative?
Absolutely! Butterfly Pea Flower powder is a natural way to get a beautiful blue color and works well in this recipe. It won’t be as vibrant as gel color, but it’s a great option if you want to avoid artificial dyes.
-
Can I make these cookies dairy-free?
You can make some adjustments, like using dairy-free butter and dairy-free chocolate chips or fillings. Just be sure to check all ingredient labels to ensure they fit your dietary needs. The texture might vary slightly, but they’ll still be tasty!
-
How long do the Cookie Monster Cookies stay fresh after baking?
Stored properly in an airtight container, these cookies stay fresh for up to 3 days at room temperature. After that, refrigeration or freezing is best to maintain freshness and flavor.
Final Thoughts
Making these Cookie Monster Cookies with Stuffed Chocolate and Cookie Fillings Recipe has become one of my favorite baking adventures because it brings out the kid in all of us. I love how they’re both fun to make and incredible to eat, with every bite revealing a little surprise—whether it’s melted chocolate or a crunchy cookie center. Give this recipe a try; I promise, you’ll enjoy the smiles they bring as much as the flavors. Baking friends, this one’s a keeper!
Print
Cookie Monster Cookies with Stuffed Chocolate and Cookie Fillings Recipe
- Prep Time: 20 minutes
- Cook Time: 20 minutes
- Total Time: 40 minutes
- Yield: 10 to 12 large cookies
- Category: Dessert
- Method: Baking
- Cuisine: American
Description
Delight in these whimsical Cookie Monster Cookies featuring a vibrant blue dough loaded with crushed cookies, chocolate chips, and a hidden surprise center of milk chocolate squares or whole cookies. Perfectly chewy and fun, these stuffed cookies are a playful treat that combines classic cookie flavors with a colorful twist.
Ingredients
Cookie Dough
- 1/2 cup butter, softened
- 1/2 cup brown sugar, packed (105 grams)
- 1/2 cup granulated sugar (100 grams)
- 2 teaspoons vanilla extract
- 2 large eggs
- 1/2 teaspoon Royal Blue gel food coloring
- 2 1/3 cups bread flour or all-purpose flour (280 grams)
- 1 3/4 teaspoons baking powder
- 1 teaspoon baking soda
- 1 teaspoon salt
- 1 cup crushed cookies (Oreos and Chips Ahoy recommended)
- 1/2 cup white chocolate chips
- 1/2 cup milk chocolate chips
Stuffing Options
- 2 milk chocolate bars, cut into squares
- 12 whole cookies (Oreos, Samoas, Chips Ahoy)
Topping
- 1/2 cup crushed cookies
- Candy eyeballs
Instructions
- Prepare the dough base: In a large mixing bowl, combine the softened butter, brown sugar, granulated sugar, and vanilla extract. Beat on medium speed for 6 to 8 minutes until the mixture is soft and fluffy. Scrape down the bowl halfway through to ensure even mixing.
- Add eggs and coloring: Incorporate the eggs one at a time, beating well after each addition. Mix in the Royal Blue gel food coloring evenly throughout the dough for the signature vibrant hue.
- Sift dry ingredients and combine: Stop the mixer, then sift the bread flour (or all-purpose flour), baking powder, baking soda, and salt over the batter. Alternatively, whisk these dry ingredients separately before adding. Mix on low speed until just combined.
- Fold in mix-ins: Gently stir in the crushed cookies along with the white and milk chocolate chips until evenly distributed throughout the dough.
- Shape and stuff cookies: Use a large cookie scoop (about 2 tablespoons) to portion out 12 balls of dough. Press each ball flat, then place a milk chocolate square or a whole cookie in the center. For smaller cookies, use a 1 tablespoon scoop and fill with miniature cookies.
- Encase the stuffing: Add more cookie dough on top of the stuffing, press down, and pinch the edges firmly so the center is completely covered. Decorate the tops with extra crushed cookies, chocolate chips, and candy eyeballs for a fun, playful look.
- Chill the dough: Place the prepared cookie balls on a tray and refrigerate for at least 3 hours to firm up, which helps maintain their shape during baking.
- Preheat oven: Heat the oven to 350°F (175°C) and line baking sheets with parchment paper.
- Bake: Arrange the stuffed cookies on the lined baking sheets spaced 2 inches apart. Bake one tray at a time—smaller cookies need 10 to 12 minutes; larger cookies require 20 to 22 minutes until edges are golden and centers are set.
- Cool: Let the cookies cool on the baking sheet for 10 minutes before transferring them to wire racks for complete cooling.
Notes
- Bread flour results in denser, thicker, and chewier cookies compared to all-purpose flour.
- A #30 cookie scoop holds approximately 2 tablespoons of dough—ideal for large cookies.
- Gel food coloring is highly concentrated and can be found at craft stores or online.
- If unavailable, double the amount of liquid food coloring can be used, but gel provides better color intensity.
- Butterfly Pea Flower powder is a natural alternative for blue coloring and is available online.
- Raw and shaped dough balls can be refrigerated for up to a week before baking.
- Stuff with a variety of chocolates or cookies such as Oreos, Nutter Butter, Chips Ahoy, Samoas, or even brownies.
- Cookies taste best warm when the chocolate filling is melted and gooey.
Nutrition
- Serving Size: 1 cookie
- Calories: 367 kcal
- Sugar: 24 g
- Sodium: 301 mg
- Fat: 15 g
- Saturated Fat: 7 g
- Unsaturated Fat: 7 g
- Trans Fat: 0 g
- Carbohydrates: 52 g
- Fiber: 1 g
- Protein: 6 g
- Cholesterol: 30 mg

