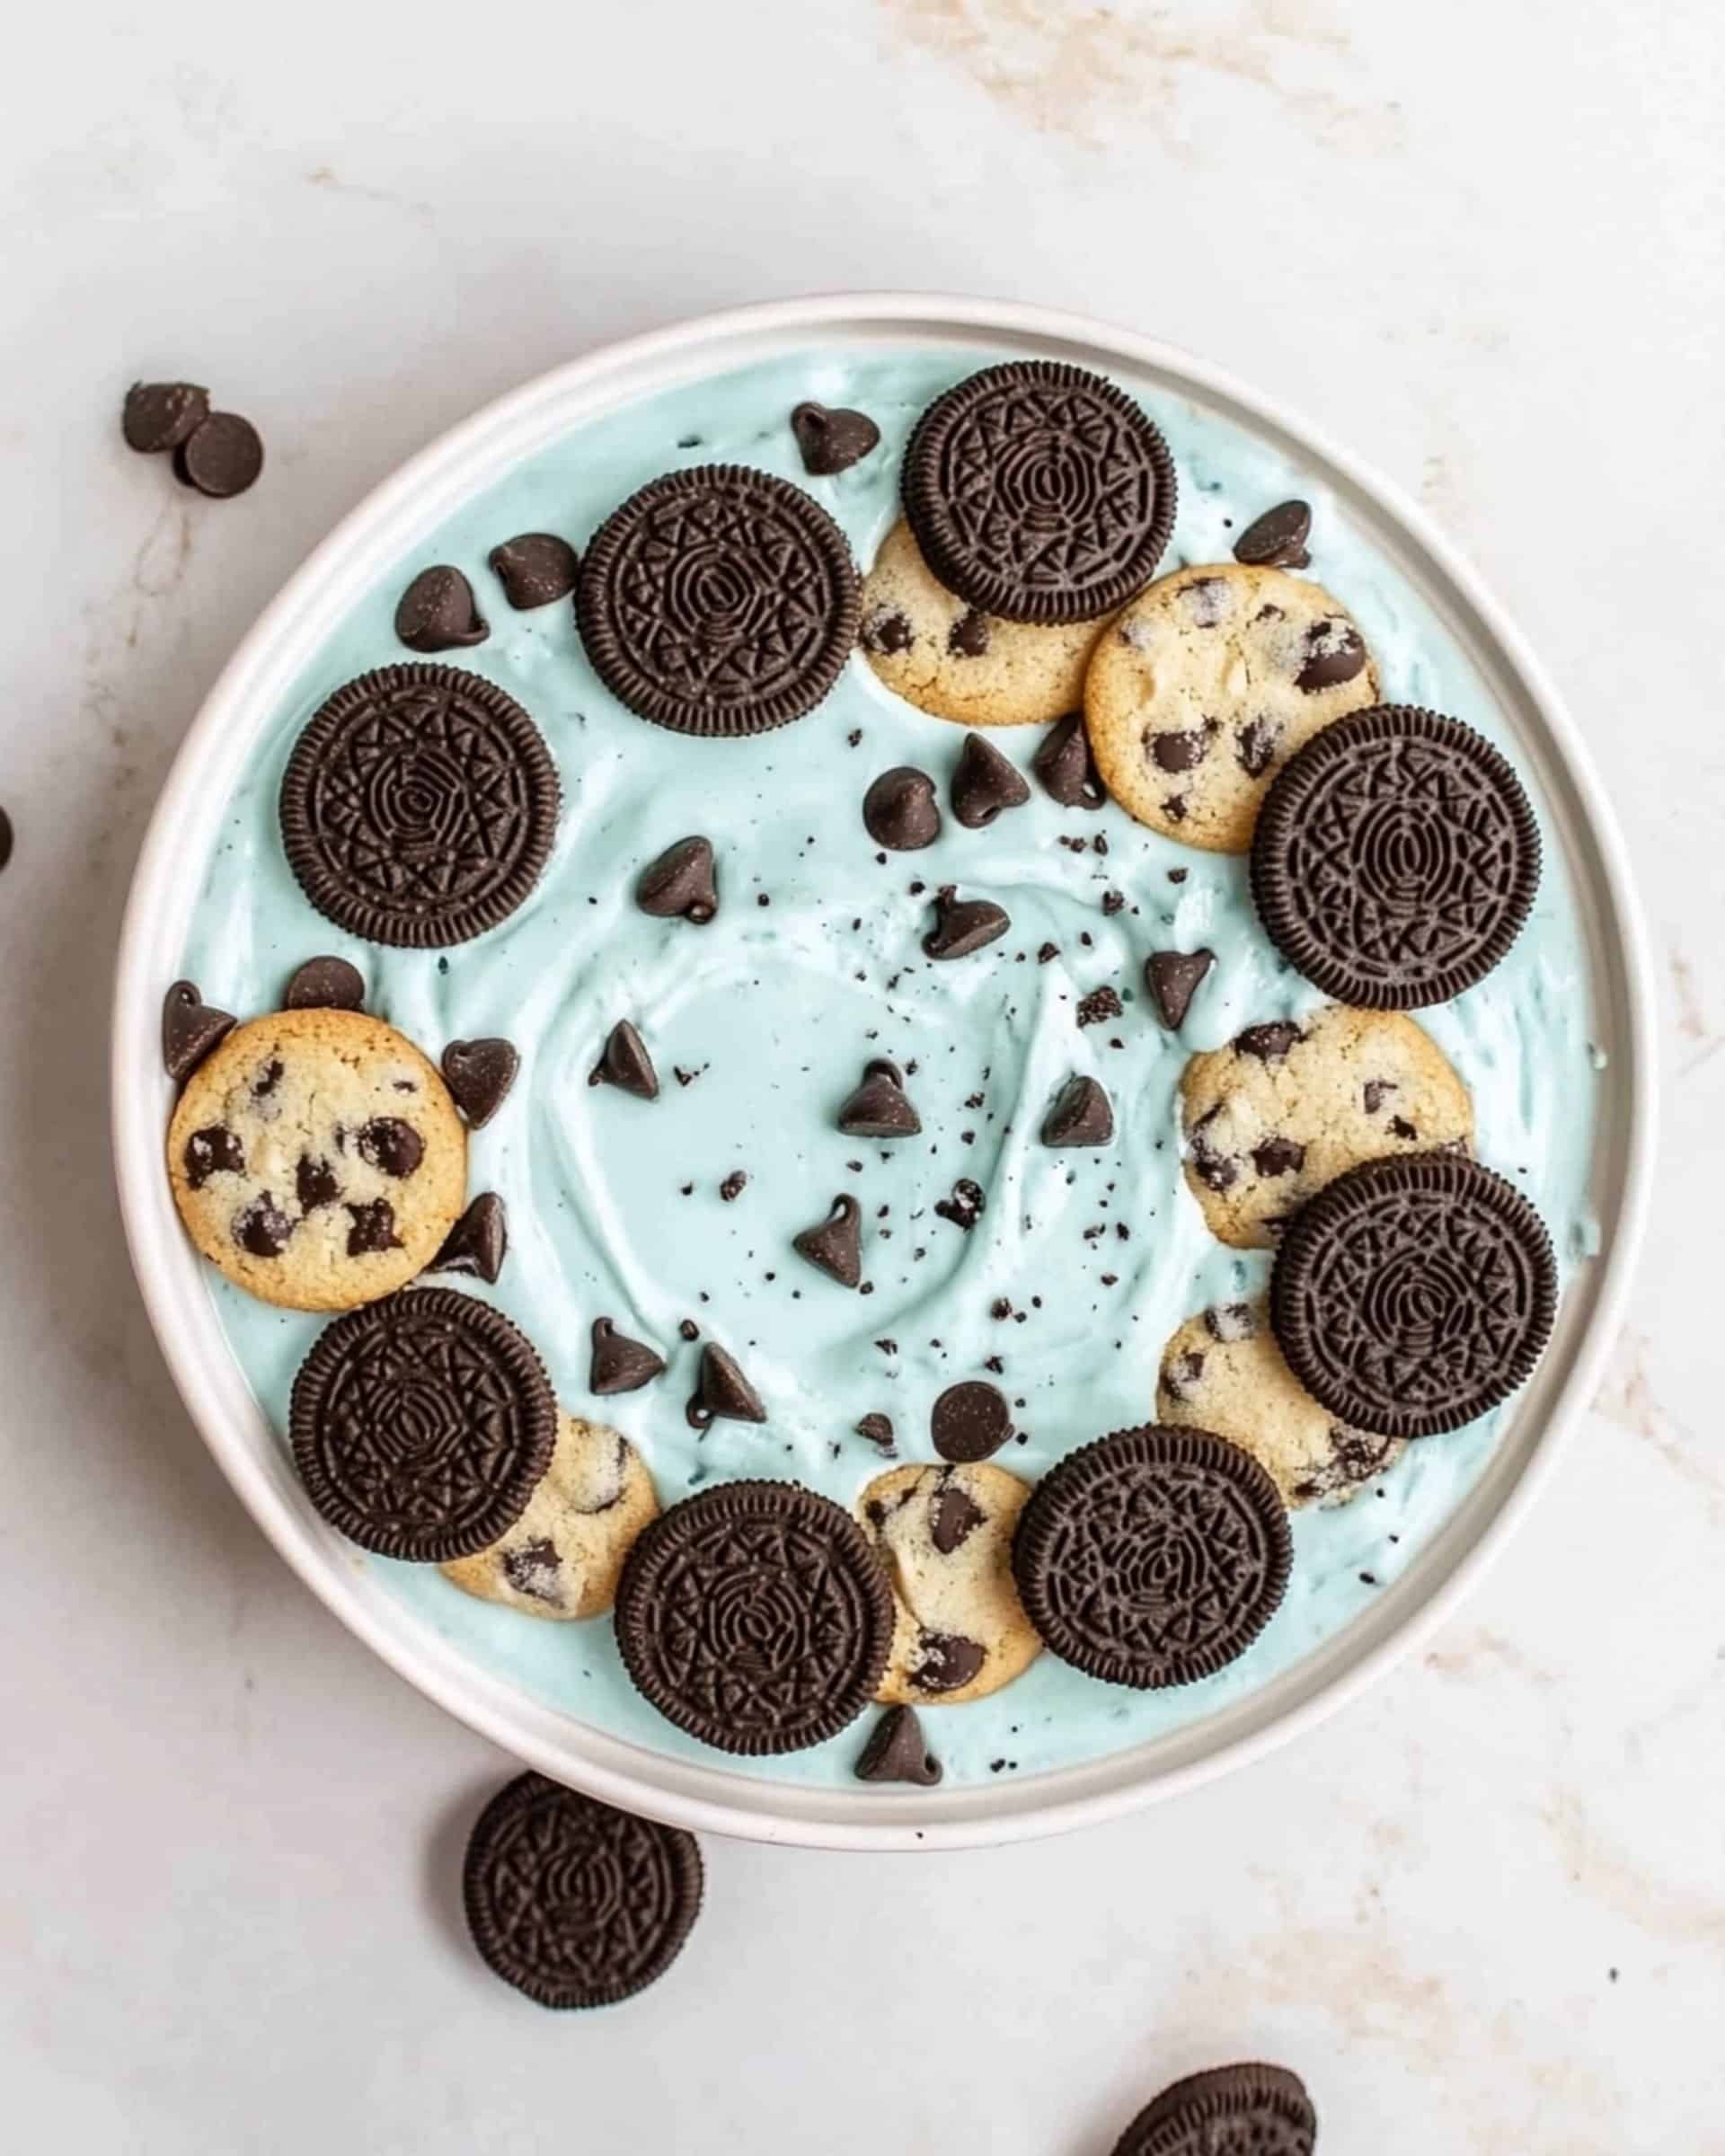
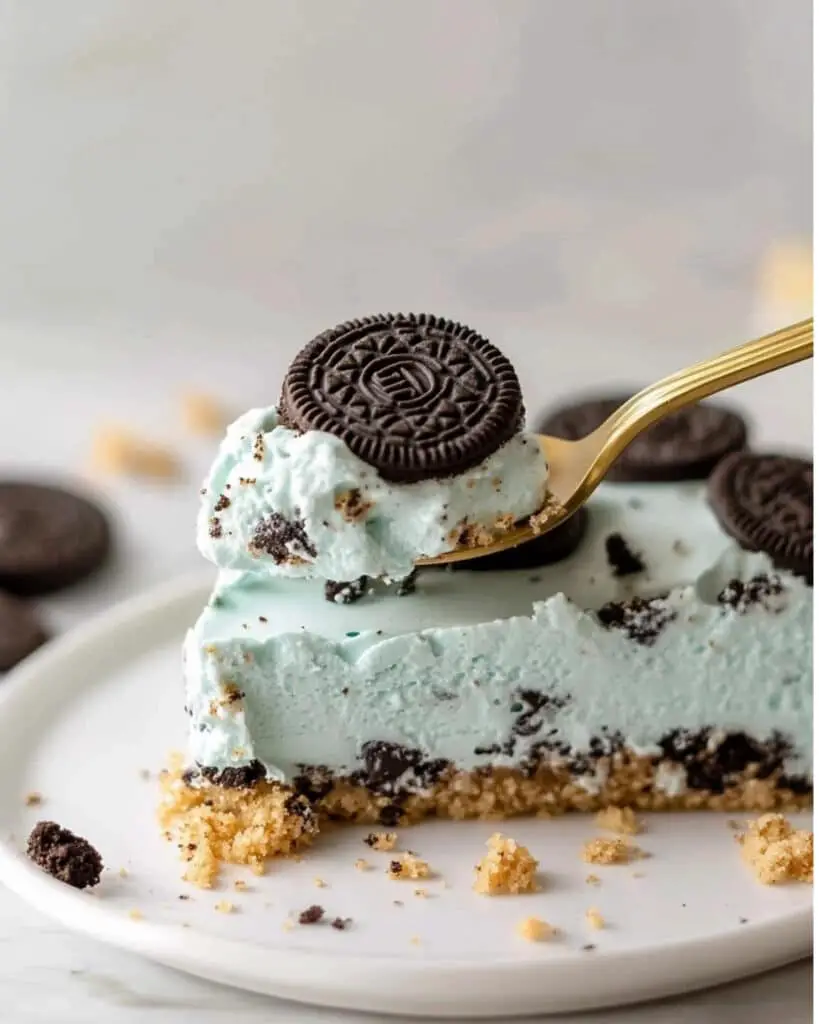
If you’re looking for a showstopping, wildly fun dessert that’s secretly a breeze to throw together, this Cookie Monster No Bake Cookie Cheesecake is your answer. With a vivid blue filling packed with Oreo and Chips Ahoy cookies, all set on a classic graham cracker crust, this playful cheesecake brings a beloved childhood flavor (and a pop of color) to any table. Even better, it’s a no-bake recipe—meaning you can have a decadent, creamy, cookie-filled treat with minimal effort, perfect for busy weeknights, celebrations, or whenever the cookie craving strikes!
Why You’ll Love This Recipe
- Incredibly Easy: There’s no need to turn on the oven or fuss with water baths here. This is truly a mix-and-chill recipe, making it perfect for busy evenings or last-minute dessert emergencies.
- Fun and Eye-Catching: The playful blue color and a topping of everyone’s favorite cookies guarantee lots of smiles, making this the ultimate crowd-pleaser for both kids and adults.
- Ultra Creamy Texture: With the combination of whipped cream and cream cheese, each bite is silky, rich, and melts in your mouth—no gelatin or eggs required.
- Customizable: Swap out cookies, change up the color, or tweak the crust as you like. This cheesecake is endlessly adaptable to your tastes and pantry.

Ingredients You’ll Need
Feel free to scan your pantry and fridge—most of these ingredients are kitchen staples!
- Graham cracker crumbs: The soul of any cheesecake crust, lending a classic toasty crunch.
- Granulated sugar: Adds a touch of sweetness to both the crust and creamy filling.
- Unsalted butter (melted): Binds the crumbs together and adds rich flavor. Salted butter works in a pinch.
- Cream cheese (softened): The foundation for a fluffy, tangy, dreamy filling. It’s vital to use room temperature cream cheese for smooth blending.
- Vanilla extract: A splash elevates the flavor and brings everything together beautifully.
- Heavy whipping cream: Whipped until thick, this lightens and fluffs the cheesecake—no need for gelatin!
- Blue gel food coloring: Completely optional, but it transforms your cheesecake into Cookie Monster blue. Gel food coloring keeps the filling vibrant with less liquid.
- Snack-size Oreos: For that chocolaty, creamy cookie bite in every forkful.
- Snack-size Chips Ahoy: Adds a classic, crunchy chocolate chip cookie element. Use the mini size for maximum cuteness on top.
- Tip: Mini cookies make adorable decorations and ensure every slice gets the perfect cookie-to-filling ratio!
Note: You’ll find the complete list of ingredients, along with their exact measurements, in the printable recipe card at the bottom of this post.
Variations
Want to put your own spin on this cheerful cheesecake? Here are a few tasty twists to consider:
- Flavor Swap: Switch the cookies! Try Biscoff, Nutter Butter, or chocolate chip graham cookies for fun flavor combos.
- Go Colorful: Change the food coloring to match a special occasion, or skip it for a more classic look.
- Crust Choices: Use chocolate graham crackers or even crushed Oreos for an extra-decadent base.
- Lighter Version: Substitute whipped topping for heavy cream if you want a lighter, slightly airier filling.
How to Make
Let’s break it down step-by-step so you can see just how quick and simple this cheesecake really is.
Step 1: Mix the Crust
Combine graham cracker crumbs, granulated sugar, and melted butter in a bowl. Stir until it has the texture of wet sand. Press evenly into the bottom of a 7- or 9-inch springform pan (the size is flexible—just know a larger pan yields a thinner cheesecake). Use a measuring cup to pack it down firmly so it holds together.
Step 2: Freeze the Crust
Pop the crust in your freezer while you work on the filling. This gives you a firm, sturdy base that won’t crumble when you slice.
Step 3: Whip the Cream Cheese Mixture
In a large bowl, beat together the softened cream cheese and sugar until perfectly silky and lump-free.
Step 4: Whip the Cream
In a separate bowl or in a stand mixer, whip the heavy whipping cream until stiff peaks form. Don’t stop until the cream holds its shape!
Step 5: Bring It All Together
Fold the whipped cream, vanilla extract, and blue food coloring (go ahead and add more or less for your ideal color) into the cream cheese mixture and mix until smooth and fully blended. Gently stir in most of the chopped Oreos and Chips Ahoy cookies, saving some for the top.
Step 6: Assemble and Chill
Pour the bright blue cheesecake filling over your now-chilled crust. Smooth the top with a spatula and scatter the reserved cookies over the top for that unmistakable Cookie Monster effect.
Step 7: Refrigerate and Serve
Refrigerate the cheesecake for at least 12 hours (overnight is best) to set. Right before serving, pop it in the freezer for 15-20 minutes—it makes slicing neat, tidy wedges a breeze.
Pro Tips for Making the Recipe
- Soften Cream Cheese Thoroughly: Cold cream cheese = lumpy filling. Let it sit on the counter for at least 30 minutes.
- Careful with Food Coloring: Start with a drop or two—you can always add more. Gel colors are more vibrant and won’t thin out the mixture.
- Whip Cream Separately: This ensures a fluffy, stable filling with absolutely no weeping or sogginess.
- Pack the Crust Firmly: A tightly packed crust means zero crumbling when you transfer slices to a plate.
- Freeze Before Slicing: Just 15–20 minutes firms up the cheesecake for clean, picture-perfect slices (also makes it easier to remove the springform pan!).
How to Serve
This fun cheesecake doesn’t need much—just a big grin and a few eager forks. However, if you want to take it up a notch:
- Serve Chilled: Always! The flavors are best when the cheesecake is cold and creamy.
- Pairings: A big glass of cold milk for a true cookie experience, or hot coffee to contrast the cool, rich filling.
- Celebration Style: Add candles, colored sprinkles, or extra cookies around the edge for an epic birthday or party dessert.
- Tip: A drizzle of chocolate or caramel sauce on individual slices is a decadent touch!
Make Ahead and Storage
Storing Leftovers
Store leftovers covered in the refrigerator. The cheesecake will stay fresh for up to 4 days, though it rarely lasts that long!
Freezing
You can freeze this cheesecake whole or as individual slices. Wrap tightly in plastic wrap and foil to prevent freezer burn. Freeze for up to 1 month; thaw overnight in the fridge before serving.
Reheating
No reheating needed—simply slice and enjoy straight from the fridge. If frozen, let it thaw in the fridge and enjoy chilled.
FAQs
-
Can I make this cheesecake ahead of time?
Absolutely! In fact, it’s best made a day ahead to ensure the filling fully sets and the flavors meld. This makes it a perfect dessert for parties or holidays when you want less stress on the day-of.
-
What if I don’t have a springform pan?
No worries! You can use a regular pie dish or an 8×8-inch baking pan. Just line it with parchment so you can lift the cheesecake out easily for slicing.
-
Can I use different cookies or crusts?
Of course—this cheesecake loves a good twist! Any crunchy cookie (think Biscoff, chocolate graham crackers, or even pretzels) can work for the crust or filling. Just keep proportions similar and have fun mixing and matching.
-
Why does my filling look runny or not set?
Be sure your heavy cream was whipped until stiff, and that you thoroughly chilled the cheesecake for at least 12 hours. If it’s still soft, a quick stint in the freezer before slicing should firm it up.
Final Thoughts
This Cookie Monster No Bake Cookie Cheesecake is the ultimate playful, make-ahead treat that delivers on taste, texture, and pure joy—all with minimal effort. It’s proof that great desserts don’t need to be complicated or time-consuming. Give this recipe a try and bring a burst of fun (and plenty of cookies!) to your next dessert table. Happy no-baking!
Print
Cookie Monster No Bake Cookie Cheesecake Recipe
- Prep Time: 15 minutes
- Cook Time: 0 minutes
- Total Time: 15 minutes (plus chilling time)
- Yield: 8 servings
- Category: Desserts
- Method: No-cook
- Cuisine: American
- Diet: Vegetarian
Description
This Cookie Monster No Bake Cookie Cheesecake is a fun, vibrant, and effortless dessert made with a buttery graham cracker crust, creamy blue-tinted cheesecake filling, and plenty of Oreo and Chips Ahoy cookies. Perfect for sharing and ideal for kids’ parties or a quick, showstopping treat.
Ingredients
Crust
- 1 1/2 cups graham cracker crumbs
- 1/3 cup granulated sugar
- 6 tablespoons unsalted butter, melted
Filling
- 3 (8-ounce) packages cream cheese, softened
- 1/2 cup granulated sugar
- 2 teaspoons vanilla extract
- 1 cup heavy whipping cream
- 2-3 drops blue gel food coloring
- 2 (1-ounce) packages snack size Oreos (plus more for decorating)
- 2 (1-ounce) packages snack size Chips Ahoy (plus more for decorating)
Instructions
- Prepare the Crust: In a medium bowl, combine graham cracker crumbs, sugar, and melted butter. Mix until the crumbs are evenly coated. Press the mixture firmly into the bottom of a 7-9 inch springform pan, using a measuring cup to pack it down. Place the pan in the freezer while you make the filling.
- Make the Cream Cheese Mixture: In a large bowl, use a hand-held mixer to beat together the softened cream cheese and sugar until very smooth and creamy.
- Whip the Cream: In a separate bowl or the bowl of a standing mixer, whip the heavy cream until thick and stiff peaks form.
- Combine & Tint Filling: Gently fold the whipped cream, vanilla extract, and blue gel food coloring into the cream cheese mixture. Mix until well-combined and uniformly colored. Stir in most of the chopped cookies, reserving some for decorating the top.
- Assemble the Cheesecake: Pour the filling over the prepared crust and spread it evenly with a spatula. Decorate the top with the reserved Oreos and Chips Ahoy pieces.
- Chill the Cheesecake: Refrigerate the cheesecake for at least 12 hours, or overnight, to allow it to set fully.
- Slice & Serve: For easier release from the springform pan and neater slices, place the cheesecake in the freezer for 15-20 minutes before serving. Remove from the pan, slice, and enjoy!
Notes
- Ensure cream cheese is fully softened for the smoothest filling.
- You can use any mini chocolate chip cookies or mini sandwich cookies if you can’t find snack-size packs.
- Let the cheesecake chill thoroughly for best texture.
- Tint the filling as light or vibrant blue as desired.
- Store leftovers in the refrigerator, tightly covered, for up to 3 days.
Nutrition
- Serving Size: 1 slice (1/8 of cheesecake)
- Calories: Approx. 540
- Sugar: 26g
- Sodium: 420mg
- Fat: 38g
- Saturated Fat: 23g
- Unsaturated Fat: 12g
- Trans Fat: 0g
- Carbohydrates: 44g
- Fiber: 1g
- Protein: 7g
- Cholesterol: 110mg


