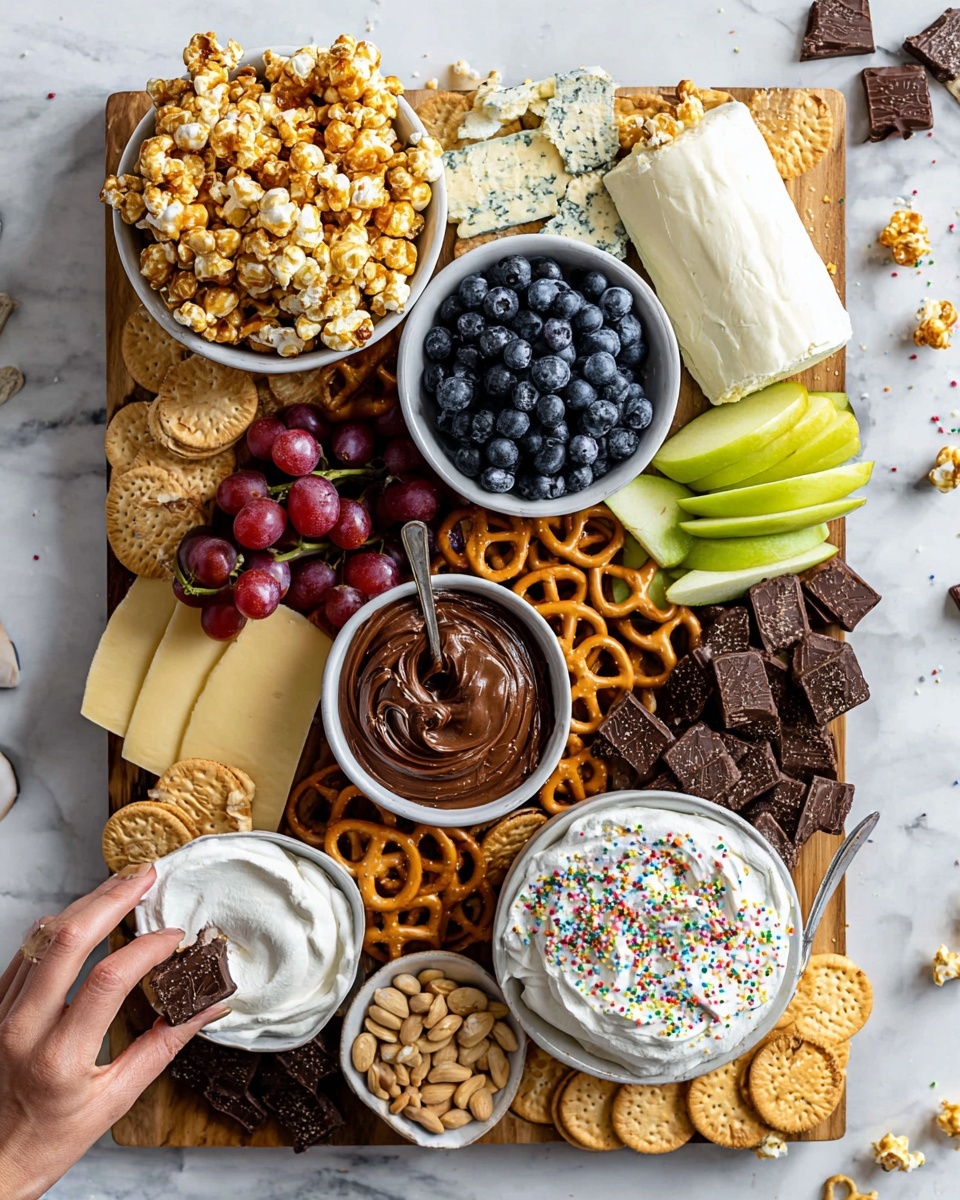
If you’re looking for a show-stopping treat that’s as fun to assemble as it is to eat, you’re in the right place! I’m excited to share my Delicious Dessert Charcuterie Board Recipe — it’s the ultimate sweet snack that feels fancy but is so easy to put together. Whether you’re hosting friends, planning movie night, or just craving a little something special, this board has it all: creamy cheeses, fresh fruit, crunchy cookies, and indulgent dips. Trust me, once you try this, it’ll be your go-to recipe for entertaining or spoiling yourself!
Why You’ll Love This Recipe
- Effortlessly Impressive: I love how easy it is to throw together yet it looks insanely fancy.
- A Crowd-Pleaser: Everyone I’ve served this to goes crazy for the mix of sweet, salty, creamy, and crunchy textures.
- Customizable to You: This dessert board is super flexible—you can swap in your favorite fruits or sweets.
- Minimal Prep: No baking required, just arrange and serve—perfect for busy days or last-minute guests.

Ingredients You’ll Need
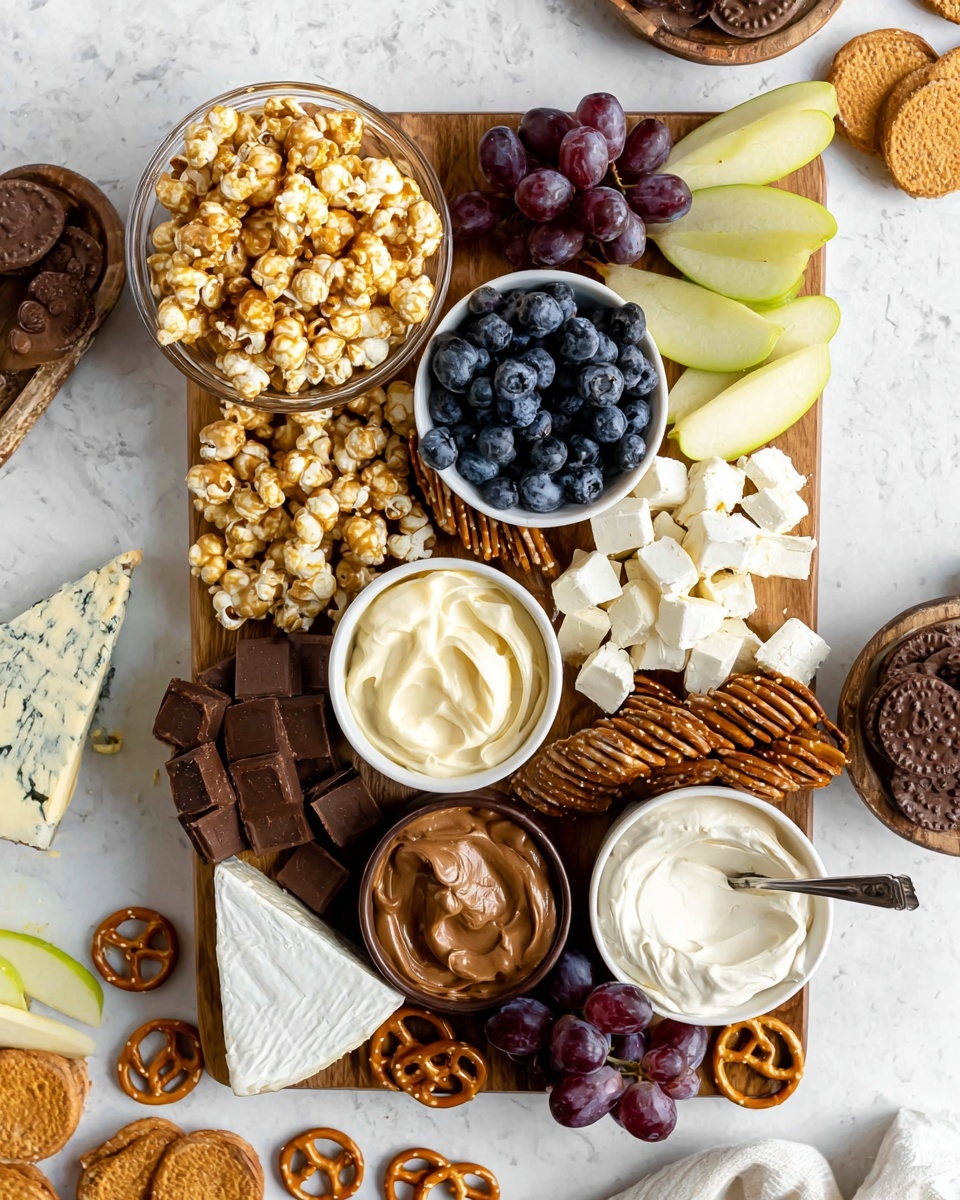
This Delicious Dessert Charcuterie Board Recipe brings together a fun blend of creamy cheeses, fresh fruit, crunchy snacks, and sweet treats. Each ingredient plays its part to add different textures and flavors, making sure every bite feels like a little celebration. When shopping, aim for fresh fruit and quality cheeses to keep this board tasting fresh and indulgent.
- Brie cheese: Its buttery softness pairs perfectly with sweet and salty flavors.
- Goat cheese log: Adds a tangy contrast that balances the sweetness from other ingredients.
- Gorgonzola cheese: Offers bold, creamy notes for those who love a bit of punch in their cheese selection.
- Green apple: Thinly sliced, they bring crispness and tartness to cut through the richness.
- Blueberries: Fresh, juicy pops of sweetness that look beautiful on the board.
- Red grapes: Easy finger food, plus they add a juicy burst in every bite.
- Graham crackers: Broken into quarters—they’re great for scooping up dips and add crunch.
- Vanilla wafer cookies: Their lightly sweet flavor perfectly complements the cheeses and dips.
- Pretzels: The salty crunch is a key contrast to the sweets.
- Roasted, shelled peanuts: A nutty addition that adds texture and flavor.
- Caramel corn: For that addictive sweet crunch that everyone secretly loves.
- Reese’s peanut butter cups: These little treasures bring chocolatey peanut butter goodness.
- Nutella: A silky chocolate-hazelnut dip that’s unbelievably good for dunking fruits and crackers.
- Dunkaroo dip (or vanilla frosting topped with sprinkles): Adds color and a creamy frosting element with fun sprinkles.
Variations
One of my favorite things about the Delicious Dessert Charcuterie Board Recipe is how easy it is to make your own. I often switch up the seasonal fruit or swap out candies depending on what I have on hand or the occasion. Feel free to get creative and make it your own!
- Nut-free version: Substitute peanuts and Reese’s with dried fruit or nut-free chocolate to keep everyone happy and safe.
- Seasonal fruits: In fall, I love swapping in pears and figs, while summer calls for peaches and strawberries.
- Healthier swaps: Use dark chocolate instead of candy and consider sliced cucumbers or carrot sticks for a crunchy veggie twist.
- Extra indulgent: Add mini cheesecakes or chocolate-covered strawberries for special celebrations.
How to Make Delicious Dessert Charcuterie Board Recipe
Step 1: Start With Your Dips and Bowls
I always start by placing any dips or bowls on the board—like Nutella, Dunkaroo dip, or a bowl of peanuts. Placing these first helps create “anchors” that guide the rest of your arrangement and make the board look visually balanced. Space them unevenly and randomly so it looks natural and inviting.
Step 2: Add Your Large Cheese Wedges
Next, I arrange the larger wedges or chunks of cheese, like the Brie wedges or thicker slices of Gorgonzola. These add height and substance, and you’ll naturally fill in around them later. It’s all about building layers for that wow factor.
Step 3: Layer on the Sliced Cheeses and Fruits
Once the big pieces are placed, add thinly sliced cheese and fruit. The green apple slices fit perfectly here alongside juicy blueberries and grapes—adding color and refreshing bites that balance out the richness of the cheeses and dips.
Step 4: Arrange Crackers and Cookies
Place your crackers and vanilla wafer cookies strategically around the board. I usually break the graham crackers into quarters to make them easier to grab, then tuck them between cheeses and dips so they’re always within reach for dipping or layering flavors.
Step 5: Fill in the Gaps With Treats
This is the fun part! Add pretzels, roasted peanuts, caramel corn, and of course, those irresistible Reese’s peanut butter cups to fill any empty spots. The mix of textures—from crunchy to gooey to chewy—makes every bite interesting and delightful.
Pro Tips for Making Delicious Dessert Charcuterie Board Recipe
- Balance flavors: I always taste as I go to make sure there’s a good mix of sweet, salty, creamy, and crunchy elements on the board.
- Fresh fruit prep: To keep apple slices from browning, I soak them briefly in lemon water before adding to the board.
- Spacing matters: Leave little gaps between items — this makes the board look fuller and invites guests to dig in.
- Keep chilled: If you’re prepping early, wrap and refrigerate cheeses separately and add them just before serving for maximum freshness.
How to Serve Delicious Dessert Charcuterie Board Recipe
Garnishes
I love sprinkling a few fresh mint leaves or edible flowers on top just before serving—it instantly elevates the look. A light dusting of powdered sugar over the fruit can make it feel even more festive, perfect for holidays or celebrations.
Side Dishes
This dessert board is often the star of the show, but if I want to round out the snack table, I’ll add a big bowl of mixed nuts or a selection of sparkling waters and fruity wines. For something savory, olives or a small bruschetta platter nearby pairs wonderfully.
Creative Ways to Present
One time, I made mini individual dessert charcuterie boards on small wooden boards for a brunch party—it was such a hit! You can swap out the classic rectangular board for a rustic slate or even a large round pizza stone for a fresh twist. Using little bowls or ramekins for dips also adds an extra layer of charm.
Make Ahead and Storage
Storing Leftovers
Leftovers? No worries! I like to store the cheeses wrapped separately in parchment paper, and the fresh fruit in airtight containers. The crackers and cookies do best stored at room temperature in sealed bags to keep their crunch intact.
Freezing
I usually don’t freeze this dessert board because the fruit and crackers lose their texture, plus the cheeses don’t freeze well. Instead, I recommend enjoying it fresh or making smaller boards for each serving.
Reheating
Since this is served cold or room temperature, reheating isn’t necessary. If you want your Nutella or dip a bit softer, a quick 10-second zap in the microwave works wonders!
FAQs
-
Can I prepare the dessert charcuterie board ahead of time?
Yes, you can prep some items ahead, like slicing the fruit and cheeses, but it’s best to assemble the board shortly before serving to keep everything fresh and visually appealing.
-
What cheeses work best on a dessert charcuterie board?
Soft, creamy cheeses like Brie, tangy goat cheese, and bold options like Gorgonzola provide a great balance when paired with sweet fruits and crunchy snacks.
-
Can I make this dessert board vegan?
Absolutely! Swap out the cheeses for dairy-free alternatives, use vegan dips like chocolate hummus, and choose vegan cookies and fruits to build a delicious vegan version.
-
How do I keep fruits like apples from browning on the board?
Dip the sliced apples in a mixture of water and lemon juice for a few minutes before placing them on the board—this helps prevent browning and keeps them looking fresh.
Final Thoughts
This Delicious Dessert Charcuterie Board Recipe is one of those recipes that feel like a treat to make and eat. I’m always amazed by how a few simple ingredients, when arranged thoughtfully, can deliver such a delightful experience. Whether it’s a spontaneous snack or a planned celebration, I hope this board becomes a favorite in your kitchen too—it’s truly a delicious way to share sweet moments with friends and family. So grab your favorite goodies and start building your own stunning dessert board today!
Print
Delicious Dessert Charcuterie Board Recipe
- Prep Time: 15 minutes
- Cook Time: 0 minutes
- Total Time: 15 minutes
- Yield: 8 servings
- Category: Dessert
- Method: No-Cook
- Cuisine: American
Description
A delightful Dessert Charcuterie Board featuring a variety of cheeses, fresh fruits, crackers, cookies, nuts, caramel corn, peanut butter cups, and sweet dips. Perfect for entertaining, movie nights, or casual gatherings, this no-cook snack board offers a beautiful combination of flavors and textures that everyone will love.
Ingredients
Cheeses
- 8 oz. wheel Brie cheese, sliced in wedges
- 4 oz. log goat cheese
- 4 oz. Gorgonzola cheese
Fruits
- 1 green apple, thinly sliced
- 1 cup blueberries
- 1 cup red grapes
Snacks & Sweets
- 1 sleeve graham crackers, broken into quarters
- Handful of vanilla wafer cookies
- 1 cup pretzels
- 1/2 cup roasted, shelled peanuts
- 1 cup caramel corn
- 8-12 Reese’s peanut butter cups
Dips
- 1 cup Nutella
- 1 cup Dunkaroo dip (or vanilla frosting topped with sprinkles)
Instructions
- Arrange Bowls: Start by placing any ingredients that go into bowls, such as Nutella, Dunkaroo dip, or roasted peanuts, unevenly and randomly across your board. These act as anchor points for the rest of the items.
- Add Large Cheese Wedges: Place wedges or large pieces of cheese like Brie around the board to create more anchor points for the other items.
- Include Sliced Cheeses and Fruits: Add sliced cheeses such as goat cheese and Gorgonzola along with sliced green apples, blueberries, and grapes near the cheese wedges.
- Add Crackers and Cookies: Arrange graham cracker pieces and vanilla wafer cookies next to the cheeses and fruits to complement the flavors and textures.
- Fill in Spaces: Use pretzels, caramel corn, Reese’s peanut butter cups, and any remaining snacks to fill in the gaps and create a full, inviting board.
Notes
- This dessert charcuterie board is an easy and delicious snack perfect for weekend get-togethers, movie nights, barbecues, or casual gatherings.
- Feel free to customize the board with your favorite candies, nuts, or seasonal fruits to suit your taste or occasion.
- Presenting the board with varied colors and textures makes it more visually appealing and appetizing.
Nutrition
- Serving Size: 1/8 of board
- Calories: 431
- Sugar: 32.8 g
- Sodium: 379.6 mg
- Fat: 25 g
- Saturated Fat: 10.6 g
- Unsaturated Fat: 14.4 g
- Trans Fat: 0 g
- Carbohydrates: 42.6 g
- Fiber: 2.4 g
- Protein: 11.8 g
- Cholesterol: 35.1 mg


