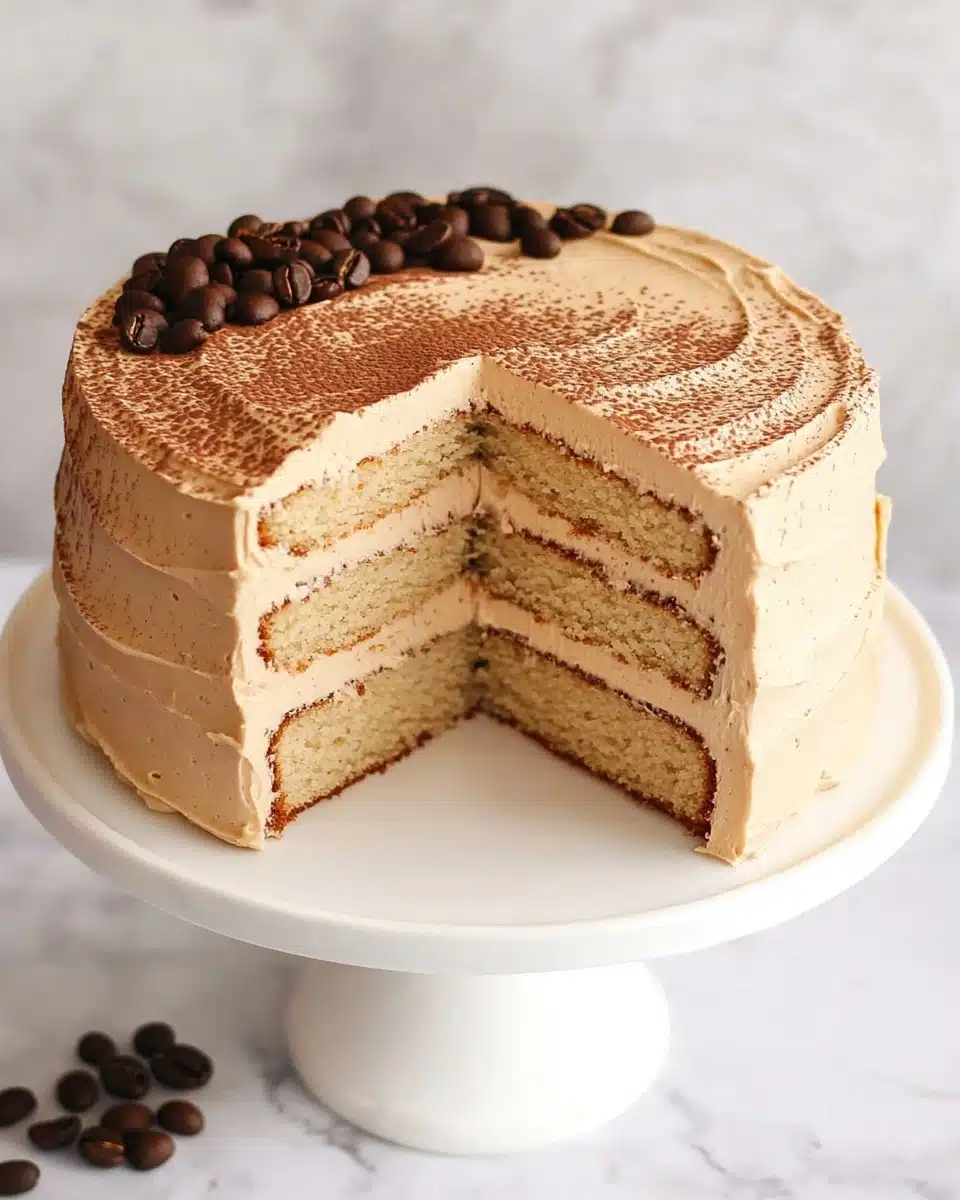
If you dream about the irresistible aroma of fresh coffee, this Espresso Cake (Coffee Layer Cake) Recipe is pure heaven. Imagine ultra-moist, tender layers infused with rich espresso flavor, all wrapped up in the silkiest espresso cream cheese frosting—this cake is the answer to every coffee lover’s dessert cravings!
Why You’ll Love This Recipe
- Coffeehouse Flavor at Home: Every bite bursts with true espresso flavor, making it a dream come true for caffeine enthusiasts.
- Incredibly Moist Layers: Thanks to sour cream and buttermilk, the cake melts in your mouth and stays soft for days.
- Dreamy Espresso Cream Cheese Frosting: The frosting is tangy and luscious with a kiss of coffee—totally irresistible!
- Make-Ahead Friendly: The cake tastes even better on day two, making it perfect for celebrations or gifting.

Ingredients You’ll Need
Don’t you love a cake that comes together from ingredients you probably already have? Each one plays a part in making this Espresso Cake (Coffee Layer Cake) Recipe wonderfully tender, richly flavored, and impossible to resist. Here’s why these ingredients matter!
- All-purpose Flour: This forms the backbone of your cake and gives it just the right amount of structure without being dense.
- Baking Powder & Baking Soda: The dynamic duo that ensures your cake is sky-high light and fluffy.
- Granulated Sugar & Light Brown Sugar: A blend for sweetness and a subtle hint of caramel depth, courtesy of the brown sugar.
- Salt: Just a touch elevates the espresso flavor and rounds everything out.
- Eggs: These add structure, moisture, and that perfect crumb.
- Vegetable Oil: Extra moisture! Oil keeps this cake delightfully soft for days.
- Buttermilk (or homemade): The acidity creates a super soft, tender crumb—just mix whole milk and a splash of vinegar if you’re out of buttermilk.
- Sour Cream: Guarantees moistness and a delicate tang in every bite.
- Vanilla Extract: Balances and intensifies the rich coffee and cream cheese flavors.
- Instant Coffee: For bold espresso flavor—go as strong as you dare!
- Boiling Water: Helps dissolve the coffee so it blends seamlessly into the batter.
- Unsalted Butter: For the frosting—softened for ultimate creaminess.
- Cream Cheese: The star of the frosting, adding tang and a luxurious texture.
- Powdered Sugar: Sifted for a light and creamy frosting consistency.
Variations
Dive in and make this Espresso Cake (Coffee Layer Cake) Recipe your own! Adapt it to suit your favorite flavors, dietary needs, or the ingredients you have on hand—don’t be afraid to try something new.
- Mocha Chip Variation: Stir in mini chocolate chips to the batter for melty pockets of chocolate in every slice.
- Dairy-Free Friendly: Swap the dairy ingredients for your favorite plant-based alternatives for a completely vegan coffee cake extravaganza.
- Nutty Twist: Add a layer of chopped toasted hazelnuts or almonds between the cake layers for extra crunch and a hint of nuttiness.
- Extra Espresso: For a bold kick, brush the baked layers with a shot of cooled espresso before frosting.
How to Make Espresso Cake (Coffee Layer Cake) Recipe
Step 1: Prep Your Pans and Preheat
Start by preheating your oven to 350°F (conventional, no fan) to ensure it’s perfectly hot when your cake goes in. Line three 8-inch round cake pans with parchment paper—this step guarantees the cakes pop out effortlessly later, with gorgeous clean edges.
Step 2: Whisk Dry Ingredients
In a large mixing bowl, whisk together the sifted flour, baking powder, baking soda, both sugars, and salt. By thoroughly combining the dry ingredients now, you avoid clumps and ensure every bite is light, even, and sweetly balanced.
Step 3: Combine Wet Ingredients
Add the eggs, vegetable oil, buttermilk, sour cream, and vanilla extract directly to the dry mix. Gently whisk until everything is just combined—you want a smooth batter with no streaks, but don’t overmix or you’ll lose that tender crumb.
Step 4: Stir in Espresso
Dissolve the instant coffee granules in boiling water, then pour this into the batter and very gently fold until everything is uniform. Your kitchen will smell absolutely divine, and you’ll see the batter become a beautiful, rich coffee color.
Step 5: Bake and Cool
Divide the luscious batter evenly between your prepared pans, smoothing the tops with a spatula. Bake for about 20 minutes, or until a toothpick inserted in the middle comes out with just a few moist crumbs clinging to it. Cool the cakes in the pans for at least 20 minutes to help lock in all that moisture, then carefully turn them out and chill them in the fridge for 30–60 minutes before assembling.
Step 6: Make the Espresso Cream Cheese Frosting
While the cakes chill, beat softened butter and cream cheese together in your mixer until ultra-smooth. Add the vanilla, salt, and instant coffee dissolved in hot water, then beat briefly. Slowly add the powdered sugar a cup at a time until you reach a creamy, thick consistency. Don’t over-beat or the frosting will thin out—if it feels soft, just pop it in the fridge for 10–20 minutes.
Step 7: Assemble and Decorate
Trim any domes from your cooled cakes to level them—this makes stacking a breeze. Spread that dreamy espresso frosting between layers, then coat the top and sides with a thin crumb coat. Chill for 20 minutes, then finish with the remaining frosting. Pipe decorative swirls, sprinkle with extra instant coffee, or dot on some whole coffee beans for a stunning final touch!
Pro Tips for Making Espresso Cake (Coffee Layer Cake) Recipe
- The Espresso Factor: Use a high-quality instant coffee or espresso powder—this is where your cake draws its deep, aromatic flavor.
- Chill for Crisp Assembly: Chilling the cake layers makes them easier to handle, so your layers stay neat and the frosting goes on like a dream.
- Scrape the Bowl (Often!): When making the frosting, stop and scrape down the bowl 2–3 times so everything is extra smooth and creamy—no lumps allowed!
- Customize the Kick: Adjust the amount of instant coffee in the cake and frosting to suit your preferred level of boldness, from hint-of-coffee to full-on espresso buzz.
How to Serve Espresso Cake (Coffee Layer Cake) Recipe
Garnishes
Give your Espresso Cake (Coffee Layer Cake) Recipe a coffeehouse finish with a scattering of chocolate shavings, a light dusting of instant coffee granules, or a few glossy coffee beans perched on top. Even a simple swirl of extra cream cheese frosting piped along the edges adds that lovely professional touch!
Side Dishes
This cake pairs beautifully with a scoop of vanilla or coffee ice cream, a dollop of lightly sweetened whipped cream, or even a simple macerated berry compote. And of course, it’s absolutely perfect alongside a mug of your best freshly brewed coffee or a tall glass of cold milk.
Creative Ways to Present
Surprise your guests by slicing the cake into individual mini “layer cakes” using a ring mold, or serve slices arranged artfully on a vintage tray for a coffeehouse vibe. For special occasions, try piping rosettes or using a stencil and cocoa powder to create a beautiful coffee-inspired design right on top!
Make Ahead and Storage
Storing Leftovers
Store any leftover Espresso Cake (Coffee Layer Cake) Recipe covered in the fridge. It stays moist and delicious for up to 5 days, and the flavors might even deepen! Just let slices come to room temperature before serving for the most luscious texture.
Freezing
You can freeze the cake layers (unfrosted) for up to 2 months—just wrap well in plastic, then foil. For frosted cake, freeze slices on a tray before wrapping individually. Thaw overnight in the fridge for a make-ahead dessert that’s ready when you are!
Reheating
This cake is best enjoyed at room temperature rather than reheated, as warming cream cheese frosting can cause it to melt. Simply let your slice sit out for 30–45 minutes before indulging for that perfect soft crumb and creamy frosting.
FAQs
-
Can I use regular brewed coffee instead of instant coffee?
For the best and boldest flavor, instant coffee or espresso powder is highly recommended since it gives a concentrated punch. Brewed coffee is much less intense—you can use it in a pinch, but the cake’s rich coffee flavor will be milder.
-
What’s the secret to extra-moist cake layers?
The combination of oil, buttermilk, and sour cream guarantees a cake that stays tender and moist. Be sure not to overmix the batter and avoid overbaking for the best, soft crumb!
-
Can I make this recipe gluten-free?
Absolutely—swap the all-purpose flour with a cup-for-cup gluten-free flour blend, and check that all your other ingredients are gluten-free. The cake will still turn out incredibly light and flavorful.
-
How do I prevent my cream cheese frosting from getting runny?
Always start with softened but not melted butter and cream cheese. Don’t over-beat after adding the powdered sugar, and if your frosting seems soft, just chill it in the fridge for 10–20 minutes—easy fix!
Final Thoughts
If you’ve been hunting for a bake that captures the aroma and warmth of your favorite coffee shop, this Espresso Cake (Coffee Layer Cake) Recipe is it. Give it a try the next time you want to treat yourself or your loved ones—every slice is a hug in cake form, and you’ll love every delicious, espresso-kissed bite!
Print
Espresso Cake (Coffee Layer Cake) Recipe
- Prep Time: 20 minutes
- Cook Time: 30 minutes
- Total Time: 50 minutes + cooling
- Yield: 12-14 servings
- Category: Dessert
- Method: Baking
- Cuisine: American
- Diet: Vegetarian
Description
Indulge in the rich flavors of coffee with this decadent Espresso Cake, featuring layers of moist espresso-infused cake and a luscious espresso cream cheese frosting. Perfect for coffee lovers and special occasions!
Ingredients
Espresso Cake:
- 2 1/2 cups all-purpose flour (325g), sifted
- 1.5 tsp baking powder
- 1.5 tsp baking soda
- 1 cup granulated sugar (200g)
- 1/2 cup light brown sugar (100g)
- 1 tsp salt
- 3 large eggs
- 2/3 cup vegetable oil (133g)
- 1/3 cup buttermilk; mix 1/3 cup whole milk (80g) + 1 teaspoon vinegar
- 1 cup sour cream (240g)
- 1 tsp vanilla
- 2-3 tablespoon instant coffee
- 3/4 cup boiling water (180g)
Espresso Cream Cheese Frosting:
- 1 1/4 cup unsalted butter, softened (2.5 sticks or 283g)
- 20 oz cream cheese, room temperature (2.5 8 oz blocks or 570g)
- 1 tsp vanilla
- 1/2 tsp salt
- 2 tbsp instant coffee + 1 tbsp hot water
- 3–4 cups icing sugar, sifted (360 to 480g)
Instructions
- Espresso cake: Preheat oven to 350F. Mix dry ingredients, add wet ingredients, fold in coffee mixture, divide batter, bake, cool, and chill.
- Espresso Cream Cheese Frosting: Combine butter, cream cheese, vanilla, salt, and coffee. Whisk until smooth. Gradually add sugar to desired consistency.
- Assembly: Trim cake layers, frost between layers, crumb coat, chill, and decorate as desired.
Notes
- This recipe yields a generous amount of frosting. Adjust quantities for a lighter frosting.
Nutrition
- Serving Size: 1 slice
- Calories: Approx. 450
- Sugar: Approx. 35g
- Sodium: Approx. 380mg
- Fat: Approx. 28g
- Saturated Fat: Approx. 15g
- Unsaturated Fat: Approx. 10g
- Trans Fat: 0g
- Carbohydrates: Approx. 45g
- Fiber: Approx. 1g
- Protein: Approx. 5g
- Cholesterol: Approx. 105mg


