If you’re on the hunt for a crowd-pleaser that’s both festive and downright delicious, then you’re going to adore this Festive Christmas Tree Cheese Ball Recipe. It’s one of those appetizers that not only tastes amazing but also brings a little holiday magic to your table. Whether you’re throwing a cozy family gathering or a spirited Christmas party, this cheese ball is as much fun to look at as it is to eat. Trust me, once you try this, it’ll become a holiday tradition in your kitchen too!
Why You’ll Love This Recipe
- Festive and Fun: It’s shaped like a Christmas tree, making it an instant holiday hit on any table.
- Easy to Make: Even if you’re not a pro in the kitchen, you’ll find this recipe straightforward and rewarding.
- Flavorful and Creamy: The combination of sharp cheddar and Monterey Jack cheese with herbs packs the perfect punch of flavor.
- Make-Ahead Friendly: You can prepare it a day in advance and just decorate before serving—super convenient!

Ingredients You’ll Need
This Festive Christmas Tree Cheese Ball Recipe is built on classic cheeses and simple seasonings that blend beautifully to create a creamy, flavorful base. The fresh parsley and colorful bell peppers add that holiday green and red pop, while the nuts bring texture and a little elegance.
- Cream Cheese: Softened for that perfectly smooth texture—don’t skip the softening step; it makes mixing easier!
- Sharp Cheddar Cheese: Adds a tangy, rich flavor to balance the cream cheese’s mildness.
- Monterey Jack Cheese: Smooth and mild, it complements the cheddar without overpowering the mix.
- Fresh Parsley: Offers fresh, herbaceous notes and vibrant green color inside and out.
- Garlic Powder: A subtle yet essential layer of savory depth.
- Onion Powder: Another flavor booster that’s gentle but impactful.
- Italian Seasoning: A blend that brings a hint of warmth and earthiness, perfect for the holidays.
- Ground Black Pepper: Adds just the right bite without overwhelming.
- Salt: Important for flavor balance—season carefully.
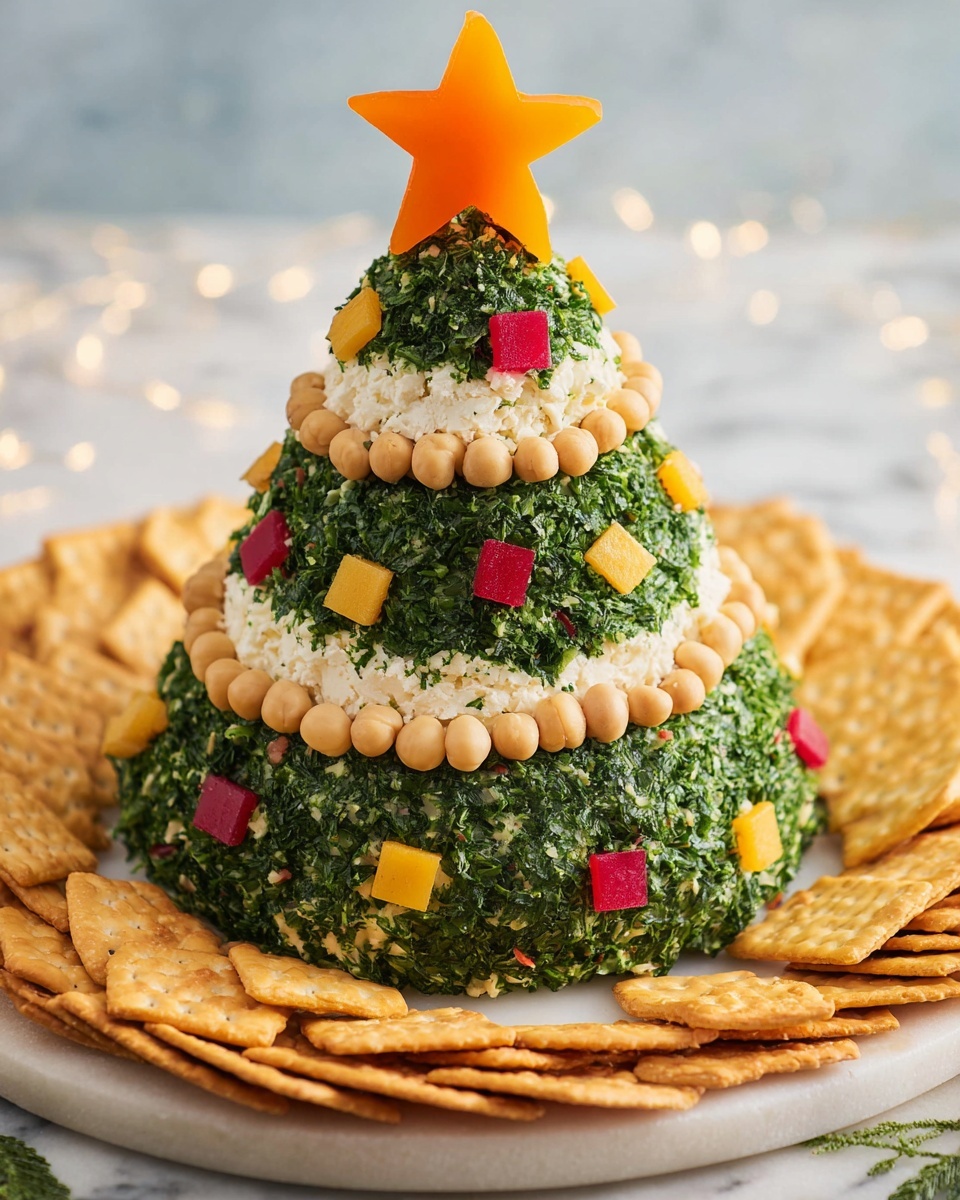
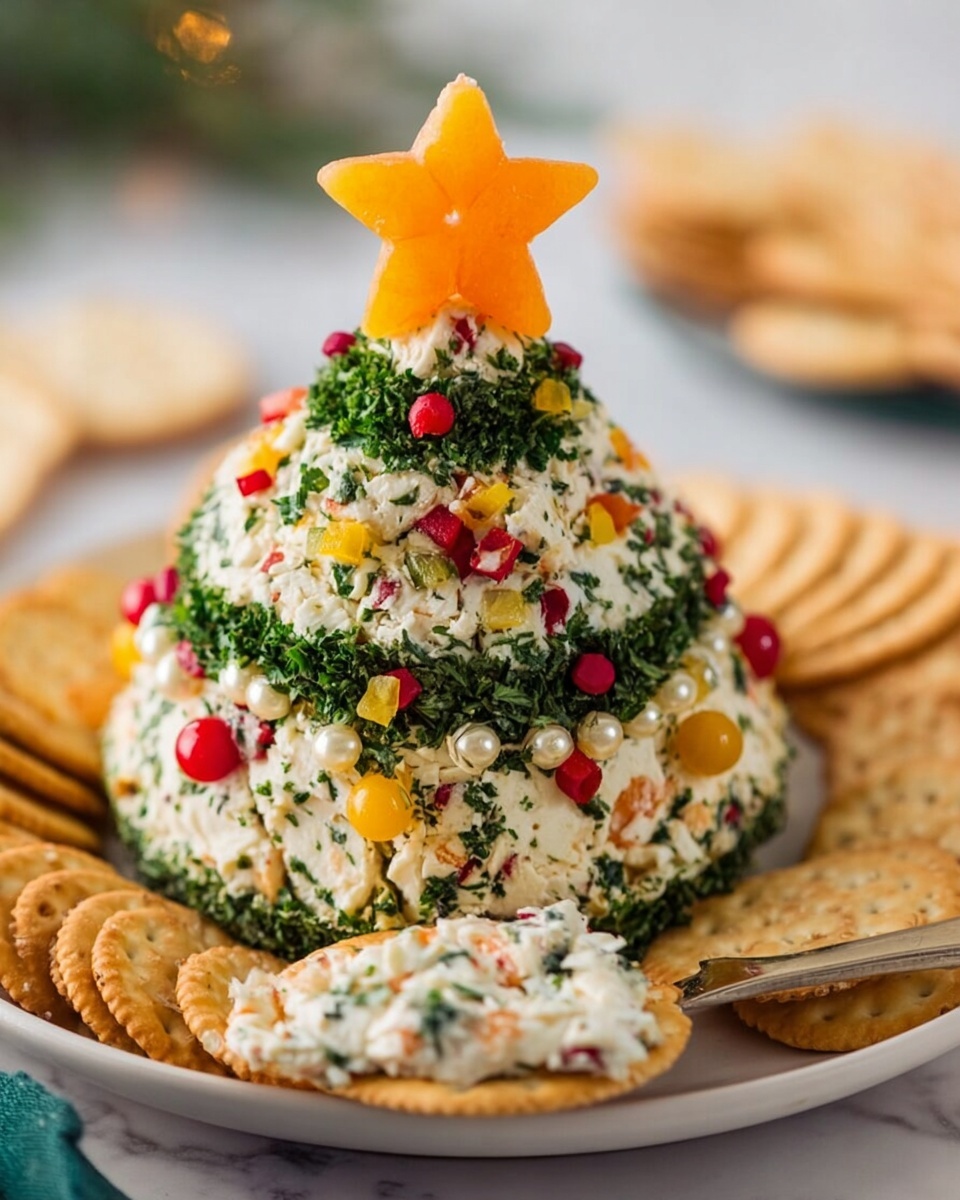
- Yellow and Red Bell Peppers: Cubed for festive red and yellow “ornaments” on the cheese tree.
- Pistachios (optional): For a crunchy texture and a beautiful green nutty accent.
- Pine Nuts (optional): Used for the “string lights” decoration—adds elegance and crunch.
Variations
This recipe is super versatile, and I love playing around with different mix-ins or decorations depending on my mood or what I have in the fridge. You can definitely customize it to suit your taste or dietary needs.
- Spicy Kick: Once, I added a dash of cayenne pepper to the cheese blend, and it gave the cheese ball a subtle warmth that our guests couldn’t stop talking about.
- Vegan Version: Swap out the cream cheese and cheddar for plant-based alternatives, and you’ll still get an eye-catching festive cheese ball everyone can enjoy.
- Nut-Free: If you’re serving people with nut allergies, simply skip the pistachios and pine nuts and use extra chopped bell peppers or olives for decoration instead.
- Herb Swap: Rosemary or thyme instead of parsley can add an interesting twist, especially if you’re going for a rustic feel.
How to Make Festive Christmas Tree Cheese Ball Recipe
Step 1: Mix the Cheeses and Seasonings
Start by putting all your softened cream cheese, shredded cheddar, and Monterey Jack into a large mixing bowl. Using a hand mixer, beat them together until the texture is creamy and lump-free. This is where the magic happens, so take your time to get a smooth mix. Then stir in the chopped fresh parsley, garlic powder, onion powder, Italian seasoning, salt, and pepper. Beat again to combine everything evenly. I discovered this trick when I realized that blending the dry spices well into the cheese mix saves you from biting into a clump of seasoning later!
Step 2: Shape and Chill the Cheese Ball
Next, lay out a large sheet of plastic wrap and transfer your cheese mixture onto it. This is where you’ll shape your festive Christmas tree! Gather the edges of the plastic wrap and mold the cheese into a cone shape, resembling a Christmas tree. Don’t worry about being perfect—the charm is in the handmade look. Chill it in the fridge for at least 2-3 hours, or even better, overnight. I’ve found that letting it rest lets all those flavors marry and also firms up the shape for decorating.
Step 3: Decorate Your Christmas Tree Cheese Ball
Once chilled, unwrap your cheese cone and place it on a serving plate. Now comes the fun part—decorating! Lightly press chopped parsley all over the cheese to create a green “foliage” effect. Dot a few pine nuts around the tree to mimic string lights—these little golden gems really add charm. Then press in the diced red and yellow bell peppers and crushed pistachios as baubles or ornaments. Finally, I love cutting a star shape from a thicker slice of cheese using a small cookie cutter and securing it to the top with a toothpick. It’s such a lovely finishing touch that really makes the tree pop.
Step 4: Serve with Your Favorite Dippers
Place your Festive Christmas Tree Cheese Ball Recipe on a platter surrounded by crackers, slices of crusty bread, or sturdy chips. I always recommend choosing dippers that are firm enough to hold a generous smear without breaking apart. Watching guests gather around and dig into this adorable tree, you’ll see why it’s become a holiday favorite in my family.
Pro Tips for Making Festive Christmas Tree Cheese Ball Recipe
- Softening Your Cream Cheese: Take it out of the fridge early or give it a quick zap in the microwave (10-15 seconds) so it blends smoothly without lumps.
- Chilling Time Is Crucial: Don’t rush this—chilling helps the cheese firm up, making it easier to decorate and keeping the shape intact.
- Use Fresh Parsley: It makes a big difference in color and freshness compared to dried herbs, which can look dull.
- Avoid Overcrowding with Decorations: Keep some green space visible so the tree looks natural and inviting, not cluttered.
How to Serve Festive Christmas Tree Cheese Ball Recipe
Garnishes
I usually stick to fresh parsley for that lush green base, plus brightly colored bell peppers for a pop of red and yellow—so fitting for the holidays! The pistachios and pine nuts add an elegant touch and a bit of crunch, which I adore. You could also experiment with olives or cherry tomatoes if you want a different twist.
Side Dishes
This cheese ball pairs wonderfully with an array of bite-sized sides—think an assortment of crackers, baguette slices, or even crunchy veggie sticks like celery or cucumber. For a holiday spread, I like adding some pickles and olives on the side to balance the richness of the cheese.
Creative Ways to Present
One year, I arranged the cheese tree on a wooden cutting board surrounded by holly sprigs and cranberries, which made it a stunning centerpiece. Another fun idea is to use different colored bell peppers to make a rainbow tree, or swap the star on top for a little red pepper shaped like a bow. Presentation is part of the joy here—let your creativity run wild!
Make Ahead and Storage
Storing Leftovers
After the party, if you have any cheese ball left, wrap it tightly in plastic wrap or an airtight container and pop it back into the fridge. It keeps well for about 4 to 5 days, and the flavors actually mellow out beautifully over time.
Freezing
I recommend freezing only if you have a large batch—wrap it super tight in plastic wrap and then foil to prevent freezer burn. When thawing, do it slowly overnight in the fridge to maintain texture. Just keep in mind the fresh parsley may lose some vibrancy after freezing.
Reheating
Since it’s a cheese ball appetizer meant to be served cold or at room temp, reheating isn’t necessary. If you do want it softer, just let it sit at room temperature for about 30 minutes before serving to regain creaminess.
FAQs
-
Can I make the Festive Christmas Tree Cheese Ball Recipe vegan?
Absolutely! You can swap the cream cheese and shredded cheeses with your favorite vegan cream cheese and vegan cheddar-style cheese. The texture and taste will differ slightly, but it still makes a beautiful and tasty appetizer.
-
How long can I prepare the cheese ball ahead of time?
You can make the cheese ball up to 24 hours before serving. Just keep it tightly wrapped and refrigerated until you’re ready to decorate and serve.
-
What can I use if I don’t have pine nuts or pistachios?
If you’re missing these nuts or have allergies, chopped olives or finely diced colorful veggies like radishes or cherry tomatoes can make great decorative alternatives.
-
Is it better to use fresh or dried herbs?
Fresh herbs like parsley work best here for flavor and color, especially since part of the spread is used for decoration on the outside of the tree.
Final Thoughts
Honestly, I absolutely love how this Festive Christmas Tree Cheese Ball Recipe turns out every single time. It’s become a staple at my holiday parties because it’s simple, beautiful, and guaranteed to impress. The best part? It brings people together—everyone gravitates toward that cheese tree with smiles and excited chatter. If you want an appetizer that’s festive, tasty, and easy to prep ahead, this is it. Give it a shot and watch it become a cherished holiday tradition in your home too.
Print
Festive Christmas Tree Cheese Ball Recipe
- Prep Time: 15 minutes
- Cook Time: 0 minutes
- Total Time: 2 hours 15 minutes
- Yield: 20 servings
- Category: Appetizer
- Method: No-Cook
- Cuisine: American
- Diet: Vegetarian
Description
A festive and delicious Christmas Tree Cheese Ball that’s perfect as a holiday appetizer. Creamy blend of cheeses seasoned with herbs and spices, shaped into a cone, then decorated with colorful bell peppers, nuts, and parsley for a beautiful tree appearance. Easy to prepare ahead and guaranteed to impress your guests.
Ingredients
Cheese Mixture
- 3 x 8 ounce (225g) packages cream cheese, softened
- 1 cup shredded sharp cheddar cheese
- ½ cup shredded Monterey Jack cheese
- 1 tablespoon chopped fresh parsley
- 1 teaspoon garlic powder
- 1 teaspoon onion powder
- 1 teaspoon Italian seasoning
- ½ teaspoon ground black pepper
- ½ teaspoon salt
Decoration
- 3 tablespoons chopped fresh parsley
- ¼ of each yellow and red bell peppers, diced
- 1 tablespoon pistachios, roughly chopped (optional)
- 1 tablespoon pine nuts (optional)
Instructions
- Mix Cheeses and Seasonings: In a large bowl, use a hand mixer to beat together the softened cream cheese, shredded cheddar, and Monterey Jack cheese until smooth and well combined. Add in 1 tablespoon of chopped fresh parsley along with garlic powder, onion powder, Italian seasoning, ground black pepper, and salt. Continue beating until all ingredients are fully incorporated and the mixture is uniform.
- Shape and Chill: Transfer the cheese mixture onto a large piece of plastic wrap. Tightly wrap the mixture and shape it into a cone, resembling a Christmas tree. Place the wrapped cheese cone in the refrigerator and chill for at least 2 to 3 hours, preferably overnight, to allow the flavors to meld and the shape to firm up.
- Decorate the Cheese Tree: Once chilled, carefully unwrap the cheese cone and transfer it onto a serving plate. Lightly press some of the additional chopped parsley onto the surface to mimic pine needles. Dot pine nuts around the tree to create the effect of string lights. Scatter diced yellow and red bell peppers and pistachios over the tree to resemble colorful ornaments or baubles. Press in the remaining parsley to cover any gaps and fill in the tree’s appearance.
- Create the Star Topper: Cut a star shape from a thick slice of cheese using a small cookie cutter. Attach the cheese star to the top of the tree using a toothpick to secure it in place.
- Serve: Present the Christmas Tree Cheese Ball with your choice of crackers, bread slices, or sturdy chips for dipping and spreading.
Notes
- This cheese ball is a festive and eye-catching appetizer that’s perfect for holiday gatherings and Christmas parties.
- Preparing the cheese ball at least a few hours ahead, or overnight, helps it set properly and makes decorating easier.
- Feel free to customize decorations with other nuts, veggies, or herbs to suit your taste and holiday theme.
- Serve with a variety of crackers and bread to suit different preferences.
Nutrition
- Serving Size: 1 serving
- Calories: 158 kcal
- Sugar: 1 g
- Sodium: 222 mg
- Fat: 15 g
- Saturated Fat: 8 g
- Unsaturated Fat: 5 g
- Trans Fat: 0 g
- Carbohydrates: 2 g
- Fiber: 1 g
- Protein: 4 g
- Cholesterol: 46 mg


