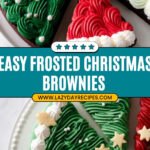
If you’re on the hunt for a festive treat that’s both indulgent and visually delightful, you’re going to adore this Frosted Christmas Brownies Recipe. These brownies come out thick, fudgy, and topped with vibrant red and green frosting that just scream holiday cheer. I absolutely love how this recipe takes simple boxed brownies to a whole new level, perfect for any Christmas party or cozy night by the fire. Stick with me, and I’ll walk you through exactly how to nail these festive treats every single time.
Why You’ll Love This Recipe
- Ultimate Festive Presentation: The vibrant red and green frosting with edible gold stars instantly brings holiday joy to your dessert table.
- Easy to Customize: Whether you use boxed mix or homemade, this recipe works beautifully and lets you play with thickness and frosting thickness.
- Perfect Crowd-Pleaser: My family goes crazy for this, and every year these brownies get devoured faster than any other treat!
- Great for All Skill Levels: Even if you’re new to baking or decorating, this recipe is foolproof and fun to make.

Ingredients You’ll Need
The ingredient list for this Frosted Christmas Brownies Recipe is wonderfully simple, yet each component brings something special. I like to say you don’t need fancy ingredients to create something spectacular. Pro tip: choosing quality frosting makes a big difference in taste and look!
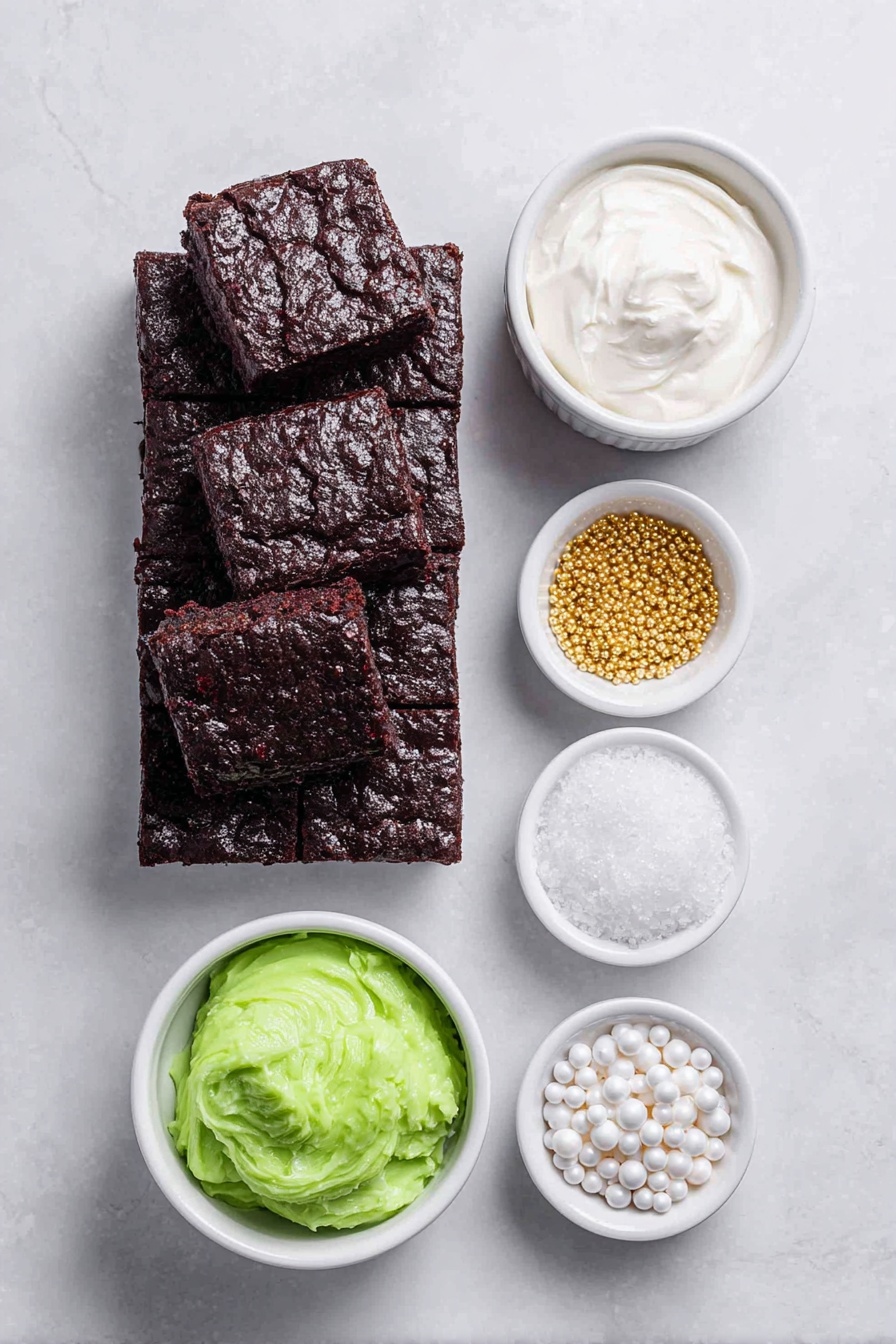
- Brownie Mix: I usually grab a fudgy boxed mix, or you can make your favorite homemade recipe; doubling the mix makes these brownies beautifully thick and indulgent.
- White Frosting: The canvas for our festive colors! Use a smooth, creamy frosting—homemade or store-bought works fine.
- Edible Gel Food Coloring: I prefer gel over liquid because it keeps the frosting thick and vibrant without watering it down.
- Edible Gold Stars: These tiny decorations add just the right amount of sparkle and holiday magic.
- White Pearl Sprinkles: I love the subtle elegance and texture these bring to the green frosting Christmas tree design.
- Icing Bags and Frosting Tips: A large star tip (like 1M) makes piping quick, neat, and festive-looking.
Variations
One thing I love about this Frosted Christmas Brownies Recipe is how easy it is to make your own. Sometimes I switch up the colors or add a little extra flair to match whatever party I’m attending. Don’t hesitate to get creative — these brownies are a great canvas!
- Peanut Butter Swirl: I once folded some peanut butter into half the batter before baking—it added a rich, nutty surprise that my family really enjoyed.
- Dairy-Free Version: Use a dairy-free brownie mix and frosting, plus plant-based milk, to make this recipe allergy-friendly without losing fudgy goodness.
- Gluten-Free Adaptation: Swap in a gluten-free brownie mix and check your sprinkles for gluten ingredients; you’ll still get all the festive joy.
- Seasonal Colors: Though Christmas colors are iconic, try blue and silver frosting for a winter wonderland vibe or pastel for holiday brunches.
How to Make Frosted Christmas Brownies Recipe
Step 1: Prepare and Bake Your Brownies
Start by preheating your oven as directed on the brownie mix box. Spray a 9-inch springform pan with cooking spray to make sure your brownies come out cleanly without sticking. I like this pan because the removable sides make it so easy to slice perfect triangles later without breaking them up.
Next, mix both boxes of your brownie mix thoroughly — doubling the mix gives you thicker, more decadent brownies. Pour that luscious batter into the pan and bake according to the package instructions, but keep in mind it may take a bit longer since it’s a double batch. The best way to check is with a toothpick: when it comes out with just a few moist crumbs, your brownies are ready. I discovered that checking early avoids drying them out.
Step 2: Cool and Cut Your Brownies
Allow your brownies to cool completely before you remove the springform pan ring. Patience here is key—if you frost warm brownies, the frosting melts and looks messy. Once cool, place your brownies on a cutting board and slice them into 8 even triangles. I find using a long, sharp knife and wiping it clean between cuts helps keep the lines crisp.
Step 3: Prepare Your Festive Frostings
In two small bowls, tint your white frosting with red and green edible gel food coloring to get those classic Christmas shades. I start with a small amount of gel — it’s super concentrated — and add more until I reach the perfect hue. Leave some frosting plain for snowy white accents.
Next, transfer each colored frosting into separate icing bags fitted with your large star piping tip. This makes decorating so much easier and fun! If you don’t have a bag, you can use a plastic sandwich bag with the corner snipped off as a quick substitute.
Step 4: Decorate and Enjoy!
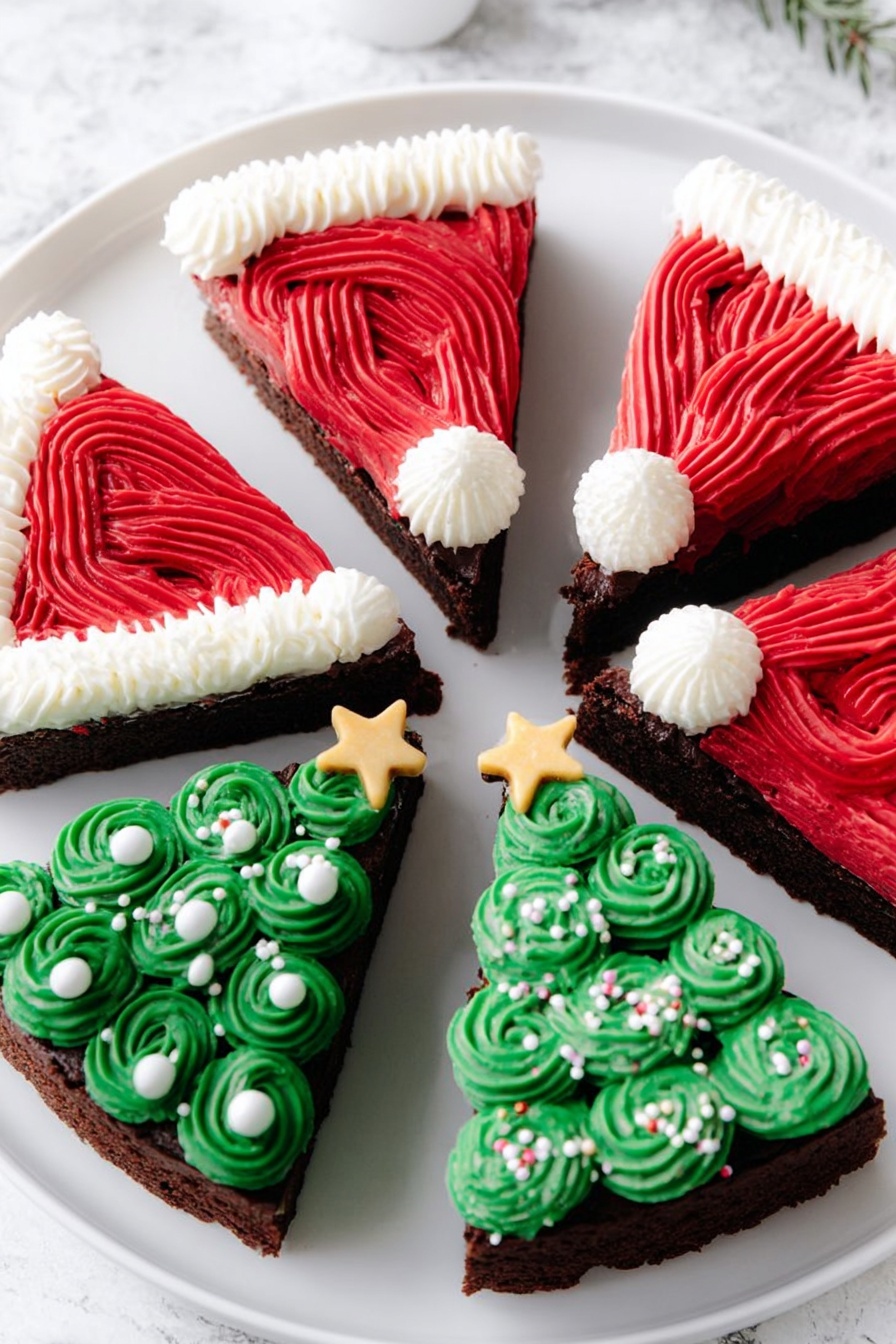
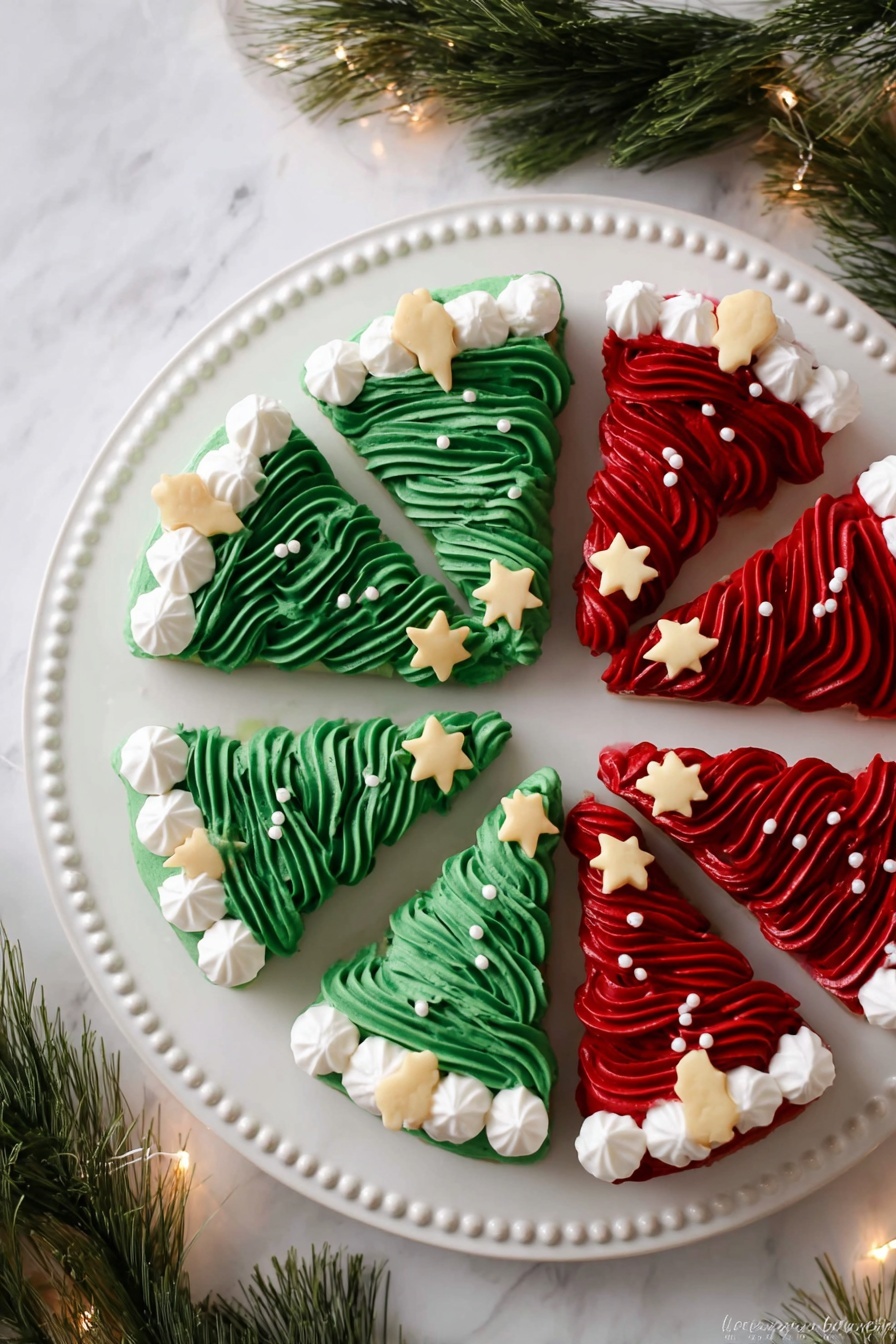
Now for the fun part! Using the green frosting, create the shape of Christmas trees on some brownies, swirling upward with your star tip. Add white pearl sprinkles as ornaments and top with edible gold stars to really make them pop. For the Santa Claus hat brownies, combine red and white frosting to mimic that classic look with a fluffy white trim and pom-pom on top.
Once decorated, these beauties are ready to serve and delight anyone lucky enough to try one.
Pro Tips for Making Frosted Christmas Brownies Recipe
- Use a Springform Pan: It really saves your brownie edges when removing from the pan, keeping your slices neat and pretty.
- Don’t Overbake: I’ve learned that checking with a toothpick early prevents dry brownies — you want them fudgy, not cakey.
- Gel vs. Liquid Coloring: Gel food coloring gives stronger, richer colors without thinning your frosting.
- Frost Only When Brownies Are Cool: This prevents melting and maintains the frosting’s texture and design.
How to Serve Frosted Christmas Brownies Recipe
Garnishes
I always garnish the frosted brownies with those shiny edible gold stars and white pearl sprinkles because they add a touch of elegance and sparkle that really elevate the treats. Plus, they bring a little crunch and texture, which your guests will appreciate. Don’t skip this step — it’s like adding the final jewel to a crown!
Side Dishes
These brownies are rich and sweet, so I like pairing them with lighter sides like fresh berries or a simple salad for holiday brunches. A scoop of vanilla ice cream or a dollop of whipped cream is also heavenly alongside warm brownie slices during dessert. And of course, a hot cup of coffee, cocoa, or spiced tea is my go-to companion when serving these.
Creative Ways to Present
For parties, I sometimes arrange the brownies like little Christmas trees on a platter with some pine sprigs or holly around them for holiday flair. Wrapping individual brownies in clear cellophane tied with red and green ribbons also makes fantastic homemade gifts. And a dusting of powdered sugar just feels like a fresh snowfall, adding extra charm.
Make Ahead and Storage
Storing Leftovers
I usually keep leftover frosted brownies in an airtight container at room temperature for up to three days. They stay moist and delicious, and the frosting holds up really well. If it’s warm or humid, I pop them in the fridge to keep the frosting firm, but that can slightly harden the brownies, so I usually let them come back to room temp before eating.
Freezing
Yes, these Frosted Christmas Brownies freeze beautifully! I recommend freezing the unfrosted brownies first — wrap tightly in plastic wrap and foil to avoid freezer burn. When you’re ready to enjoy, thaw completely, then frost as usual. This helps keep the frosting fresh and vibrant, perfect for making ahead of big celebrations.
Reheating
If you want warm brownies, I carefully microwave a single slice for about 10-15 seconds — just enough to take the chill off without melting the frosting completely. Alternatively, a short bake at 300°F (about 5 minutes) works well if you prefer oven warming. Always keep an eye to avoid drying them out!
FAQs
-
Can I use homemade brownies instead of boxed mix for this Frosted Christmas Brownies Recipe?
Absolutely! Homemade brownies work wonderfully and give you full control over the texture and flavor. Just make sure they’re fully cooled before frosting, and you can follow the same decorating steps. I’ve tried both ways, and they come out equally festive and delicious.
-
How do I prevent frosting colors from bleeding into each other?
I recommend letting the first layer of frosting set up slightly before adding a second color near it. Using firmer, thick frosting helps, and piping with a steady hand is key. Refrigerating the decorated brownies briefly can also help the frosting firm up and reduce bleeding.
-
What if I don’t have edible gold stars or pearl sprinkles?
No worries! You can use any festive sprinkles you have, like red and green sugar crystals or even mini candy canes crushed gently as a topping. Sometimes, a sprinkle swap adds a fun personal touch without altering the deliciousness.
-
How thick should the frosting be for decorating?
I usually go for a piping consistency that’s stiff enough to hold shape but soft enough to pipe smoothly. If it’s too runny, add more powdered sugar; if too stiff, a little milk or water thins it out. This balance makes decorating the Christmas tree and Santa hat shapes simple and pretty.
Final Thoughts
I truly think this Frosted Christmas Brownies Recipe is one of those holiday classics you’ll want to come back to year after year. It’s easy enough to whip up at the last minute, yet impressive enough to wow any crowd. Plus, the bright colors and sparkly decorations make them a festive centerpiece that tastes just as amazing as it looks. I hope you have as much fun making and sharing these as I do — they really are the sweetest way to spread some Christmas joy!
Print
Frosted Christmas Brownies Recipe
- Prep Time: 15 minutes
- Cook Time: 35-45 minutes
- Total Time: 50-60 minutes
- Yield: 8 large triangle brownies
- Category: Dessert
- Method: Baking
- Cuisine: American
- Diet: Vegetarian
Description
Delight in these festive Frosted Christmas Brownies, featuring thick, rich brownies topped with vibrant red, green, and white frostings. Decorated with edible gold stars and white pearl sprinkles, these treats bring holiday cheer in every bite, perfect for holiday parties and family gatherings.
Ingredients
Brownies
- 2 Boxes of Brownie Mix, or a double batch of homemade brownies
Frosting and Decorations
- White Frosting, 1-3 jars (depending on desired coverage)
- Edible Gel Food Coloring (red and green or alternative natural food colorings)
- Edible Gold Stars
- White Pearl Sprinkles
- Icing Bags
- Frosting Tips (large star – 1M)
Instructions
- Preheat and prepare pan: Preheat the oven according to the brownie mix box instructions. Spray a 9-inch springform pan thoroughly with cooking spray to prevent sticking.
- Mix and bake brownies: Combine both brownie mixes (or prepare a double batch of homemade batter) thoroughly. Pour the batter into the prepared springform pan and bake as per the packaging instructions or until a toothpick inserted in the center comes out clean.
- Cool and cut brownies: Allow the brownies to cool completely. Once cooled, remove from the springform pan carefully, place on a cutting board, and slice into 8 triangular pieces resembling Christmas tree shapes.
- Prepare colored frostings: In separate small bowls, mix some white frosting with red gel food coloring in one, and green gel food coloring in another. Adjust the dye quantity to achieve your preferred vibrant color shades.
- Fill icing bags: Transfer the red, green, and remaining white frosting into individual icing bags fitted with large star frosting tips (1M recommended) for decorative piping.
- Decorate brownies: Using the green frosting, pipe Christmas tree patterns on some brownies and embellish them with white pearl sprinkles and edible gold stars. Use white and red frosting for decorating Santa Claus hat brownies or other festive designs as desired.
- Serve and enjoy: Arrange the decorated brownies on a holiday platter, serve, and enjoy the festive flavors and beautiful presentation with family and friends.
Notes
- You can opt to use only one box or batch if you prefer thinner brownies; two boxes create extra thick, indulgent brownies.
- Baking times may be longer for a double batch – monitor brownies and adjust baking time accordingly.
- The amount of frosting used depends on how thickly you want to frost the brownies and the intensity of your desired red and green hues.
- Use natural or gel food coloring alternatives if you prefer to avoid artificial dyes.
Nutrition
- Serving Size: 1 brownie (1/8 of batch)
- Calories: 320
- Sugar: 30g
- Sodium: 230mg
- Fat: 14g
- Saturated Fat: 5g
- Unsaturated Fat: 7g
- Trans Fat: 0.1g
- Carbohydrates: 45g
- Fiber: 2g
- Protein: 3g
- Cholesterol: 25mg