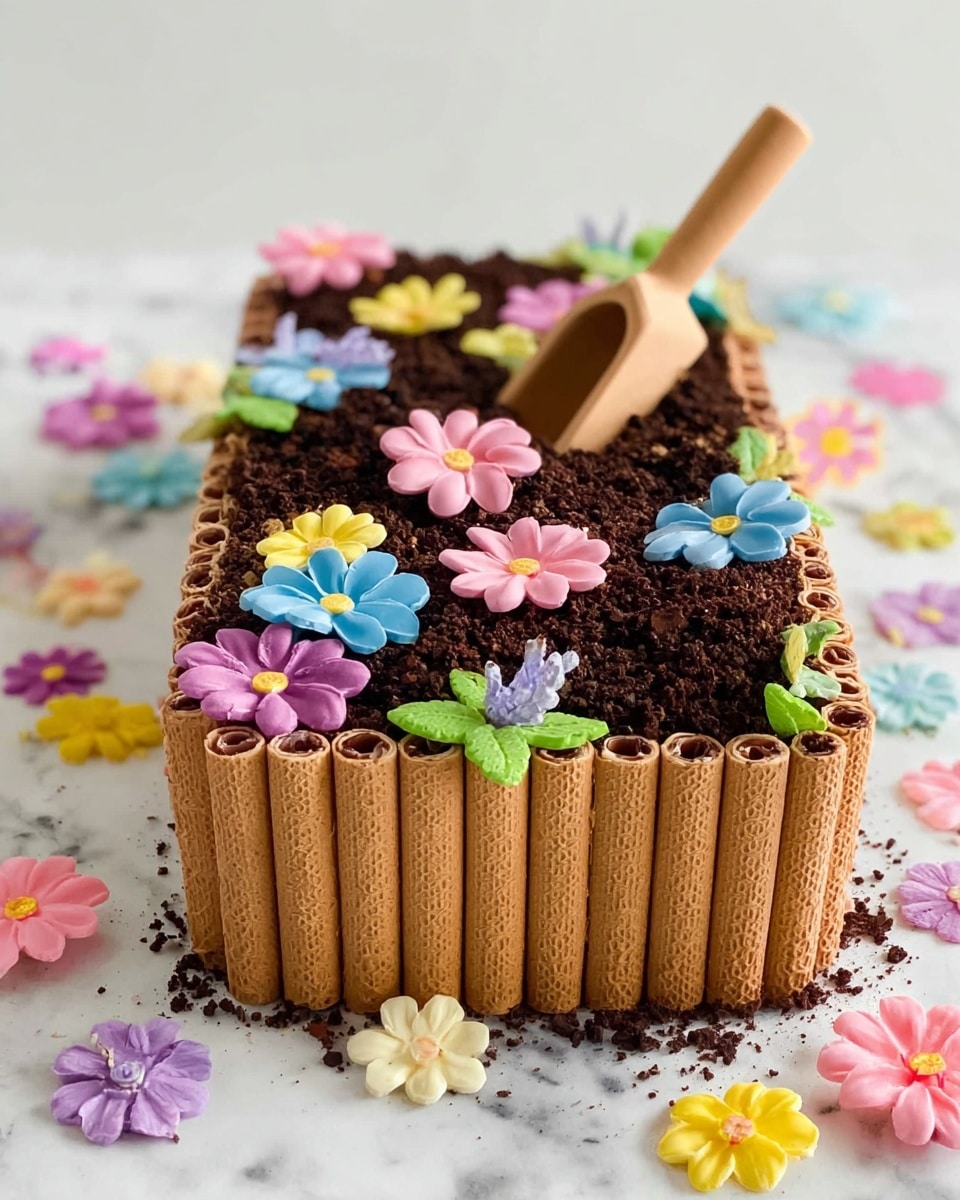
If you’re looking for a dessert that’s as delightful to look at as it is to eat, you’re going to love this Garden Flower Cake Recipe. I absolutely adore how this cake turns the classic chocolate loaf into a whimsical garden bursting with edible flowers. Whether you’re celebrating a special occasion like Mother’s Day or just want to surprise someone with a fun homemade treat, this cake is sure to get oohs and ahhs. Stick with me—I’ll share all the tips and tricks that make this not only stunning but really easy to pull off!
Why You’ll Love This Recipe
- Effortlessly Beautiful: You don’t have to be a pro baker to create a cake that looks professionally decorated.
- Kid-Friendly Fun: Decorating with edible flowers and chocolate “soil” makes this a great project for baking with kids.
- Flavorful Texture Contrast: The chocolate frosting and cookie crumbs pair perfectly with the floral accents for a unique dessert experience.
- Great for Any Occasion: This versatile garden-themed cake brightens up special events and casual gatherings alike.
Ingredients You’ll Need
The ingredients for this Garden Flower Cake Recipe are simple but thoughtfully chosen for both taste and visual impact. Each component plays a role in making your cake look like a lush garden, plus it tastes incredible! If you want to save time, go for store-bought items like the loaf cake and frosting—I often do, and it works like a charm.
- Store-bought chocolate loaf cake: This makes the perfect base, but if you’re feeling adventurous, you can bake your favorite chocolate cake recipe instead.
- Edible flowers (like pansies, violets, or marigolds): These add a pop of color and natural freshness—just make sure they’re pesticide-free.
- Chocolate wafers: Use these to create the garden bed edging; they add structure and a fun crunch.
- Chocolate frosting: You can pick up a tub from the store or whip up a homemade frosting if you prefer—it’s the “mud” that holds your garden together.
- Chocolate cookie crumbs (from Oreo or similar): Crushed cookies create that authentic “soil” texture and add delicious flavor.
- Small wooden scoop or decorative garden tool (cleaned and washed): This optional piece adds a charming finishing touch and really brings the garden theme home.
Variations
One of the best things about the Garden Flower Cake Recipe is how easy it is to make your own by swapping ingredients or trying new toppers. I love experimenting with different edible flowers and cookies to match the season or occasion.
- Gluten-Free Version: Use a gluten-free chocolate loaf cake and gluten-free chocolate wafers; I tried this once for a friend’s birthday, and no one missed the gluten!
- Fruit-Enhanced: Add fresh berries or sliced fruit among the flowers for a tasty twist that also adds moisture and colors.
- White Chocolate Garden: Swap the chocolate frosting and wafers for white chocolate versions for a lighter, elegant look.
- Herbal Garden: Incorporate fresh edible herbs like mint or rosemary alongside flowers for a fragrant, unique experience.
How to Make Garden Flower Cake Recipe
Step 1: Frost the Cake Like Rich Soil
Start by evenly spreading your chocolate frosting over the entire surface of your chocolate loaf cake—top and sides. This frosting is the “mud” that holds your garden together, so take your time and make it smooth and thick enough to stick the crumbs and flowers later. I like to use an offset spatula because it makes spreading so much easier and even.
Step 2: Add the ‘Soil’ with Cookie Crumbs
Next, sprinkle a generous layer of crushed chocolate cookie crumbs over the frosted top. This creates a realistic, earthy garden soil effect. I recommend twisting Oreo cookies apart and removing the white filling before crushing them in a plastic bag with a rolling pin—this yields perfect crumbs every time. Make sure the frosting is tacky, so the crumbs stick well and cover completely.
Step 3: Decorate with Edible Flowers
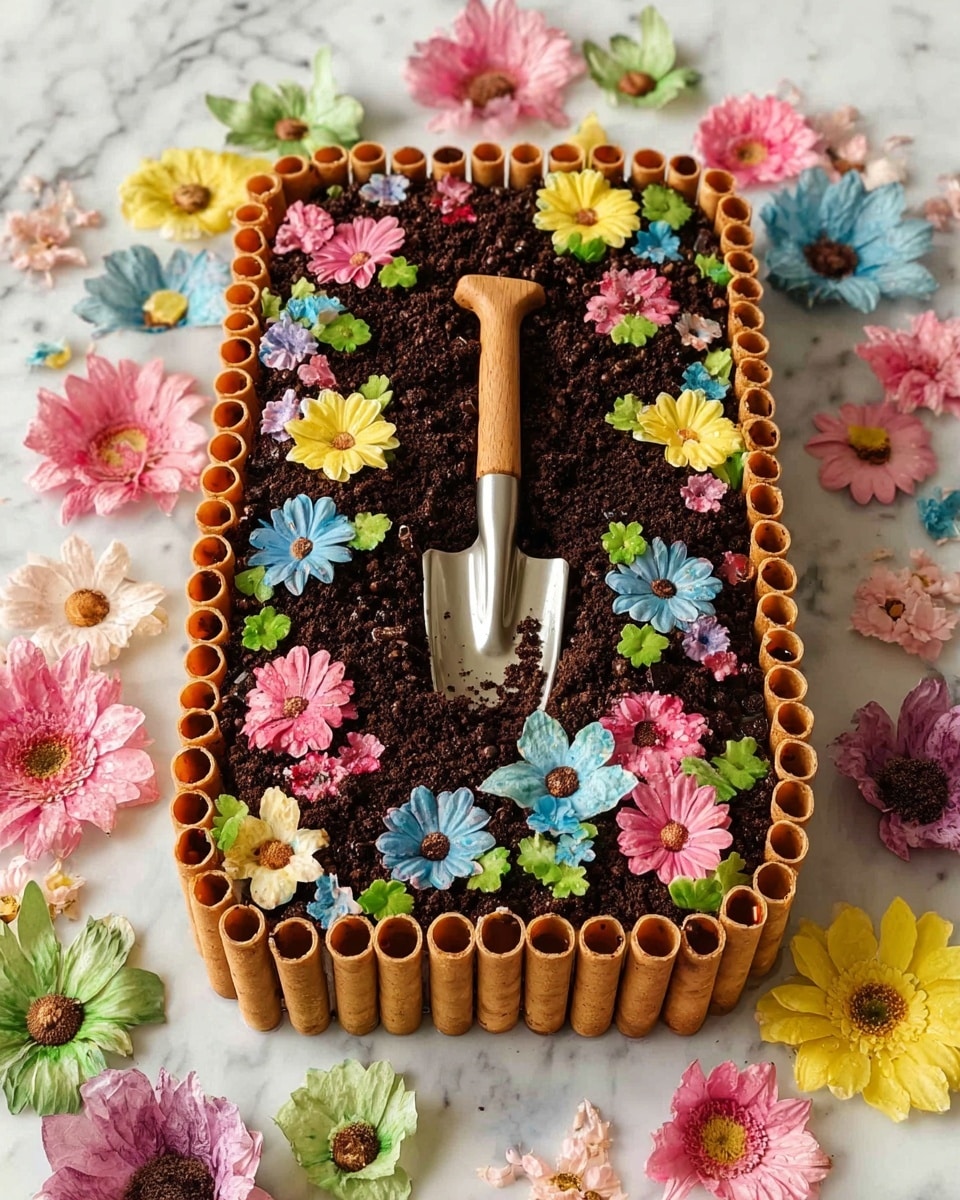
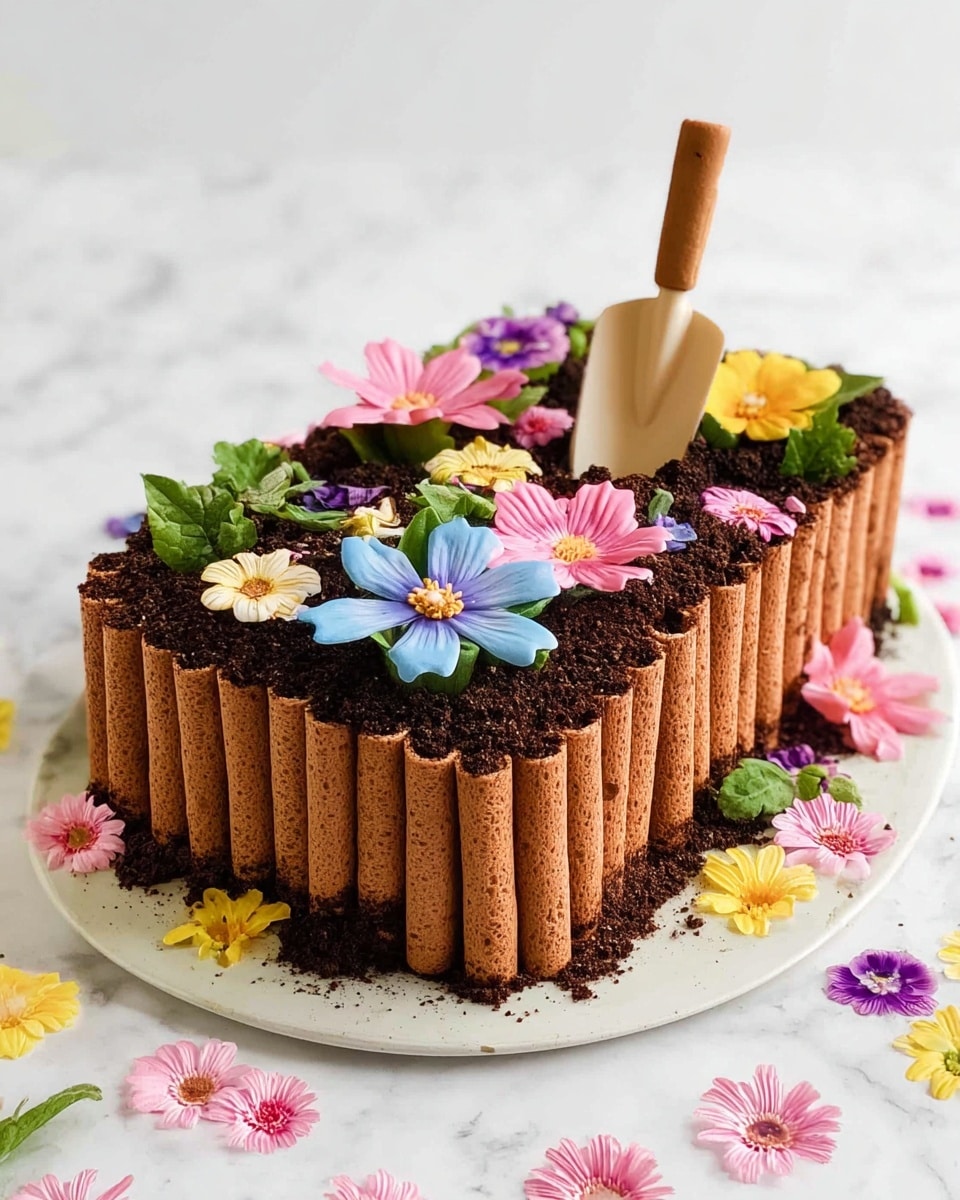
This is the most fun step! Gently press your edible flowers into the cookie crumb “soil” all over the top of the cake. I like to arrange a mix of sizes and colors to mimic a natural flower bed. Remember to wash and dry your flowers carefully before adding them to the cake. It really feels special seeing the garden come to life here.
Step 4: Create the Garden Bed with Chocolate Wafers
Stand your chocolate wafers vertically around the edges of the cake to build the garden bed border. This adds a nice contrast in texture and a charming, rustic look. You might need to press them gently into the frosting so they stay upright. When I’ve done this, I sometimes tap the cake board gently to make sure they’re snug and secure.
Step 5: Add the Finishing Touch (Optional)
For that extra bit of whimsy, place a small, clean wooden scoop or a decorative garden tool right on top of your cake. This little detail brings the whole “garden” theme together and is a real conversation starter. When I made this cake for Mother’s Day, that scoop was the cherry on top—it made it feel thoughtful and handmade.
Pro Tips for Making Garden Flower Cake Recipe
- Choose Pesticide-Free Edible Flowers: Always double-check that your flowers are safe to eat and haven’t been sprayed—your health matters, and it makes a big flavor difference.
- Keep Cake Cool Before Serving: Refrigerate the cake after decorating to keep the frosting firm and the flowers fresh, but bring it back to room temperature before serving for the best taste.
- Crush Cookies Evenly: Crushing cookies with a rolling pin inside a sealed bag helps get consistent crumbs without making it dusty or too fine.
- Handle Flowers Gently: Use clean hands or tweezers when placing flowers to avoid bruising and keep them looking fresh longer on the cake.
How to Serve Garden Flower Cake Recipe
Garnishes
I like to add a few extra edible flowers around the serving plate, maybe with a sprig of fresh mint or a dusting of powdered sugar. This makes the whole presentation pop and really ties the garden theme together. If you’re feeling fancy, a drizzle of chocolate or caramel around the plate works beautifully too.
Side Dishes
This cake pairs wonderfully with a simple scoop of vanilla ice cream or a dollop of whipped cream. Fresh berries or a zesty fruit salad on the side add a nice balance to the rich chocolate flavors—you’ll find those bright notes a perfect contrast.
Creative Ways to Present
For Mother’s Day or a garden party, try placing your cake on a rustic wooden platter with some small potted plants nearby. You can even create a mini soil patch around the cake using extra cookie crumbs on the serving board—it turns the whole display into a charming garden scene that everyone admires.
Make Ahead and Storage
Storing Leftovers
Once decorated, cover the cake loosely with plastic wrap or place it in a cake dome. I keep mine in the refrigerator to preserve the freshness of the edible flowers and frosting. The flavors hold up beautifully for 2-3 days, though the flowers might start to wilt after that.
Freezing
If you want to freeze this cake, I recommend doing so before decorating. Wrap the frosted cake tightly in plastic wrap and then foil to protect it from freezer burn. When you’re ready, thaw it overnight in the fridge before adding flowers and cookie crumb soil for best results.
Reheating
I usually serve this cake at room temperature. If your cake feels too chilled, simply take it out of the fridge about 30 minutes before serving. Avoid microwaving the cake, as this can melt the frosting and damage the flower decorations.
FAQs
-
Can I use any type of edible flower for this Garden Flower Cake Recipe?
Yes! You can use a wide variety of edible flowers such as pansies, violets, marigolds, nasturtiums, and calendula. Just be certain that they are specifically labeled edible and free of pesticides, and always wash them gently before use.
-
What if I can’t find chocolate wafers for the garden bed?
If chocolate wafers aren’t available, try using thin chocolate-covered biscuits or even rectangular chocolate bars broken into sticks. The key is to create a neat border that can stand upright around the cake.
-
How do I make sure the cookie crumbs stick to the frosting?
Make sure the frosting is spread smoothly and thick enough so that it’s still tacky when you sprinkle the crumbs. The slight stickiness will help hold the crumbs in place and create that authentic soil texture.
-
Can I make this cake ahead of time?
You can prepare the chocolate loaf cake and frosting ahead, but I recommend decorating with the edible flowers and cookie crumbs on the day you plan to serve it for maximum freshness and visual impact.
Final Thoughts
When I first created this Garden Flower Cake Recipe, it felt like magic bringing a chocolate cake to life with colorful blooms and a crunchy garden border. I’ve since made it for Mother’s Day, birthdays, and even casual tea parties—and every time, it delights both the eyes and the taste buds. It’s truly a showstopper that’s easy and fun to make. I hope you’ll give it a try soon and share the joy of this sweet little garden with your family and friends!
Print
Garden Flower Cake Recipe
- Prep Time: 15 minutes
- Cook Time: 0 minutes
- Total Time: 15 minutes
- Yield: 8 servings
- Category: Dessert
- Method: No-Cook
- Cuisine: American
Description
Celebrate Mother’s Day with a charming Garden Flower Cake that looks like a blooming flower bed. This easy-to-make cake features a chocolate loaf base frosted with rich chocolate frosting, topped with crushed chocolate wafers to resemble soil, and decorated with vibrant edible flowers. It’s a perfect centerpiece that’s as beautiful as it is delicious, making it a fun baking project for the whole family.
Ingredients
Base
- 1 store-bought chocolate loaf cake (or homemade using your favorite cake recipe or cake mix)
Decoration
- Edible flowers (such as pansies, violets, or marigolds), enough to decorate
- Chocolate wafers (to line the garden bed)
- Chocolate frosting (store-bought or homemade), about 1 cup
- Chocolate cookie crumbs (made by crushing Oreo cookies without the white filling), approximately 1 cup
- Small wooden scoop or decorative garden tool (clean and washed), optional for garnish
Instructions
- Frost the Cake: Evenly spread the chocolate frosting over the entire top and sides of the chocolate loaf cake. This layer will serve as the moist “mud” or soil base for planting your edible flowers.
- Add the ‘Soil’: Sprinkle a generous layer of chocolate cookie crumbs over the frosted top to create the appearance of rich garden soil. To make the crumbs, place Oreo cookies (twist to remove the white filling) into a sealed plastic bag and crush them finely with a rolling pin or similar tool until crumbly.
- Decorate with Edible Flowers: Gently press the edible flowers into the chocolate cookie crumb layer. Arrange them creatively to mimic a colorful blooming garden on the cake surface.
- Create the Garden Bed: Stand chocolate wafers vertically around the edges of the cake, pressing gently into the frosting to form a neat garden bed border that holds the soil and flowers in place.
- Add the Finishing Touch: Optionally, place a small clean wooden scoop or decorative garden tool on top of the cake to enhance the garden theme and add a charming, playful element.
- Enjoy the Presentation: Present the finished Garden Flower Cake on a serving plate. Surround it with additional edible or decorative flowers for an eye-catching Mother’s Day centerpiece that doubles as a delicious treat.
Notes
- This cake is a delightful and creative project that children can help with, making it a perfect baking activity for Mother’s Day.
- Make sure all flowers used are edible and safe to consume.
- If homemade frosting is preferred, a simple chocolate buttercream works beautifully.
- For a gluten-free version, use gluten-free chocolate cake and wafers.
- The wooden scoop is optional but adds an adorable garden-themed detail.
Nutrition
- Serving Size: 1 slice (1/8 of cake)
- Calories: 320 kcal
- Sugar: 28 g
- Sodium: 180 mg
- Fat: 15 g
- Saturated Fat: 8 g
- Unsaturated Fat: 5 g
- Trans Fat: 0.2 g
- Carbohydrates: 42 g
- Fiber: 2 g
- Protein: 4 g
- Cholesterol: 35 mg

