
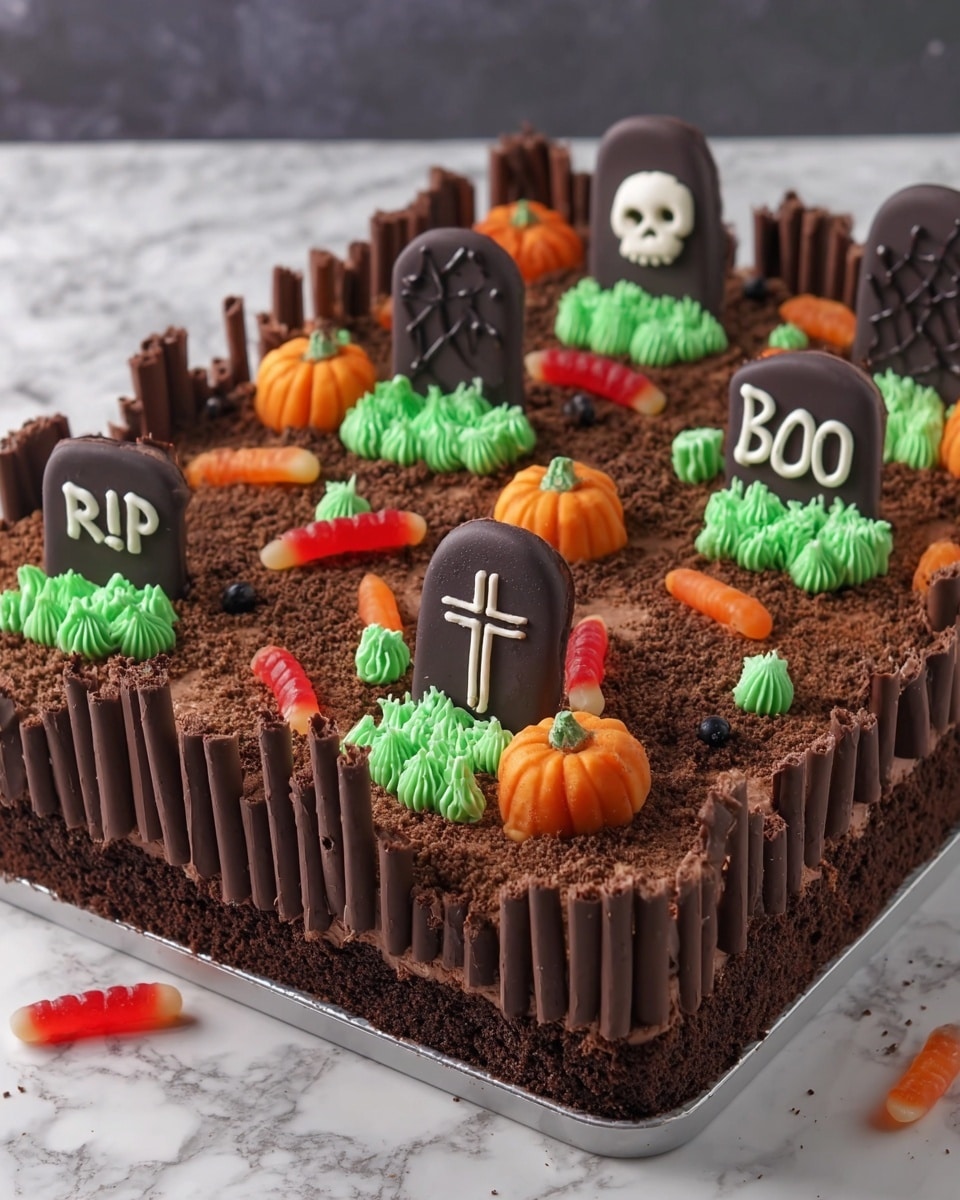
Hey friend! If you’re on the hunt for a show-stopping dessert this Halloween, let me introduce you to my absolute favorite: the Halloween Graveyard Cake Recipe. This cake is decadent, spooky, and seriously fun to make—perfect for impressing your family and friends at any Halloween gathering. I absolutely love how the chocolatey crumb “soil,” biscuit tombstones, and grass piping come together to create this eerie yet scrumptious treat. Stick with me, and I’ll walk you through every delicious step so you can nail this Halloween classic with zero stress.
Why You’ll Love This Recipe
- Easy to Assemble: Despite all the spooky details, the steps are straightforward and beginner-friendly.
- Incredibly Moist Chocolate Cake: The rich cocoa and soft brown sugar create a tender crumb every time.
- Fun for Kids and Adults Alike: Everyone loves the creepy decorations and delicious textures.
- Customizable Decor: Makes it easy to adjust to your own Halloween theme or dietary needs.

Ingredients You’ll Need
To get this Halloween Graveyard Cake Recipe just right, you’ll want to use quality ingredients that play well together—softened unsalted butter for creaminess, good cocoa powder for that rich chocolate flavor, and sturdy biscuits for the tombstones that hold their shape beautifully.
- Butter or baking spread (unsalted, softened): Softening it to room temperature ensures your cake is rich and tender.
- Light brown soft sugar: Adds subtle molasses notes that deepen the chocolate flavor.
- Eggs (large): Bring structure and moisture to the cake; room temperature is best.
- Vanilla extract: It enhances the overall flavor beautifully without overpowering.
- Milk: Use full-fat if you can for creaminess; it also helps the batter come together.
- Self-raising flour: Gives the cake its light and fluffy texture.
- Cocoa powder: I prefer natural unsweetened cocoa for the rich chocolate taste.
- Baking powder and bicarbonate of soda: These give the cake a nice lift.
- Icing sugar: For the buttercream’s perfect sweetness and smooth texture.
- Dark chocolate (melted): For dipping biscuit tombstones, it hardens to a nice glossy finish.
- White candy melts or white chocolate: Great for piping spooky details on the tombstones.
- Biscoff biscuits: Perfect shape and texture to become your creepy graves.
- Chocolate fingers: These act like the spooky fence around your graveyard—break them into varying lengths for effect.
- Oreos (crushed into crumbs): Creates the crumbly dirt that gives your cake its eerie look.
- Green food colouring: To dye your “grass” buttercream an eye-popping shade of green.
- Jelly snakes and fondant pumpkins (optional): Adds extra creepy, festive flair if you want to go all out!
Variations
I love switching things up depending on who I’m baking for! Sometimes I swap the chocolate fingers for pretzel sticks to add a salty crunch, or make a vegan version using plant-based butter and milk alternatives. Feel free to make this recipe your own—play around with decorations and flavors to match your Halloween vibe.
- Vegan Variation: Use dairy-free spread and plant-based milk with egg replacements like flax eggs; the chocolate buttercream still tastes decadent!
- Spiced Version: Add a teaspoon of cinnamon or pumpkin pie spice to the cake batter for a festive twist.
- Nutty Upgrade: Stir chopped walnuts or pecans into the batter for added texture and flavor.
How to Make Halloween Graveyard Cake Recipe
Step 1: Prep Your Baking Tin and Oven
First things first—preheat your oven to 160°C fan (or 180°C conventional/350°F/Gas Mark 4). Grease and line a 12” x 9” traybake tin with parchment paper. This helps your cake slide right out once it’s baked and cooled. I’ve learned that taking this extra care makes things much less frustrating later on.
Step 2: Make the Cake Batter
In a large bowl, cream the softened butter (or baking spread) with the light brown soft sugar using an electric mixer until fluffy—about 2 to 3 minutes. I like to scrape down the sides as I go to keep everything evenly mixed. Next, add the eggs, milk, and vanilla extract, mixing until fully combined. Now gently fold in the self-raising flour, cocoa powder, baking powder, and bicarbonate of soda until just combined. Don’t overmix here, or you might lose some of that lovely fluffiness.
Step 3: Bake and Cool
Pour your batter into the tin and smooth it out evenly. Pop it into the oven for 25–30 minutes or until a skewer inserted in the center comes out clean. My little trick here: start checking around 25 minutes so you don’t accidentally dry it out. Let it cool completely in the tin or transfer to a rack. Cooling fully is key—if you frost too soon, your buttercream might melt!
Step 4: Create Your Tombstone Biscuits
While the cake is baking and cooling, snap off about a third from each Biscoff biscuit end to get nice tombstone sizes. Melt the dark chocolate and dip each biscuit, shaking off excess, then place on baking paper. Once set, melt the white candy melts and pipe on spooky designs using a piping bag with a tiny tip. This trick really adds personality to your graveyard!
Step 5: Make the Chocolate Buttercream
Whip your softened butter in an electric mixer fitted with a paddle attachment. Add icing sugar, cocoa powder, and milk, mixing until creamy and smooth. Don’t be afraid to tweak the milk amount to get your perfect spreading consistency—I usually add a tiny splash at a time. This frosting is the glue that holds your spooky creation together.
Step 6: Frost and Decorate
Using an angled palette knife, spread the chocolate buttercream evenly over the top and sides of your cooled cake. Break chocolate fingers into different lengths and press them gently around the cake’s sides to act like a crooked fence. Sprinkle Oreo crumbs on top to look like fresh “dirt.” Cut slits in the frosting where you want your tombstone biscuits and gently insert them. Finally, add any jelly snakes or fondant pumpkins for an extra creepy effect.
Step 7: Pipe the Green Grass
Mix softened butter with icing sugar and add vanilla and green food coloring until you get a bright, grassy green. Use a multi-opening grass piping tip to pipe fluffy clusters of grass around the tombstones and scatter patches across the top. I like to add a few blobs and gently flick the buttercream for texture—it really brings the graveyard scene to life!
Pro Tips for Making Halloween Graveyard Cake Recipe
- Don’t Skip Cooling: Make sure your cake is fully cool before frosting to keep buttercream smooth and prevent melting.
- Secure the Graveyard Fence: Gently press chocolate fingers into buttercream so they stand upright and stay put.
- Use Quality Chocolate: It makes a massive difference when dipping biscuits and for the buttercream’s rich flavor.
- Keep Green Buttercream Chill: Pipe your grassy details close to serving time so the colors stay vibrant and fresh.
How to Serve Halloween Graveyard Cake Recipe
Garnishes
I’m a big fan of decorating with jelly snakes for that creepy crawl vibe and fondant pumpkins to tie in the Halloween theme. If you want to keep it simple, chocolate shavings and edible silver stars can add a bit of eerie sparkle without much fuss. These little touches elevate your cake from tasty to totally spooky.
Side Dishes
This cake is sweet and rich, so I like to pair it with something light like a tangy berry salad or a crisp apple slaw to balance it out. A cold glass of milk or creamy pumpkin spice latte also makes a cozy partner for your graveyard delight.
Creative Ways to Present
One year, I spread the cake on a vintage wooden board and surrounded it with miniature Halloween decorations like faux cobwebs and LED tea lights—it really brought the graveyard scene to life! You could also build little pathways with crushed cookies or add edible tombstone markers customized with names. Presentation makes the party extra memorable.
Make Ahead and Storage
Storing Leftovers
I keep leftover cake covered tightly in an airtight container in a cool spot, like the fridge if your kitchen is warm. This keeps the buttercream fresh, and the cake moist for 2-3 days. Before serving leftovers, I usually let it sit at room temp for 15 minutes so it softens up a bit—way better texture that way.
Freezing
This Halloween Graveyard Cake Recipe freezes well! I slice it into portions and wrap them tightly in plastic wrap and foil before freezing. When thawing, I defrost overnight in the fridge—this keeps the frosting’s texture intact without getting soggy or crumbly.
Reheating
Since it’s a frosted cake, I skip reheating in the microwave. Instead, I enjoy leftovers chilled or at room temperature. If you prefer a warmer slice, remove frosting-heavy parts and just warm a plain piece briefly in the microwave (about 10 seconds), then add frosting after.
FAQs
-
Can I make this Halloween Graveyard Cake Recipe gluten-free?
Absolutely! Swap the self-raising flour for a gluten-free blend that includes xanthan gum for structure, and double-check your cocoa powder and biscuits are gluten-free. Expect minor texture differences, but the taste remains delicious.
-
How far in advance can I make this cake?
You can bake the cake and make the buttercream up to 2 days ahead. Store it covered in the fridge and decorate on the day you plan to serve for the freshest look and best texture of the green buttercream grass.
-
Can I substitute the Biscoff biscuits for something else?
Definitely! Any firm biscuit like graham crackers or digestive biscuits can work as tombstones. Just pick ones sturdy enough to dip in chocolate and stand upright.
-
What if I don’t have a grass piping tip?
No worries! You can pipe short little spikes with a star tip or use a small spoon to dab buttercream “blobs” and flick them with a spoon’s back to mimic grass texture. It’s all about the creepy effect, not perfect technique!
Final Thoughts
This Halloween Graveyard Cake Recipe has become a centerpiece in our household celebrations—I still remember the proud smiles on my kids’ faces the first time we made it together. It’s easy, fun, and downright delicious, combining chocolatey goodness with spooky creativity that everyone loves. Trust me, once you try this, you’ll want to bake it year after year. Grab your apron, invite some helpers, and enjoy creating your own mini haunted graveyard that tastes as good as it looks!
Print
Halloween Graveyard Cake Recipe
- Prep Time: 20 minutes
- Cook Time: 25-30 minutes
- Total Time: 75 minutes
- Yield: 12 servings
- Category: Dessert
- Method: Baking
- Cuisine: British
Description
This Halloween Graveyard Cake is a delightfully spooky chocolate traybake perfect for festive celebrations. Featuring a moist cocoa sponge, rich chocolate buttercream, Oreo crumb ‘soil’, chocolate finger fencing, and biscuit tombstone decorations, this cake brings a creepy-cute graveyard scene to your dessert table. Decorated with jelly snakes and fondant pumpkins, it’s a fun and impressive centerpiece for Halloween parties.
Ingredients
Cake
- 225 g Butter or baking spread (unsalted, softened)
- 225 g Light brown soft sugar
- 4 Eggs (large)
- 1 tsp Vanilla extract
- 75 ml Milk
- 175 g Self raising flour
- 50 g Cocoa powder
- 1/4 tsp Baking powder
- 1/4 tsp Bicarbonate of soda
Chocolate Buttercream
- 200 g Butter (unsalted, softened)
- 325 g Icing sugar
- 75 g Cocoa powder
- 3 tbsp Milk
Biscuit Graves Decoration
- 8 Biscoff biscuits
- 125 g Dark chocolate (melted)
- 25 g White candy melts (or white chocolate)
Additional Decorations
- 200 g Chocolate fingers
- 120 g Oreos (crushed into crumbs)
- Jelly snakes (optional)
- Fondant pumpkins (optional)
Green Grass Buttercream
- 25 g Butter (unsalted, softened)
- 50 g Icing sugar
- 1/8 tsp Vanilla extract
- 1/4 tsp Milk
- Green food colouring
Instructions
- Preheat and Prepare Tin: Preheat your oven to 160C Fan/180C/350F/Gas Mark 4, and grease and line a 12″ x 9″ traybake tin with baking paper to prevent sticking.
- Make the Cake Batter: In a large bowl, beat the softened baking spread (or butter) and light brown soft sugar together using an electric mixer until fluffy, about 2-3 minutes. Add the eggs, milk, and vanilla extract and mix until fully incorporated. Gently fold in the self raising flour, cocoa powder, baking powder, and bicarbonate of soda, ensuring no lumps remain.
- Bake the Cake: Pour the batter into the prepared tin and smooth the surface evenly. Bake in the preheated oven for 25-30 minutes or until a skewer inserted into the centre comes out clean. Allow the cake to cool completely in the tin or on a cooling rack.
- Prepare Biscuit Graves: Break about a third off each Biscoff biscuit end to size them appropriately for the cake. Dip each biscuit into melted dark chocolate, shaking off excess, and place on baking paper to set. Once set, melt white candy melts and pipe graveyard designs onto biscuits using a piping bag. Leave to set fully.
- Make Chocolate Buttercream: Using an electric mixer with a paddle attachment, beat 200 g softened butter until smooth for a few minutes. Gradually add icing sugar, cocoa powder, and milk, mixing until well combined. Adjust milk amounts if the buttercream is too stiff.
- Frost the Cake: Using an angled palette knife, spread the chocolate buttercream evenly over the top and sides of the cooled cake.
- Decorate with Chocolate Fingers and Oreo Crumbs: Break chocolate fingers into random lengths and press them gently, broken side down, into the buttercream around the cake’s edges to form a fence. Cover the top surface of the cake with crushed Oreo crumbs to mimic soil.
- Arrange Biscuit Graves and Additional Decorations: Cut slits in the cake surface where you’d like the biscuit graves to stand, then gently insert the chocolate-coated biscuits. Decorate with jelly snakes, fondant pumpkins, or any additional Halloween decorations as desired.
- Make Green Grass Buttercream: Mix 25 g softened butter with 50 g icing sugar, vanilla extract, and milk. Add green food colouring and beat until smooth and vibrant. Use a piping bag fitted with a grass nozzle to pipe grass around biscuit graves and scattered on the cake, or create texture with a spoon.
- Serve and Store: Slice the cake into squares to serve. Store any leftovers in an airtight container in a cool place and consume within 3 days for best freshness.
Notes
- A deliciously spooky chocolate traybake cake perfect for Halloween celebrations.
- The Oreo crumb ‘soil’ and biscuit tombstones create a fun graveyard effect.
- Chocolate finger fencing adds a unique and textural cake border.
- Optional jelly snakes and fondant pumpkins enhance the Halloween theme.
- Use an electric mixer for faster and smoother buttercream preparation.
- Make sure the cake is completely cool before frosting to avoid melting the buttercream.
- Store the cake properly to maintain freshness over a few days.
Nutrition
- Serving Size: 1 serving
- Calories: 800 kcal
- Sugar: 58 g
- Sodium: 372 mg
- Fat: 42 g
- Saturated Fat: 25 g
- Unsaturated Fat: 15 g
- Trans Fat: 1 g
- Carbohydrates: 84 g
- Fiber: 6 g
- Protein: 8 g
- Cholesterol: 137 mg


