
If you’ve ever wondered how creamy, fresh butter straight from your own kitchen tastes, you’re in for a treat with this Homemade Butter Recipe. Trust me, once you make butter yourself, the store-bought stuff just won’t cut it anymore. It’s surprisingly simple, and I love how rich and flavorful it turns out every time. Stick around—I’ll walk you through every step so you can make your own buttery magic happen at home.
Why You’ll Love This Recipe
- Freshness You Can Taste: Homemade butter tastes fresher and more vibrant than anything you get in a store.
- Simple Ingredients: Just heavy cream and a pinch of salt if you like it salted—nothing more complicated than that.
- Hands-On Fun: Watch the cream transform right before your eyes—it’s honestly like a little kitchen science experiment.
- Customizable Flavor: You control the saltiness and can even add herbs or garlic for a personal twist.

Ingredients You’ll Need
The star of the show here is really good-quality heavy whipping cream. It’s all you need to get that rich, creamy butter flavor. If you want salted butter, sea salt is the way to go—it dissolves well and adds a nice subtle pop.
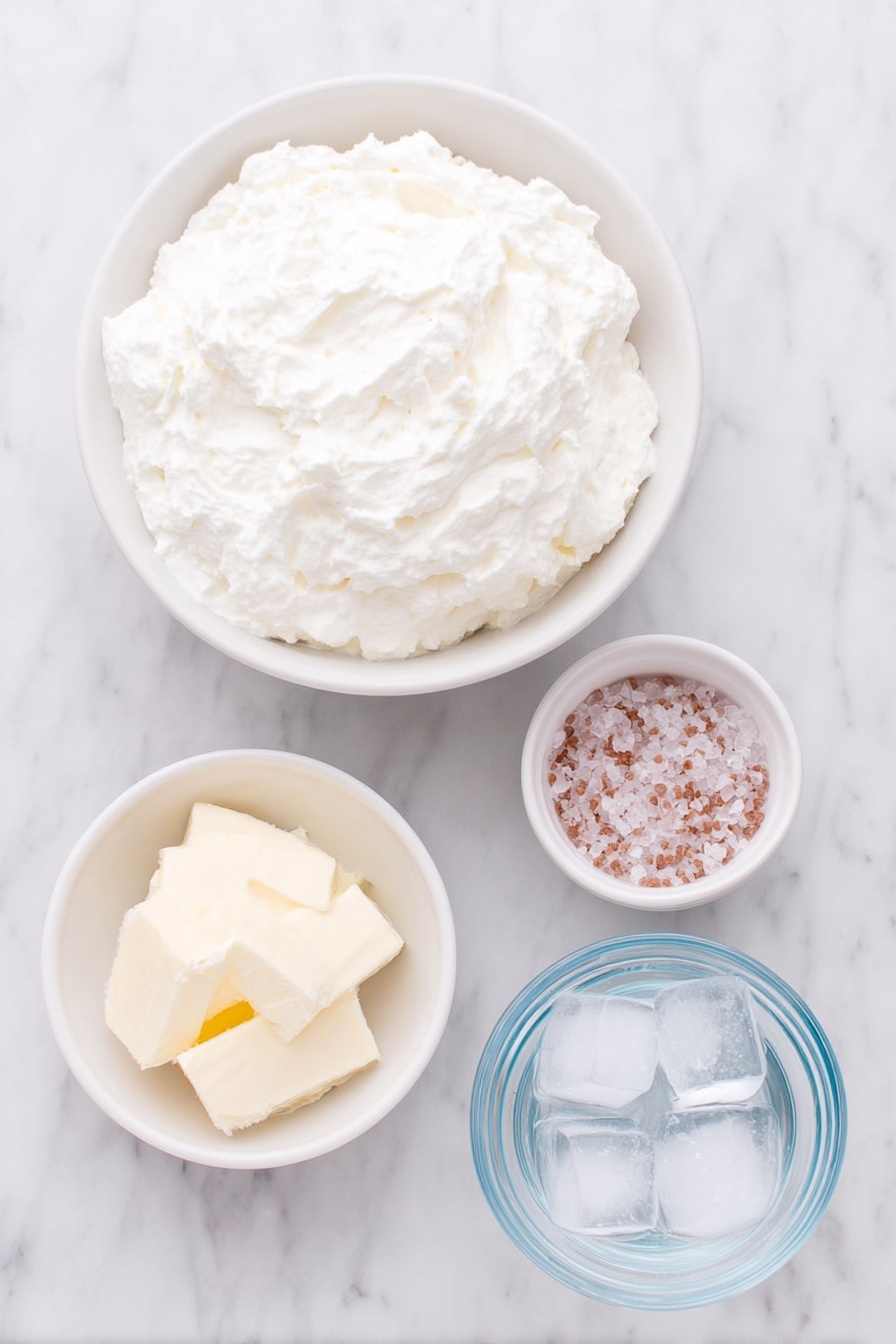
- Heavy whipping cream: Use fresh, full-fat cream for the best texture and taste.
- Sea salt (optional): Adds that perfect touch of seasoning, but totally optional if you prefer unsalted butter.
- Ice water: Important for rinsing off the buttermilk so your butter stays fresh longer.
Variations
I love mixing things up by adding a little garlic and fresh herbs to my butter—it’s amazing brushed on warm bread or melting over steamed veggies. Feel free to personalize this recipe however you like!
- Garlic Herb Butter: Blend softened butter with minced garlic and chopped parsley—perfect for dinner parties or soaking up pasta sauce.
- Honey Butter: Stir in a touch of honey for a slightly sweet spread that’s heavenly on warm rolls.
- Spiced Butter: Add a pinch of smoked paprika or cayenne for a subtle smoky kick.
- Unsalted Butter: Skip the sea salt completely if you want pure, fresh butter flavor to use in baking.
How to Make Homemade Butter Recipe
Step 1: Whip the Cream Until It Separates
Start by pouring your heavy whipping cream into a stand mixer bowl fitted with the whisk attachment—or use a large mixing bowl with a hand mixer. I like to use my stand mixer because it frees up my hands, but either way works. Whisk on medium speed for about 10 minutes. You’ll first see the cream turn fluffy with stiff peaks—this is how you know it’s whipped properly. If you’re unsure about stiff peaks, think of peaks that stand straight up without collapsing. Once you hit that stage, sprinkle in the sea salt if you’re making salted butter and keep whisking. Soon enough, you’ll notice the cream breaking apart—solid clumps of butter will cling to the whisk, and a milky liquid called buttermilk will collect in the bowl. This magic usually takes around 10 minutes, but can vary slightly depending on your mixer and cream freshness.
Step 2: Strain the Buttermilk from the Butter
Once you see the butter and buttermilk separating, set up a mesh sieve over a smaller bowl. Carefully pour the mixture into the sieve so the buttery solids stay behind, and the buttermilk collects below. You’ll want to save the buttermilk too—if you’re into baking or cooking, it’s fantastic for pancakes or biscuits! Let the butter drain for a bit before moving on.
Step 3: Rinse and Squeeze Out Excess Liquid
Next, it’s time to rinse the butter in ice-cold water to wash off any leftover buttermilk, which helps extend freshness and prevents your butter from spoiling too quickly. Dip the butter into a bowl of ice water, then squeeze it tightly to press out the liquid. You might want to repeat this rinsing and squeezing step a couple of times until the water runs clear—that’s your sign the butter is ready.
Step 4: Shape and Store Your Butter
Finally, transfer your butter onto parchment or wax paper. I like to form it into a log or rectangle—kind of like store-bought butter sticks—so it’s easy to slice and use. Wrap it tightly and secure with kitchen twine or string. For extra protection, I’ll pop the wrapped butter into a resealable bag before refrigerating. Chill it to firm up, and voilà: fresh homemade butter ready to elevate any meal. It usually keeps for about 3 weeks in the fridge or you can freeze it to last even longer.
Pro Tips for Making Homemade Butter Recipe
- Use Cold, Fresh Cream: Fresh cream with higher fat content whips better and gives you richer butter.
- Don’t Rush the Whipping: It can take around 10 minutes, sometimes longer—sit back and enjoy the process, it’s worth the wait.
- Save Your Buttermilk: This by-product is perfect for baking—don’t pour it down the drain!
- Rinse Thoroughly: Rinsing and squeezing removes leftover buttermilk that can make your butter spoil faster.
How to Serve Homemade Butter Recipe

Garnishes
I love topping my fresh butter with a sprinkle of flaky sea salt or a dash of cracked black pepper right before serving. Sometimes, I’ll melt a little butter and swirl in fresh herbs like thyme or rosemary for an elegant garnish that tastes amazing on warm bread.
Side Dishes
Homemade butter pairs beautifully with just about everything, but I especially enjoy it with crusty sourdough bread, roasted potatoes, steamed green beans, or buttery mashed sweet potatoes. My family goes crazy for warm biscuits slathered with this butter—total game changer.
Creative Ways to Present
For special occasions, I like rolling my butter into logs with herbs rolled into the sides, then slicing into rounds to serve. You can also shape it into fun shapes using little molds or cookie cutters—kids love that! Wrapped in parchment and served with a cute knife, it adds a homemade touch to your table.
Make Ahead and Storage
Storing Leftovers
I keep my homemade butter tightly wrapped in parchment and stored in an airtight container in the fridge. This keeps it fresh for up to 3 weeks, giving me plenty of time to enjoy it without rushing.
Freezing
Freezing butter is an option if you want to keep it longer. I slice mine into sticks before freezing, then wrap each stick individually in parchment and pop them into a freezer-safe bag. Frozen butter keeps well for up to 9 months and thaws quickly in the fridge.
Reheating
Butter doesn’t need reheating really—but if you want it soft and spreadable, just leave it at room temperature for 10-15 minutes. For melting, a quick low-heat zap in the microwave (5-7 seconds) works, but watch it carefully so it doesn’t turn oily.
FAQs
-
Can I use low-fat cream or half-and-half to make homemade butter?
No, for the best results, you need heavy whipping cream with a high fat content (at least 36%). Low-fat cream or half-and-half won’t separate properly into butter and buttermilk.
-
How long does homemade butter last in the fridge?
Properly stored homemade butter usually stays fresh for up to 3 weeks in the refrigerator. Make sure it’s tightly wrapped and sealed to prevent it from absorbing other fridge odors.
-
What should I do with the buttermilk leftover from making butter?
Don’t throw it away! This buttermilk is great for baking pancakes, biscuits, or even making salad dressings. It adds a lovely tang and richness to your dishes.
-
Can I add flavors to the homemade butter?
Absolutely! Once your butter is made, soften it slightly and mix in herbs, garlic, honey, or spices to create custom flavored butter for any occasion.
-
Is it normal for the butter to be soft after making it?
Yes, freshly made butter is soft at room temperature. Refrigerating it for a few hours will help it firm up to a pleasant, sliceable texture.
Final Thoughts
I absolutely love how this Homemade Butter Recipe turns simple cream into a luscious, fresh dairy delight. It’s fun to make, tastes incredible, and honestly feels so rewarding to craft your own butter from scratch. Whether you’re spreading it on toast, baking with it, or serving it at your next family meal, I promise you’ll enjoy the difference. Give it a try—you might just find a new kitchen favorite!
Print
Homemade Butter Recipe
- Prep Time: 25 minutes
- Cook Time: 0 minutes
- Total Time: 25 minutes
- Yield: 1 pound (4 sticks, approx. 32 tablespoons)
- Category: Dairy
- Method: Blending
- Cuisine: American
Description
Make rich and creamy homemade butter from fresh heavy whipping cream with this simple stand mixer method. Whip the cream until it separates into butter and buttermilk, then rinse and shape for fresh, preservative-free butter perfect for cooking and baking.
Ingredients
Ingredients
- 4 cups heavy whipping cream
- 2 tsp sea salt (optional, for salted butter)
- Ice water (for rinsing butter)
Instructions
- Prepare the equipment: Get out a stand mixer fitted with the whisk attachment or a large mixing bowl with a hand mixer and whisk attachment. Use a bowl large enough to allow the cream to expand as it whips.
- Whip the heavy cream: Pour the heavy cream into the mixer bowl and whisk at medium speed for about 10 minutes. Once stiff peaks begin to form, add the sea salt if using. Continue whisking until you see the butter separate from the buttermilk; the butter will cling to the whisk while liquid remains in the bowl.
- Strain the buttermilk: Set a mesh sieve over a smaller bowl. Pour the whipped cream mixture into the sieve to separate the butter from the buttermilk.
- Squeeze out excess liquid: Gather the butter in the sieve and press or squeeze it to remove as much buttermilk as possible.
- Rinse the butter: Dip the squeezed butter into a bowl of ice water, then squeeze again to remove any remaining liquid. This helps remove residual buttermilk and extends the butter’s freshness.
- Shape and store the butter: Transfer the butter onto parchment or wax paper and shape it into a log or rectangle similar to store-bought butter sticks. Wrap tightly with the paper and secure with kitchen twine or string. Optionally, place the wrapped butter inside a sealed plastic bag.
- Chill the butter: Refrigerate the shaped butter to firm up. The butter will keep fresh in the refrigerator for up to 3 weeks or can be frozen for up to 9 months.
Notes
- This recipe yields approximately 1 pound of butter, equivalent to 4 sticks or 32 tablespoons.
- Cannot substitute heavy whipping cream with other cream types for this recipe.
- Whipping time may vary based on mixer and room temperature; watch carefully for separation of butter and buttermilk.
- Use ice water to rinse butter for best texture and shelf life.
Nutrition
- Serving Size: 1 tablespoon (14g)
- Calories: 102
- Sugar: 0.1 g
- Sodium: 82 mg
- Fat: 11.5 g
- Saturated Fat: 7.3 g
- Unsaturated Fat: 3.6 g
- Trans Fat: 0.5 g
- Carbohydrates: 0.01 g
- Fiber: 0 g
- Protein: 0.1 g
- Cholesterol: 31 mg


