
This heavenly Japanese Cheesecake is a game-changer in the world of desserts. Unlike traditional dense cheesecakes, this Japanese version is incredibly light, airy, and soufflé-like while still delivering that rich cream cheese flavor you crave. The process might seem detailed, but I promise the results are absolutely worth it – a jiggly, cloud-like cake that melts in your mouth with each bite. Perfect for impressing guests or treating yourself to something special!
Why You’ll Love This Recipe
- Unique Texture: You get the best of both worlds – the richness of cheesecake with the lightness of a soufflé. It literally jiggles when you touch it!
- Balanced Flavor: The cream cheese provides a subtle tanginess while the lemon adds a refreshing brightness that isn’t overwhelming.
- Impressive Results: This is one of those showstopper desserts that looks like it came from a high-end bakery, even though you made it at home.
- Versatility: Perfect for any occasion from casual family dinners to elegant celebrations. Serve it plain or dress it up with fruit.
- Make-Ahead Friendly: Actually tastes better after chilling overnight, making it perfect for planning ahead for gatherings.

Ingredients You’ll Need
- Eggs: The star of the show! Separated eggs are crucial – yolks add richness to the batter while whipped whites create that signature airy texture.
- Cream Cheese: The foundation of any good cheesecake. Full-fat Philadelphia works beautifully for the creamiest results.
- Butter: Adds richness and helps create that velvety mouthfeel that makes this cake so special.
- Heavy Cream: Creates a silky-smooth batter and adds luxurious richness. Whole milk can work in a pinch.
- Sugar: Split between the cream cheese mixture and egg whites, it provides sweetness while helping stabilize those gorgeous meringue peaks.
- Cake Flour: The lower protein content yields a more tender, delicate crumb. Don’t substitute with all-purpose without adjusting!
- Lemon: Both zest and juice brighten the whole cake and balance the richness perfectly.
- Apricot Jam: For that beautiful shiny glaze that takes presentation to the next level.
Note: You’ll find the complete list of ingredients, along with their exact measurements, in the printable recipe card at the bottom of this post.
Variations
Flavor Twists
- Matcha Variation: Add 1-2 tablespoons of matcha powder to the batter for a lovely green tea flavor and color.
- Chocolate Lover’s Version: Fold in 2 tablespoons of cocoa powder and a handful of mini chocolate chips.
- Citrus Boost: Replace lemon with orange or yuzu for a different citrus profile.
Topping Ideas
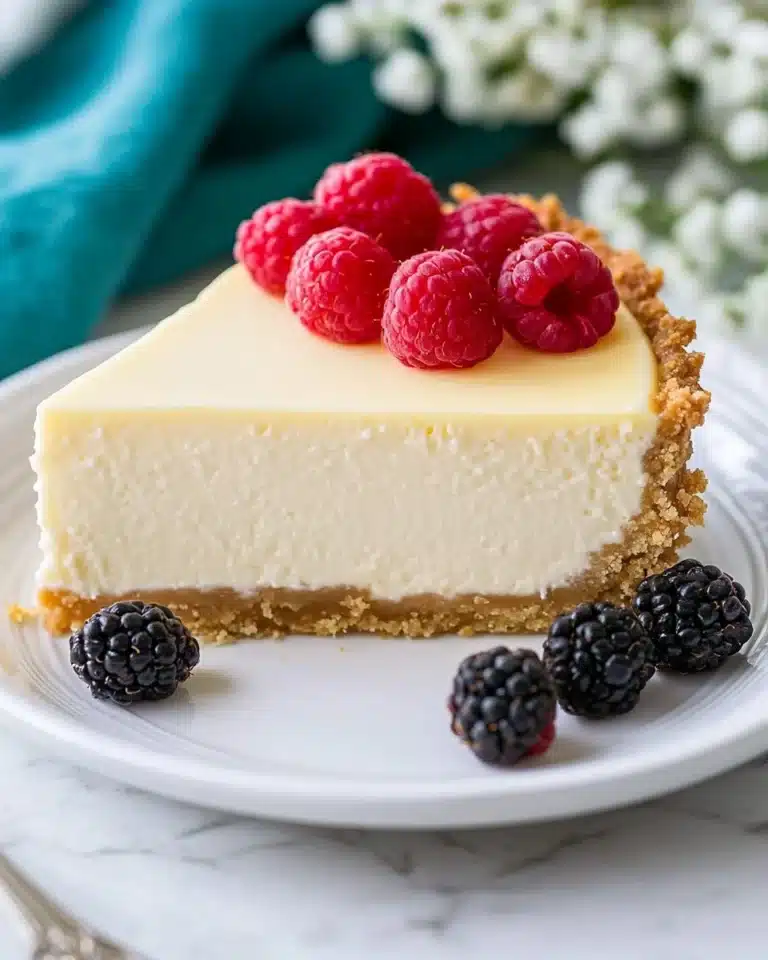
- Fresh Fruit: Top with seasonal berries or sliced stone fruits just before serving.
- Whipped Cream: Add a dollop of lightly sweetened whipped cream on each slice.
- Different Glazes: Try strawberry jam or cherry preserves instead of apricot for the glaze.
How to Make Japanese Cheesecake
Step 1: Prepare the Pan
Line a 9-inch cake pan with parchment paper on the bottom and sides. Create parchment “straps” to help lift the cake out later. Butter everything lightly to ensure nothing sticks.
Step 2: Make the Cream Cheese Batter
Melt cream cheese, butter, heavy cream, and sugar in a double boiler until smooth. Whisk in egg yolks one by one, then sift in cake flour. Add lemon zest and juice for brightness.
Step 3: Prepare the Meringue
Beat cold egg whites until foamy, gradually add sugar, and whip to firm peaks. This is critical – underwhipped whites won’t give you height, overwhipped will make the cake dry.
Step 4: Combine and Bake
Fold the meringue into the cream cheese mixture in three batches, being gentle to keep the air bubbles. Pour into the prepared pan, tap to remove air pockets, and bake in a water bath.
Step 5: Cool Properly
Allow the cake to cool gradually in the oven with the door ajar, then at room temperature, before refrigerating. This prevents dramatic collapse.
Step 6: Glaze and Finish
Brush with warm apricot jam glaze for a beautiful shine, then chill thoroughly before serving.
Pro Tips for Making the Recipe
- Temperature Matters: Cold egg whites whip better, but cream cheese should be warm for a smooth batter.
- Perfect Folding Technique: Cut through the center with your spatula, scrape along the bottom, and lift up the sides. Rotate the bowl as you go for even mixing without deflating.
- Water Bath is Non-Negotiable: The steam creates a humid environment that prevents cracking and helps the cake rise evenly.
- Checking Doneness: The cake should jiggle slightly in the center when done, but a skewer should come out clean.
- Cooling Gradually: This prevents the dramatic collapse that comes from sudden temperature changes. Patience yields beauty!
How to Serve

Japanese cheesecake truly shines when served simply. Here are my favorite ways to enjoy it:
Simple Elegance
Serve it chilled with just a light dusting of powdered sugar for a clean, elegant presentation that lets the cake’s texture be the star.
Fruit Pairings
Fresh berries or a simple berry compote complement the delicate flavor perfectly. The tartness of raspberries or strawberries balances the sweet cake.
Beverage Companions
A cup of high-quality green tea or a small glass of dessert wine makes for a sophisticated pairing that enhances the cake’s subtle flavors.
Make Ahead and Storage
Storing Leftovers
Keep the cheesecake covered in the refrigerator for up to 3-4 days. The flavor actually improves after the first day as it sets and melds.
Freezing
This cheesecake freezes beautifully for 3-4 weeks. Wrap individual slices or the whole cake (minus any fresh fruit toppings) tightly in plastic wrap and then foil.
Reheating
Don’t actually reheat! Instead, thaw frozen cake overnight in the refrigerator. For the best texture, let refrigerated cake sit at room temperature for about 15 minutes before serving.
FAQs
-
Why did my cheesecake crack on top?
Cracks usually happen when the cake is exposed to sudden temperature changes or baked without a water bath. Make sure your oven isn’t too hot, use a water bath, and cool the cake gradually with the oven door slightly open.
-
Can I use all-purpose flour instead of cake flour?
You can, but you’ll need to make an adjustment. For every cup of all-purpose flour, remove 2 tablespoons and replace with 2 tablespoons of cornstarch. Sift several times to incorporate well. Without this adjustment, your cake will be denser and less tender.
-
Why didn’t my cheesecake rise as high as expected?
This usually happens when the egg whites aren’t beaten to firm peaks or when they’re deflated during folding. Make sure your mixing bowl is completely clean and grease-free, and fold the mixture gently but thoroughly.
-
Do I really need to chill the cake for so long?
Yes! The extended chilling time (4-6 hours minimum, preferably overnight) is crucial for developing both the flavor and that signature creamy-yet-light texture. The cake continues to set during this time, so don’t rush this step.
Final Thoughts
This Japanese Cheesecake isn’t just a dessert – it’s an experience! The pillowy softness combined with that subtle cream cheese flavor creates something truly magical that’s different from any cheesecake you’ve tried before. While it does require a bit of patience and attention to detail, the process itself is part of the joy. Trust me, when you see the beautiful golden dome rising in your oven and take that first ethereally light bite, you’ll understand why this recipe is worth every minute. Give it a try this weekend – your friends and family will be absolutely amazed!
Print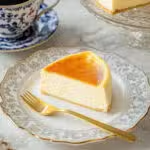
Japanese Cheesecake Recipe
- Prep Time: 25 minutes
- Cook Time: 1 hour 25 minutes
- Total Time: 1 hour 50 minutes (plus 8 hours cooling and chilling)
- Yield: 1 cake (9 inches, serves about 8–10)
- Category: Desserts
- Method: Baking
- Cuisine: Japanese
- Diet: Vegetarian
Description
Japanese Cheesecake, also known as ‘soufflé cheesecake,’ is renowned for its light, airy, yet creamy texture. Unlike classic American cheesecakes, this recipe combines the richness of cream cheese with the fluffiness of meringue, resulting in a delicate, cloud-like dessert with a perfectly balanced tang of lemon and subtle sweetness.
Ingredients
For the Cake
- 1 Tbsp unsalted butter (for greasing the pan and parchment paper)
- 6 large eggs (separated, about 50 g each without shell; 300 g total without shell)
- 10.6 oz (300 g) cream cheese (full-fat, preferably Philadelphia Original Cream Cheese)
- 4 Tbsp unsalted butter
- 200 ml (3/4 cup + 4 tsp) heavy (whipping) cream, or substitute whole milk
- 4 1/2 Tbsp sugar (for the cream cheese mixture)
- 2/3 cup cake flour
- Zest of 1/2 large lemon
- 2 Tbsp lemon juice (from 1/2 large lemon)
- 1/2 cup sugar (for the egg whites)
For the Glaze
- 2 Tbsp apricot jam
- 2 tsp hot water
Instructions
- Prepare the Pan: Line a 9-inch (23-cm) cake pan, 4 inches (10 cm) high, with parchment paper. Cut a circle for the bottom and a 4×30 inch strip for the sides. Use two additional 2×30 inch strips as “straps” to help lift the cake later. Grease the pan and parchment well with 1 Tbsp unsalted butter.
- Preheat the Oven & Set Up Double Boiler: Preheat oven to 350ºF (180ºC) (reduce by 25ºF/15ºC for convection ovens; baking will be at 320ºF/160ºC). Fill a medium saucepan with 2 inches of water and bring to a simmer for a double boiler.
- Gather & Measure Ingredients: Prepare and weigh all ingredients. Separate the eggs into yolks and whites. Keep whites in the fridge. Weigh or measure flour accurately.
- Make Cheesecake Batter: In a large bowl, combine 10.6 oz cream cheese, 4 Tbsp unsalted butter, 200 ml heavy cream, and 4½ Tbsp sugar. Place the bowl over the simmering saucepan, softening the cheese and butter. Mash and whisk until smooth, then remove from heat.
- Incorporate Yolks & Flour: Whisk the egg yolks into the warm cheese mixture, one at a time. Sift ⅔ cup cake flour into the batter and whisk. For extra silky texture, strain the batter into a clean bowl using a fine-mesh strainer.
- Add Lemon: Grate the zest of ½ lemon and stir into the batter. Squeeze and measure 2 Tbsp lemon juice and add, whisking well to combine. Set aside.
- Prepare the Water Bath: Place a large baking sheet in the oven and fill with hot water, about halfway up the sides or ½ inch deep.
- Whip Egg Whites: In a clean, dry mixing bowl, whisk the chilled egg whites on medium speed until opaque and foamy (about 2 minutes). Gradually add ½ cup sugar in thirds. Once added, beat on high until firm peaks form.
- Combine Meringue & Batter: Whisk one-third of the meringue into the cheese mixture. Gently fold in another third, then pour the batter into the bowl with the remaining meringue and fold gently until just combined.
- Fill Pan & Remove Air: Pour the batter into the prepared cake pan, avoiding air pockets. Tap the pan gently on the counter to release any trapped air bubbles.
- Bake: Place cake pan onto the prepared water bath in the oven. Reduce the temperature to 320ºF (160ºC) and bake for 70–75 minutes. Lower oven to 300ºF (150ºC) and bake another 10 minutes, or until the top is golden and a skewer comes out clean.
- Cool Gradually: Turn off oven, leave the door slightly open, and let the cake cool inside for 15–20 minutes to prevent collapse. Remove and lift the cake from the pan using the parchment straps. Remove parchment from sides, but leave bottom paper.
- Glaze: Mix 2 Tbsp apricot jam with 2 tsp hot water and brush over top of cheesecake. Allow to cool to room temperature.
- Chill: Refrigerate for at least 4–6 hours (or overnight) for best texture and flavor.
- Serve: For clean slices, use a sharp knife dipped in warm water and wipe between cuts. Allow cake to sit at room temp for 10–15 minutes if a fluffier texture is preferred.
Notes
- Use cake flour, not all-purpose flour, for a delicate texture. Substitute by removing 2 Tbsp from 1 cup all-purpose flour and adding 2 Tbsp cornstarch, then sift 3–4 times.
- Make sure all bowls and beaters for the meringue are clean and dry to maximize egg white volume.
- Avoid plastic bowls when beating egg whites as they can retain oil and reduce volume.
- Weight measurements ensure best results. If using cups, fluff, spoon, and level the flour for accuracy.
- The cake must chill thoroughly for its signature fluffy-creamy texture.
- Store leftovers in the refrigerator for 3–4 days or freeze for up to 3–4 weeks. Thaw overnight in the fridge before serving.
Nutrition
- Serving Size: 1 cake (9 inch, 23 cm)
- Calories: 3560
- Sugar: 189 g
- Sodium: 1488 mg
- Fat: 252 g
- Saturated Fat: 142 g
- Trans Fat: 2 g
- Carbohydrates: 266 g
- Fiber: 3 g
- Protein: 70 g
- Cholesterol: 1838 mg


