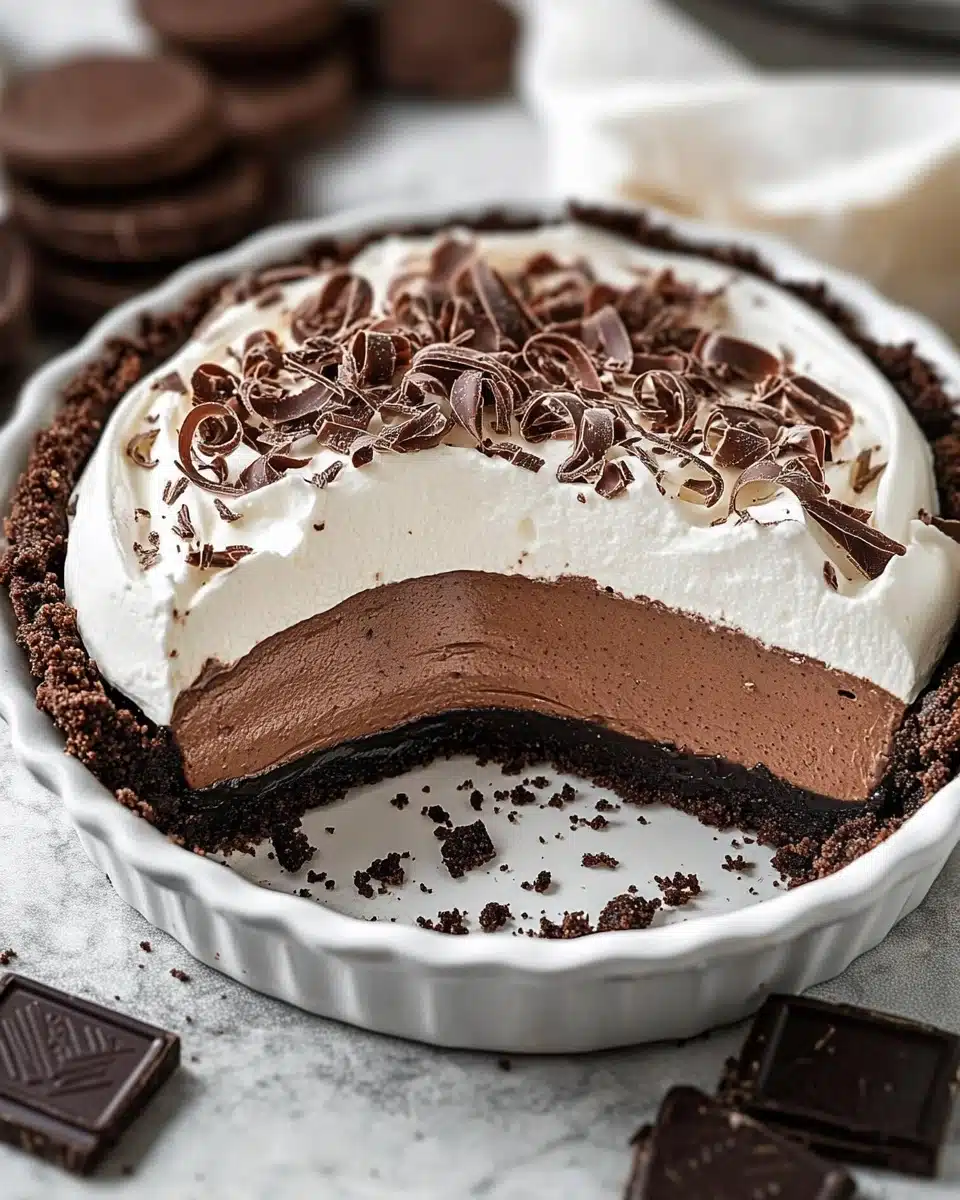
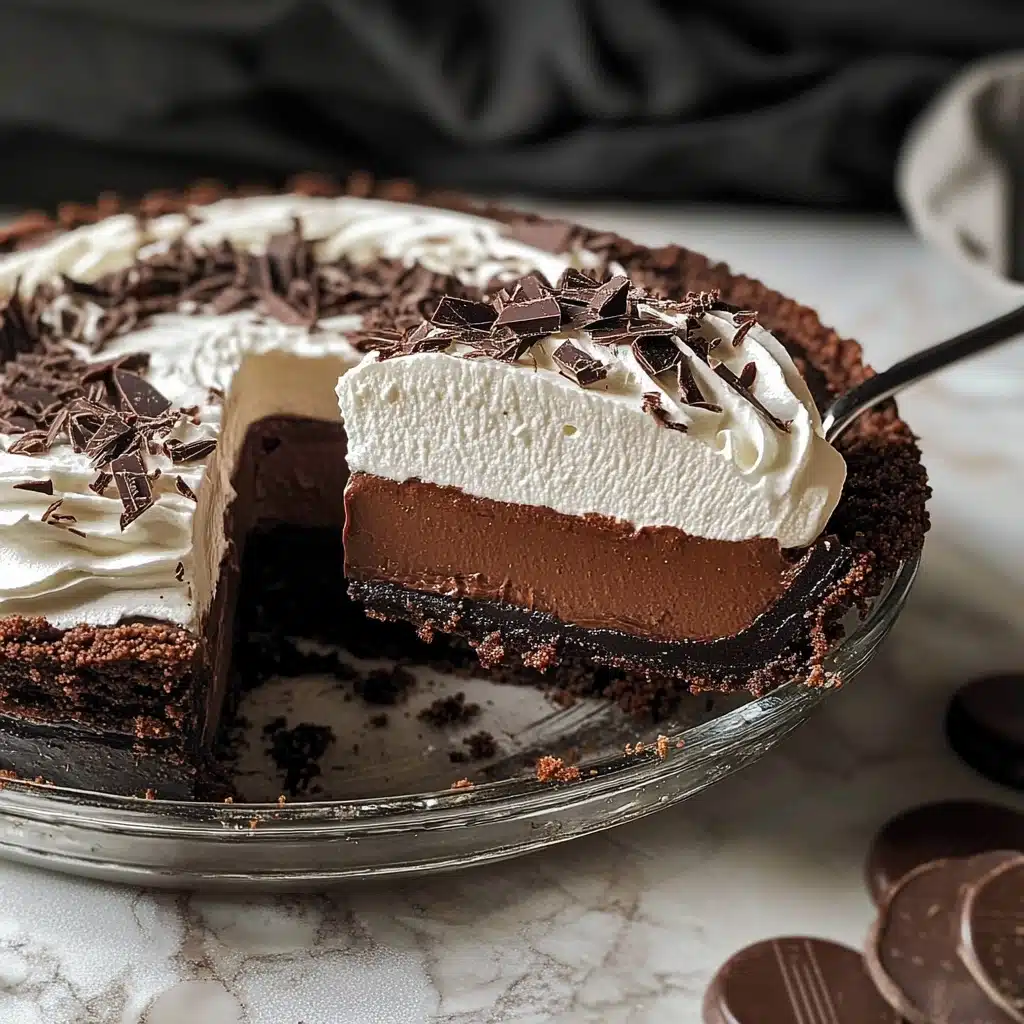
This No-Bake Chocolate Cream Pie is pure chocolate bliss—creamy, dreamy, and so simple to make you’ll find yourself whipping it up for every special occasion (or just because!). With an Oreo cookie crust, rich chocolate ganache filling, and a cloud-like whipped cream topping, it’s an irresistible favorite that comes together without ever turning on the oven.
Why You’ll Love This Recipe
- Absolutely No Baking: All the decadent flavor and texture you crave from a show-stopping dessert, but none of the oven time—perfect for warm days or quick desserts!
- Ultra Creamy Chocolate Filling: The silky ganache strikes the perfect balance between rich, pudding-like chocolate and a lighter mousse.
- Crowd-Pleasing Classic: Every layer—from crisp Oreo crust to fluffy whipped cream—makes this pie a guaranteed hit at potlucks, birthdays, or family dinners.
- Make-Ahead Wonder: The pie holds beautifully in the fridge, so you can prep it in advance for stress-free entertaining or celebrations!

Ingredients You’ll Need
You only need a handful of classic ingredients to make this No-Bake Chocolate Cream Pie, and each one truly brings something special—whether it’s decadent chocolatey goodness, buttery crunch, or creamy, dreamy topping. Let’s break down why you’ll adore every item in this dreamy pie!
- Oreo cookies: These crushed cookies create a rich, chocolatey crust with just the right crunch and a hint of nostalgia—no need to remove the filling!
- Unsalted butter: Melted and mixed with the Oreos, this binds the crust and gives it that irresistible, slightly salty taste to balance all the sweetness.
- Semi-sweet chocolate: For the filling, semi-sweet chocolate gives a deep, smooth cocoa flavor that’s decadent without being overly sweet.
- Heavy cream: The star of both the filling and the whipped topping, heavy cream ensures serious silkiness and that gorgeous, fluffy finish.
- Confectioners’ sugar: Sifted into the whipped cream topping, it adds just the right touch of sweetness and keeps things nice and airy.
Variations
This No-Bake Chocolate Cream Pie is basically a blank canvas for dessert lovers, and it’s so satisfying to put your own spin on it. Tweak, swap, and get creative based on what you have and what you’re craving—you’ll quickly find your signature version!
- Peanut Butter Chocolate Pie: Gently swirl in a few spoonfuls of smooth peanut butter to the ganache for a classic flavor combo that’ll win everyone over.
- Mint Chocolate Pie: Stir a splash of peppermint extract into the ganache or use mint-flavored Oreo cookies for a refreshing twist.
- Gluten-Free Crust: Substitute gluten-free chocolate sandwich cookies for the Oreo base for a pie everyone can enjoy.
- Dairy-Free & Vegan: Use dairy-free butter and coconut cream, plus your favorite vegan chocolate, for a luscious plant-based treat.
How to Make No-Bake Chocolate Cream Pie
Step 1: Prepare the Oreo Cookie Crust
Begin by crushing a package of Oreo cookies into fine crumbs—no need to scrape out the filling! Toss the cookie crumbs with melted unsalted butter in a large bowl and mix until everything’s well coated. Press this mixture firmly into a 9-inch pie dish, packing it not only across the bottom but up the sides as well for that classic pie shape. Pop the crust into the freezer for at least 30 minutes so it sets into the perfect, sliceable base.
Step 2: Make the Silky Chocolate Ganache Filling
Now, for the pièce de résistance: the chocolate filling! Place your chopped semi-sweet chocolate in a heatproof bowl—breaking it up small will help it melt smoothly. Bring heavy cream just to a gentle simmer on the stovetop (keep an eye on it, cream heats quickly!). Pour the hot cream over the chocolate, let it sit for one minute to soften, then whisk until the mixture becomes completely glossy and lump-free. Finally, add the cubes of room-temperature butter and stir gently until melted and fully incorporated. The ganache should look irresistibly smooth and shiny!
Step 3: Pour and Chill
Take the set Oreo crust out of the freezer and carefully pour in the warm chocolate ganache, using a spatula to gently spread it to the edges. The crust will be about 90% full and you’ll see it already looks tempting. Transfer the pie to the fridge for at least two hours (or until fully set)—trust me, this wait is more than worth it!
Step 4: Whip Up the Creamy Topping
Just before serving, whip up the cream. Pour heavy cream and sifted confectioners’ sugar into a mixing bowl, then use a hand mixer or stand mixer to beat until you see soft peaks. (Don’t walk away—whipped cream changes in seconds!) This fluffy cloud will be the finishing crown for your No-Bake Chocolate Cream Pie.
Step 5: Assemble and Garnish
Once your pie is set and the whipped cream is ready, dollop the cream right in the center or spread over the entire surface. If you want to add a touch of wow factor, sprinkle chocolate shavings or curls on top—your guests will ooh and ahh! Slice with a sharp knife and serve immediately for pure chocolate happiness with every bite.
Pro Tips for Making No-Bake Chocolate Cream Pie
- Best Oreo Technique: A food processor will yield the finest, most even Oreo crumbs—perfect for a sturdy, sliceable crust that doesn’t fall apart.
- Chocolate Melting Magic: Chop chocolate very finely and pour cream that’s hot but not boiling for the smoothest ganache (this avoids any lumps or separation!).
- Chill Time Matters: Don’t skimp on the fridge time—letting the chocolate layer set fully ensures each slice is rich, clean, and picture-perfect.
- Whipped Cream Timing: Whip your cream just before serving for maximum volume and freshness—this keeps the topping cloud-like instead of weeping or deflating.
How to Serve No-Bake Chocolate Cream Pie
Garnishes
For an extra pop of decadence, top your pie with chocolate curls, mini chocolate chips, or a dusting of cocoa powder. If you want to add a little freshness, a few raspberries or slices of strawberry pair beautifully with chocolate. A drizzle of caramel or chocolate sauce right before serving adds instant “bakery window” appeal!
Side Dishes
Since No-Bake Chocolate Cream Pie is so rich and chocolate-forward, serve it after lighter meals, or pair with a plate of fresh fruit for balance. Strong brewed coffee or espresso, or an after-dinner glass of milk, make perfect companions to each silky, chocolatey bite.
Creative Ways to Present
Impress at dinner parties by making individual pies in mini tart pans or mason jars for a personal touch! Or, serve slices with a piped swirl of whipped cream and a sprinkle of flaked sea salt for serious restaurant vibes. A fun twist? Make a “pie bar” with bowls of different toppings for everyone to customize their own decadent slice.
Make Ahead and Storage
Storing Leftovers
To keep your No-Bake Chocolate Cream Pie fresh and luscious, store leftovers tightly covered in the fridge for up to 4 days. The whipped cream topping holds up surprisingly well, but for maximum magic, you may want to re-whip or refresh just before serving slices later in the week.
Freezing
This pie freezes beautifully! Wrap the pie (ideally without whipped cream topping) tightly in plastic wrap and foil and stash it in the freezer for up to 2 months. Thaw overnight in the fridge, then add freshly whipped cream just before serving for the best texture and flavor.
Reheating
No need for reheating—this No-Bake Chocolate Cream Pie is best enjoyed chilled straight from the fridge! If serving from the freezer, allow it to thaw in the refrigerator until soft enough to slice. Serve cold for that perfect creamy, fudge-like texture.
FAQs
-
Can I use milk chocolate or dark chocolate instead of semi-sweet for the ganache?
Absolutely! Using milk chocolate will make the filling much sweeter and lighter, while dark chocolate (70% or higher) brings a more intense cocoa note. Taste as you go and adjust based on your preference—just keep ratios nearly the same for the silkiest texture.
-
Can I make No-Bake Chocolate Cream Pie ahead of time?
Yes, you can! The pie benefits from a few hours in the fridge and can even be made a day in advance—just wait to whip and add the cream topping until right before serving for optimal fluffiness.
-
Do I need to remove the cream filling from the Oreos?
Nope! Use the whole Oreo cookies, cream and all, for maximum flavor and the perfect sticky, cohesive crust. The filling helps the crust stick together, so you don’t need to add any extra sugar.
-
How do I make really clean, neat slices?
For bakery-worthy slices, dip a sharp knife into hot water, wipe dry, and slice—cleaning between each cut. This will help you get those perfect, photogenic wedges even with the creamy ganache!
Final Thoughts
If you’re craving a dessert that’s rich, chocolatey, and guaranteed to make you (and anyone you serve it to) swoon, this No-Bake Chocolate Cream Pie is calling your name. It’s easy enough for a weekday craving yet stunning enough for celebrations—give it a try, and you’ll see why it’s such a beloved, shareable treat!
Print
No-Bake Chocolate Cream Pie Recipe
- Prep Time: 30 minutes
- Cook Time: 5 minutes
- Total Time: 2 hours 35 minutes
- Yield: 1 – 9″ Pie
- Category: No-Cook
- Method: No-Cook
- Cuisine: American
Description
Indulge in the rich and creamy delight of this No-Bake Chocolate Cream Pie. A decadent Oreo cookie crust filled with luscious chocolate ganache and topped with fluffy whipped cream, this dessert is a chocolate lover’s dream come true.
Ingredients
For the Oreo Cookie Crust:
- (1) package Oreo cookies, crushed into crumbs
- 8 tablespoons unsalted butter, melted
For the Chocolate Ganache Filling:
- 16 ounces semi-sweet chocolate, finely chopped
- 2 and 1/4 cups heavy cream
- 1/2 cup (1 stick) unsalted butter, at room temperature, cut into cubes
For the Whipped Cream Topping:
- 1 and 1/2 cups heavy cream
- 1/4 cup confectioners’ sugar, sifted
Instructions
- For the Oreo Cookie Crust: In a large bowl, combine Oreo cookie crumbs and melted butter. Press the crust into a 9″ pie plate and freeze for 30 minutes.
- For the Chocolate Ganache Filling: Add chopped chocolate to a bowl. Heat cream, pour over chocolate, and stir until smooth. Add butter and stir until melted. Set aside.
- For the Whipped Cream Topping: Beat heavy cream and sugar until soft peaks form.
- Assembly: Pour ganache into crust, refrigerate for 2 hours. Top with whipped cream and chocolate shavings before serving.
Notes
- Whipped cream should be made just before serving.
Nutrition
- Serving Size: 1 slice
- Calories: 375
- Sugar: 19g
- Sodium: 120mg
- Fat: 28g
- Saturated Fat: 17g
- Unsaturated Fat: 8g
- Trans Fat: 0g
- Carbohydrates: 33g
- Fiber: 2g
- Protein: 3g
- Cholesterol: 55mg


