
If you’re on the hunt for a bread that feels like a warm hug, tastes a little like fall, and yet requires almost no elbow grease, you’ve come to the right place. This No-Knead Cranberry Walnut Bread Recipe is my absolute favorite go-to when I want impressive homemade bread without spending ages working the dough. The sweet-tart cranberries combined with crunchy walnuts and that lovely hint of orange zest make every bite feel festive and comforting — perfect for breakfast, snacks, or a cozy dinner side.
Why You’ll Love This Recipe
- Effortless Baking: You don’t need to knead the dough, making it perfect for beginners or busy days.
- Flavorful & Festive: Cranberries, walnuts, and orange zest create a lovely balance that’s neither too sweet nor too savory.
- Crispy Crust, Tender Crumb: Baking in a Dutch oven gives a bakery-quality crust that’s golden and crackly every time.
- Make Ahead Friendly: The 18-hour rise builds amazing flavor and lets you prep the dough the day before baking.

Ingredients You’ll Need
This recipe works because the ingredients are simple, yet each one brings something special to the party. From the yeast activating in warm water to the orange zest giving a fresh twist, you’ll want to use quality items to get the best taste and texture.

- Active dry yeast: Ensures the dough rises beautifully without any fuss.
- Warm water: Around 110-115°F is ideal to activate yeast without killing it.
- Granulated sugar: Feeds the yeast and adds a hint of sweetness.
- Kosher salt: Balances flavor and strengthens the dough’s structure.
- Bread flour: Gives this bread the perfect chewy texture; all-purpose can work but bread flour is best.
- Dried cranberries: Add bursts of tartness and a lovely red pop throughout the bread.
- Dried walnuts: Roughly chopped for crunch that complements the soft crumb beautifully.
- Honey: Adds subtle sweetness and helps with moisture retention.
- Orange zest: Brightens up the whole loaf with fresh citrus aroma and flavor.
Variations
I love tweaking the No-Knead Cranberry Walnut Bread Recipe depending on the season or what I have in my pantry — this bread is super flexible and welcomes your personal touch.
- Substitute nuts: I’ve swapped walnuts for pecans or hazelnuts and loved the different crunch and flavor they bring.
- Fruit changes: Sometimes I use dried cherries or blueberries instead of cranberries for a sweeter twist.
- Spice it up: Adding a teaspoon of cinnamon or pumpkin pie spice turns this into an even more cozy autumn treat.
- Gluten-free version: I’ve experimented with gluten-free flour blends, but you’ll want to add a binder like xanthan gum for best results.
How to Make No-Knead Cranberry Walnut Bread Recipe
Step 1: Activate Your Yeast and Mix the Dough
Start by dissolving the yeast and granulated sugar in warm water. The water temperature is key here — too hot and you’ll kill the yeast, too cold and it won’t activate well. After about 10 minutes, you should see a foamy layer on top, meaning the yeast is happy and ready. I’ve learned the hard way not to skip this step; if it doesn’t foam, start over with fresh yeast and water.
Next, whisk your bread flour with salt in a big bowl, then add the yeast water and honey. Stir everything together until there aren’t any pockets of flour, but try not to overmix—the dough will be pretty sticky, and that’s exactly how it should be. Fold in the cranberries, walnuts, and orange zest gently. Cover with plastic wrap and let it rest on your countertop for about 18 hours. This slow rise is where that deep flavor develops.
Step 2: Shape the Dough Without Kneading
After that long rise, your dough will look sticky and wet — don’t panic, this is normal. Instead of punching it down, transfer it to a generously floured surface. Sprinkle flour on your hands and the dough, then gently fold it over toward the center to form a rough ball. Be careful not to deflate the air bubbles, as these give the bread its lovely texture. Transfer the shaped dough onto parchment paper, cover loosely, and let it rest for another 30 minutes while you preheat your oven and Dutch oven.
Step 3: Bake for the Perfect Crust and Crumb
Pop your Dutch oven (lid and all) into a 450°F oven for at least 30 minutes so it heats thoroughly. This step is critical for that crispy crust. Before baking, score an “X” or your favorite pattern on the dough’s surface using a sharp knife — it helps the bread expand beautifully in the oven.
Carefully transfer the dough on its parchment paper into the blazing hot Dutch oven, cover it with the lid, and bake for 30 minutes. Resist any temptation to peek during this phase, because all that steam trapped inside is what makes your crust golden and crackly. Then, remove the lid and bake for an additional 8 to 10 minutes to brown the crust perfectly. When done, lift the bread out with the parchment, let it cool completely — I know it’s tempting to slice early, but patience here really pays off!
Pro Tips for Making No-Knead Cranberry Walnut Bread Recipe
- Water Temperature Matters: Always check your water temperature with a thermometer; yeast loves warmth but hates heat.
- Don’t Skimp on Flour When Shaping: The dough is sticky, so flour your hands and surface liberally to avoid frustration.
- Hot Dutch Oven Is Key: Preheating makes the steam that creates the crust—don’t rush this step!
- Patience for Cooling: Wait until the bread is completely cool before slicing to avoid a gummy crumb.
How to Serve No-Knead Cranberry Walnut Bread Recipe

Garnishes
I often serve this bread with a simple spread of softened butter or a drizzle of honey to complement the cranberry’s tartness. For special occasions, a smear of cream cheese mixed with a little fresh orange zest or even a cinnamon honey butter turns it into something unforgettable.
Side Dishes
This bread pairs wonderfully with a warm bowl of soup like butternut squash or tomato basil, making it perfect for chilly evenings. I also love it alongside a light salad or served at brunch with eggs and fresh fruit.
Creative Ways to Present
For holiday gatherings, I slice the loaf into thick pieces and layer them on a rustic wooden board alongside nuts, fresh rosemary sprigs, and small bowls of jam or honey. It’s an inviting setup that your guests will love exploring.
Make Ahead and Storage
Storing Leftovers
I like to store leftover bread in a semi-open paper bag—this keeps the crust nice and crisp while preventing the crumb from drying out. If you seal it tightly in plastic, you’ll lose that perfect crustiness pretty quickly.
Freezing
To freeze, I wrap the loaf tightly in aluminum foil and then seal it in a freezer-safe bag. This method keeps it fresh for up to 3 months. When I’m ready to enjoy, I just let it thaw at room temperature, and it tastes almost like fresh-baked.
Reheating
Reheating the bread in a 350°F oven for 10-15 minutes revives that wonderful crust and warms the inside just right. Avoid microwaving if you can—it makes the crust soggy.
FAQs
-
Can I use all-purpose flour instead of bread flour?
Yes, you can substitute all-purpose flour, but the texture might be slightly less chewy and the bread won’t rise quite as much. I prefer bread flour for that nice gluten structure, but all-purpose works in a pinch.
-
What if my yeast doesn’t foam during activation?
If the yeast doesn’t foam after 10 minutes, it’s best to start over with fresh yeast and check your water temperature. Old or inactive yeast won’t make your bread rise properly.
-
Can I reduce the rising time?
The long 18-hour rise helps develop the flavor and texture, but you could try as little as 12-16 hours. Shorter times may yield a denser loaf with less complex taste.
-
Why do I need a Dutch oven for this recipe?
The Dutch oven traps steam which is crucial for creating that crispy, golden crust. Without it, the bread may bake unevenly and won’t get the characteristic crusty finish.
-
Can I add other mix-ins?
Absolutely! Just keep mix-ins to about 1 cup total to avoid weighing down the dough. Dried fruit, seeds, or spices can all be delicious additions.
Final Thoughts
This No-Knead Cranberry Walnut Bread Recipe has genuinely become a staple in my kitchen because of how effortless and rewarding it is. I love that I can start the dough one day and come back to an incredible artisan-style loaf with minimal effort. Whether you want to impress guests or just treat yourself to something homemade and cozy, this bread hits all the right notes. Give it a try and soon you’ll wonder how you ever lived without it!
Print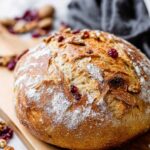
No-Knead Cranberry Walnut Bread Recipe
- Prep Time: 15 minutes
- Cook Time: 40 minutes
- Total Time: 19 hours 25 minutes
- Yield: 12 slices
- Category: Bread
- Method: Baking
- Cuisine: American
Description
This Thanksgiving Cranberry Walnut Bread is a flavorful no-knead bread perfect for the holiday season. Infused with dried cranberries, chopped walnuts, and bright orange zest, this artisan-style loaf has a crisp crust and a tender, moist crumb. Made using a simple yeast fermentation and baked in a Dutch oven to lock in steam, it delivers bakery-quality bread with minimal hands-on effort. The bread is perfect sliced for breakfast, sandwiches, or alongside your Thanksgiving feast.
Ingredients
Wet Ingredients
- ½ teaspoon active dry yeast
- 1 ½ cups warm water (110 to 115 degrees F)
- 1 teaspoon granulated sugar
- 1 tablespoon honey
Dry Ingredients
- 2 teaspoons Kosher salt
- 3 cups bread flour, plus 2 tablespoons (plus more for surface)
- ¾ cup dried cranberries
- ½ cup dried walnuts, roughly chopped
- 1 tablespoon orange zest
Instructions
- Prep the yeast mixture: Dissolve the active dry yeast and granulated sugar in the warm water (110-115°F). Let it sit for 10 minutes until foamy. If it doesn’t foam, discard and restart to ensure the yeast is active.
- Mix the dough: In a large bowl, whisk together bread flour and salt. Add the yeast mixture and honey, combining until no flour pockets remain. Stir in dried cranberries, walnuts, and orange zest gently to incorporate. The dough will be sticky and wet.
- First rise: Cover the bowl tightly with plastic wrap, ensuring the wrap does not touch the dough. Leave at room temperature to rise for 18 hours to develop flavor and texture.
- Shape the dough: After rising, transfer the dough to a generously floured surface. Sprinkle extra flour as needed on dough and hands. Gently fold dough from edges to center forming a ball while preserving air bubbles. Place dough seam side down on lightly floured parchment paper, smoothing top. Cover with plastic wrap and rest for 30 minutes.
- Preheat Dutch oven: Place a 5-6 quart Dutch oven with its lid inside your oven. Preheat oven to 450°F and heat the Dutch oven for 30 minutes.
- Score and bake: Just before baking, score the dough with an X or desired pattern. Carefully remove hot Dutch oven from oven and lift the parchment paper with dough directly into it. Cover with lid tightly and bake for 30 minutes without opening the lid to trap steam.
- Finish baking: Remove lid and continue to bake an additional 8-10 minutes until crust turns golden brown and crisp.
- Cool and serve: Remove bread from the Dutch oven using the parchment paper. Let cool completely on a wire rack before slicing to maintain crumb structure. Enjoy fresh or store as instructed.
Notes
- Allow the dough to rise for a full 18 hours for optimal flavor and texture development. You may shorten to 16 hours but avoid less than 12 hours to prevent dense bread.
- The dough is intentionally very wet and sticky to create steam inside the Dutch oven, forming a beautiful crust. Use plenty of flour when handling to prevent sticking.
- A Dutch oven is essential for trapping steam during baking, which gives the bread a crispy, artisan crust similar to professional bakeries.
- Store leftover bread in a semi-open paper bag to maintain crustiness, mimicking bakery storage.
- For freezing, wrap the cooled bread tightly in aluminum foil and place inside a resealable freezer bag for up to 3 months. Thaw at room temperature before slicing.
Nutrition
- Serving Size: 1 slice (about 1/12th of loaf)
- Calories: 210
- Sugar: 7g
- Sodium: 370mg
- Fat: 4.5g
- Saturated Fat: 0.5g
- Unsaturated Fat: 4g
- Trans Fat: 0g
- Carbohydrates: 38g
- Fiber: 3g
- Protein: 6g
- Cholesterol: 0mg


