
There’s something simply magical about a classic Old Fashioned Apple Cobbler. It’s the kind of comforting dessert that promises nostalgia in every bite, with tender baked apples tucked beneath a golden, biscuit-style crust. This recipe is the answer for busy weeknights when you crave a homemade treat but don’t want to fuss with complicated steps. The combination of sweet-tart apples with warm cinnamon and a rustic, buttery topping will have your whole kitchen smelling irresistible and your family begging for seconds. It’s practically foolproof and so satisfying—especially when a scoop of vanilla ice cream is added on top!
Why You’ll Love This Recipe
- Quick to Prep: You’ll only need about 15 minutes to get everything into the oven. The cobbler does the rest of the work for you.
- Incredible Flavor & Texture: The apples turn perfectly tender and saucy, while the topping bakes into a chewy, slightly crisp biscuit that’s both rich and comforting.
- Minimal Ingredients, Maximum Comfort: Using pantry staples and easy-to-find apples, you can whip up dessert without an extra grocery run.
- Perfect for All Occasions: Whether it’s a special Sunday dinner, a potluck, or a weeknight family treat—this cobbler fits right in.

Ingredients You’ll Need
Let’s break down what goes into each layer of this apple cobbler and why every component works so well:
For the Apple Filling:
- Granny Smith Apples: Their tartness balances the sweetness and keeps the filling from turning mushy.
- Brown Sugar: Deepens the caramel notes of the apples and adds that classic cobbler warmth.
- Cornstarch: Thickens the juices so the filling isn’t runny—no soggy bottoms here!
- Ground Cinnamon: Essential for that signature cozy apple pie flavor.
- Ground Nutmeg: Adds a subtle, almost nutty background spice—just a touch goes a long way.
- Vanilla Extract: Rounds out the flavors and adds a beautiful aroma to the filling.
For the Cobbler Batter:
- All-Purpose Flour: Forms the sturdy, rustic base for your topping.
- Powdered Sugar: Sweetens the topping without any graininess.
- Baking Powder: Gives the topping that perfect lift and fluffiness.
- Salt: Balances out the sweet and enhances every bite.
- Cold Butter: THE secret to a flaky, crumbly crust—don’t use margarine!
- Half and Half: Makes the batter extra tender and moist.
Note: You’ll find the complete list of ingredients, along with their exact measurements, in the printable recipe card at the bottom of this post.
Variations
There’s no rule saying you can’t tweak your cobbler! Here are a few ways to mix things up:
- Mix Up the Fruit: Try half apples and half pears, or add a handful of fresh cranberries for tartness.
- Spice It Up: Swap nutmeg for cardamom, add ginger for a zing, or toss in a little orange zest for brightness.
- Make it Gluten-Free: Use your favorite 1:1 gluten-free flour blend.
- Dairy-Free Option: Substitute cold coconut oil or vegan butter, and use almond or oat milk instead of half and half.
- Nutty Crunch: Sprinkle chopped pecans or walnuts over the batter before baking for a toasty crunch.
How to Make Old Fashioned Apple Cobbler
You’re just a few easy steps away from diving into a bowl of warm cobbler!
Step 1: Prep the Apples
Preheat your oven to 350°F and grease a 9×13-inch baking pan. In a mixing bowl, toss your sliced apples with brown sugar, cornstarch, cinnamon, nutmeg, and vanilla so the fruit is evenly coated. Spread the apple mixture in an even layer in the pan.
Step 2: Make the Cobbler Batter
In another large bowl, combine flour, powdered sugar, baking powder, and salt. Cut in the cold butter with a pastry cutter (or pulse in a food processor) until the mixture looks like coarse crumbs—the butter is key for that tender crust! Add the half and half and stir just until a thick, lumpy batter forms.
Step 3: Assemble and Bake
Dollop the batter in large, rustic clumps right on top of the apples—don’t worry about it looking perfect! This is what gives cobbler its charm. Bake for about 1 hour, until the topping is golden brown and you can see the apple juices bubbling around the edges.
Note: The smell will be absolutely irresistible, so be prepared for everyone to wander into the kitchen!
Pro Tips for Making the Recipe
- Keep Butter Cold: Don’t let the butter soften too much before you cut it in; cold butter gives you that gorgeous, flaky topping.
- Rustic is Better: Don’t try for a perfectly smooth crust—the uneven bits bake up with extra crispy, golden spots.
- Let it Rest: After baking, give your cobbler 10–15 minutes to cool a bit. The filling will thicken and the flavors will meld even more.
- Taste Your Apples: If your apples are very tart, you can add a touch more brown sugar.
How to Serve

The best way to serve Old Fashioned Apple Cobbler is warm from the oven, with big, hearty scoops. Here are some perfect pairings:
- Classic Vanilla Ice Cream: The ultimate contrast—cool, creamy ice cream melting over hot cobbler.
- Whipped Cream: Lightly sweetened, piled high for a cloud-like finish.
- A Drizzle of Salted Caramel: For extra decadence and a touch of fancy.
- Cup of Coffee: This is a power duo, especially on a cool evening!
Tip: Serve straight from the baking dish for extra rustic charm—nobody will mind!
Make Ahead and Storage
Storing Leftovers
Cover any leftovers and refrigerate for up to 4 days. The flavors get even cozier as they sit!
Freezing
Cobbler can be frozen after baking. Just let it cool, wrap tightly, and store for up to 2 months. Thaw overnight in the fridge before reheating.
Reheating
Warm individual portions in the microwave, or reheat the whole pan in a 325°F oven until heated through and bubbly.
Note: Add a splash of water or milk before reheating if the topping looks a little dry.
FAQs
-
Can I use a different variety of apples for this cobbler?
Absolutely! While granny smith apples are wonderfully tart and hold their shape, feel free to experiment with honeycrisp, fuji, jonagold, or a mix for a more complex flavor.
-
How do I know when the cobbler is done?
The topping should be deeply golden, and you should see the fruit filling bubbling up around the edges. If the topping still looks pale after an hour, add a few more minutes—oven temperatures can vary.
-
Can I make the cobbler batter ahead of time?
For best results, assemble the batter just before baking so the baking powder stays active and the cold butter stays chilled. If you need to prep ahead, slice your apples and toss with lemon juice to prevent browning.
-
Is it possible to make this dessert vegan?
Yes! Swap the butter for vegan butter or coconut oil, and use a plant-based milk instead of half and half. Make sure your sugar is vegan too.
Final Thoughts
There’s no better way to wind down a busy day than with a bowl of homemade Old Fashioned Apple Cobbler. It’s simple, homey, and gives you big flavor rewards for minimal effort—just the kind of recipe every home cook needs in their back pocket. You might find yourself making it again and again, trying new twists or sticking with the timeless original. Give it a try, share it with loved ones, and see just how quickly it disappears from the table!
Print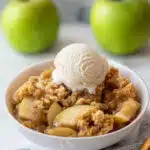
Old Fashioned Apple Cobbler Recipe
- Prep Time: 15 minutes
- Cook Time: 1 hour
- Total Time: 1 hour 15 minutes
- Yield: 8 servings
- Category: Desserts
- Method: Baking
- Cuisine: American
- Diet: Vegetarian
Description
This Old Fashioned Apple Cobbler recipe combines tart granny smith apples with a sweet spiced filling and a buttery, rustic biscuit topping. Baked to golden perfection, it’s the ultimate comforting dessert for fall or any time you crave a classic homemade treat.
Ingredients
Apple Filling
- 4 to 5 pounds granny smith apples, peeled, cored, and sliced
- 1/2 cup brown sugar
- 2 tablespoons cornstarch
- 1 teaspoon ground cinnamon
- 1/4 teaspoon ground nutmeg
- 1/2 teaspoon vanilla extract
Cobbler Batter
- 2 cups all-purpose flour
- 3/4 cup powdered sugar
- 1 tablespoon baking powder
- 1 teaspoon salt
- 1/2 cup cold butter, diced
- 1 cup half and half
Instructions
- Preheat and Prepare Pan: Preheat your oven to 350°F (175°C). Spray a 9×13 inch baking pan with nonstick cooking spray to prevent sticking and set aside.
- Make Apple Filling: In a medium-size mixing bowl, combine the sliced apples with brown sugar, cornstarch, cinnamon, nutmeg, and vanilla extract. Toss until all apple slices are evenly coated. Spread the apple mixture in an even layer in the prepared pan.
- Prepare Cobbler Batter: In a large mixing bowl, stir together the flour, powdered sugar, baking powder, and salt. Add the diced cold butter and use a pastry cutter to cut it into the flour mixture until it resembles coarse meal. Alternatively, pulse all ingredients together in a food processor.
- Add Liquid: Pour the half and half into the dry mixture and stir until a thick batter forms. Be careful not to overmix; just combine until incorporated.
- Assemble Cobbler: Scoop the batter in large clumps or dollops over the apple filling. You don’t need to cover the apples completely; the rustic look is traditional for cobbler.
- Bake: Place the pan in the preheated oven and bake for about 1 hour, or until the topping is golden brown and the apple filling is bubbling.
- Cool and Serve: Remove the cobbler from the oven and let it cool slightly before serving. Enjoy warm, optionally with ice cream or whipped cream.
Notes
- For best flavor, use tart apples like Granny Smith, but you can substitute other baking apples if preferred.
- Cobbler is delicious served fresh, but can be reheated in the oven or microwave if making ahead.
- Add a scoop of vanilla ice cream on top for an extra indulgent dessert.
- Leftovers can be stored in the refrigerator for up to 3 days.
Nutrition
- Serving Size: 1 serving (1/8th of recipe)
- Calories: 361 kcal
- Sugar: 24g
- Sodium: 410mg
- Fat: 15g
- Saturated Fat: 9g
- Unsaturated Fat: 6g
- Trans Fat: 0g
- Carbohydrates: 52g
- Fiber: 1g
- Protein: 4g
- Cholesterol: 41mg


