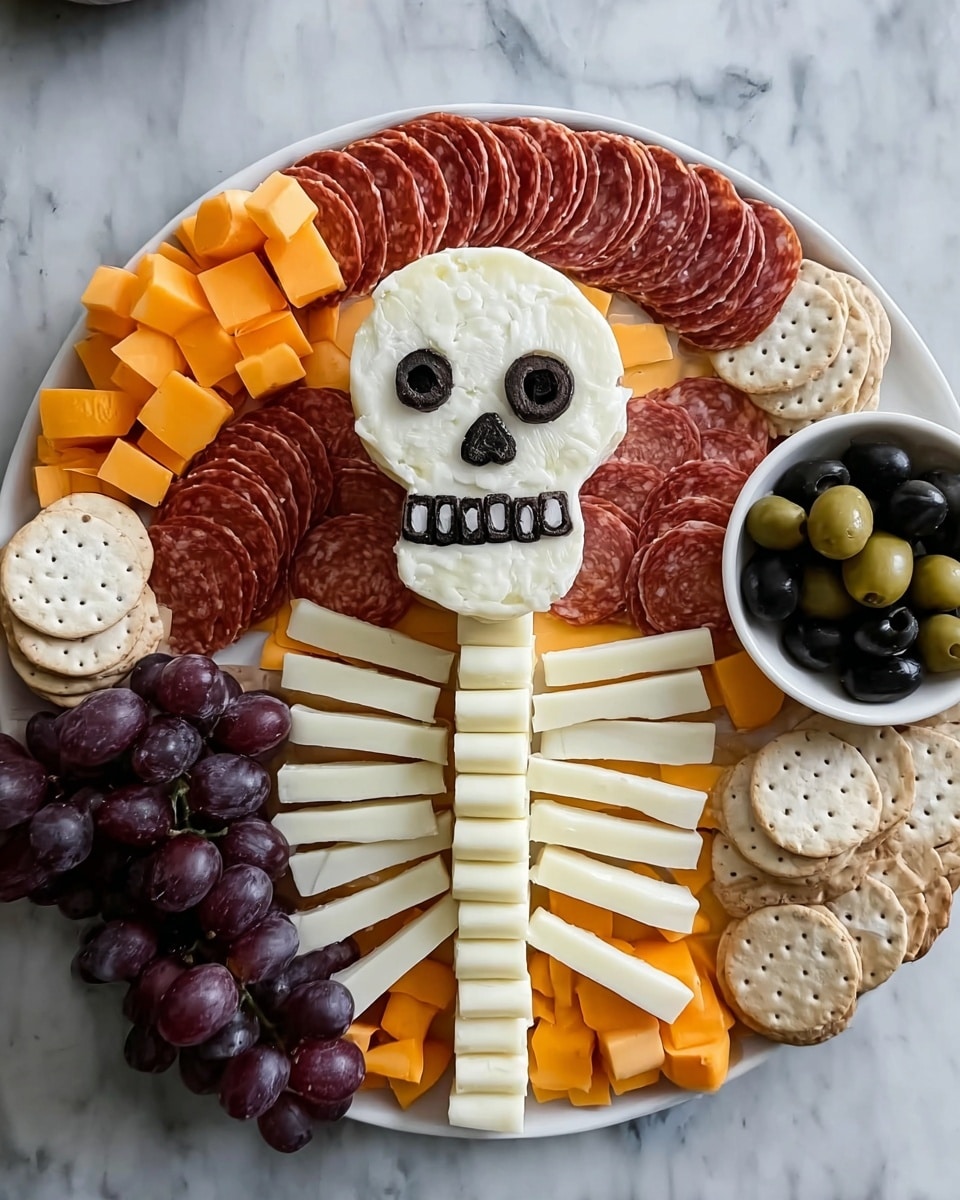
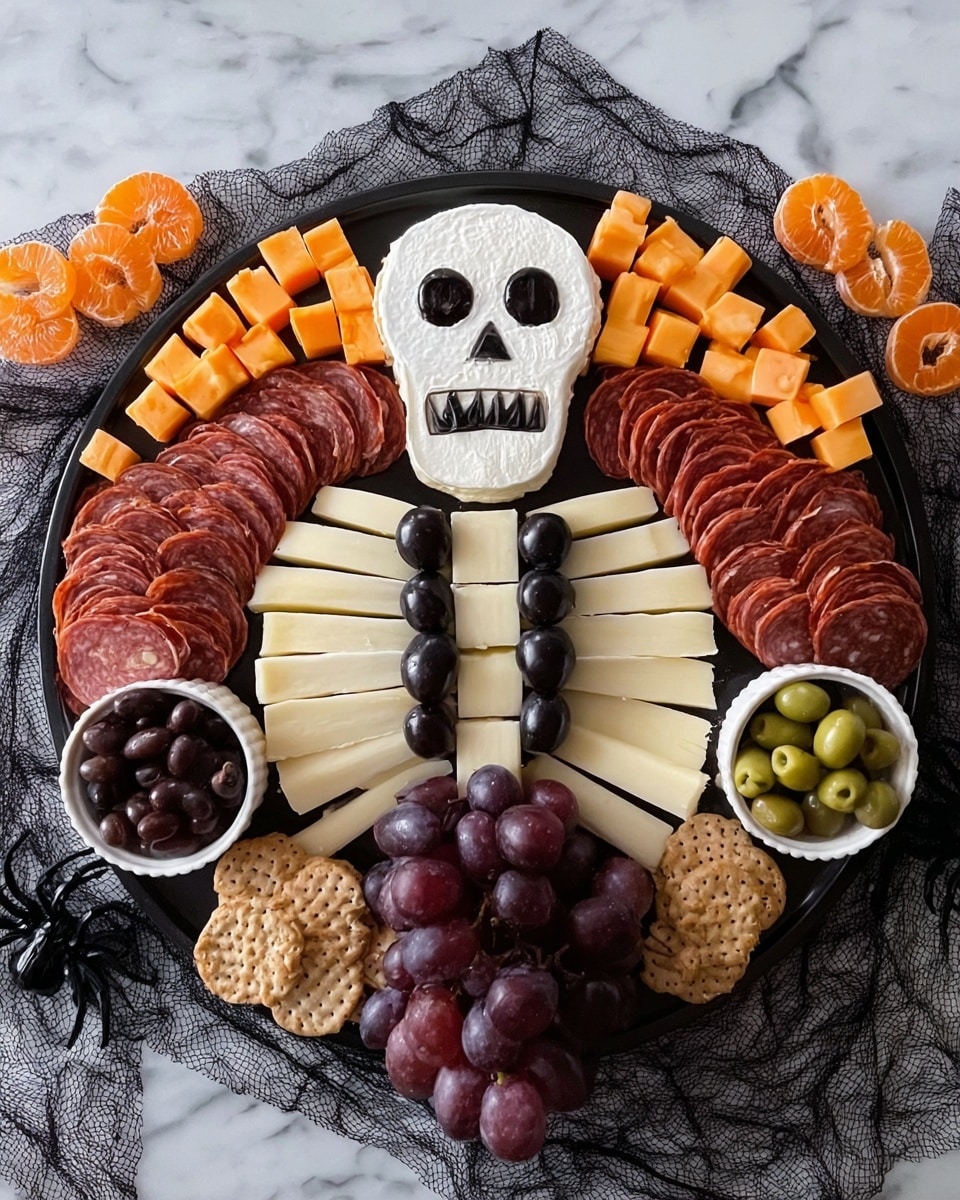
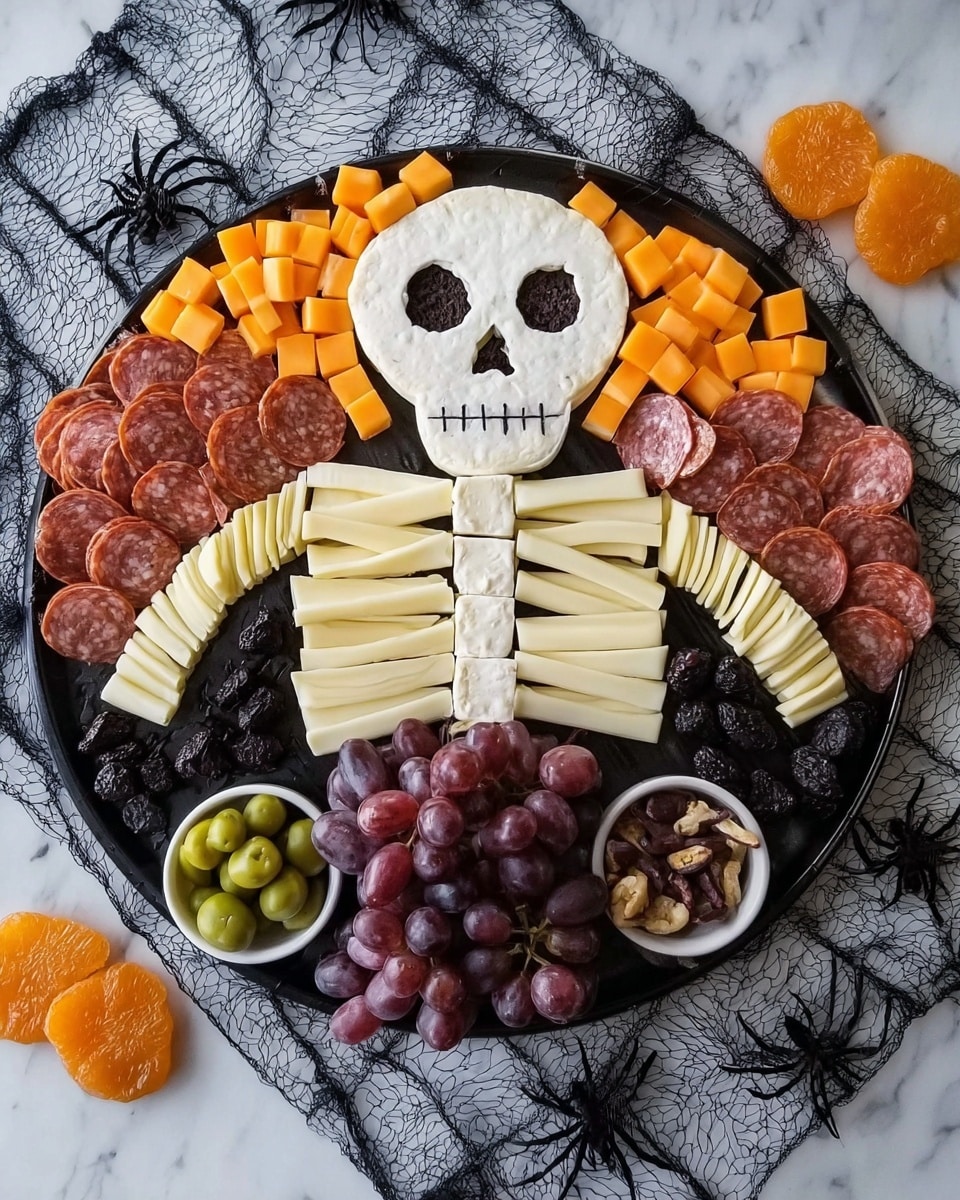
If you’re looking for a unique and festive way to wow your friends this Halloween, you’re in the right place! My Skeleton Charcuterie Board for a Spooky Snack Recipe is nothing short of a party showstopper. It’s playful, delicious, and surprisingly easy to pull together — perfect for those who want to impress without a ton of stress. Trust me, once you see that brie skull and all the gnarly little details, you’ll want to make this year after year.
Why You’ll Love This Recipe
- Festive and Fun: You’re not just serving snacks — you’re serving a mini Halloween art piece everyone will love.
- No Cooking Required: It’s all about assembly and presentation, so it’s great for a last-minute party prep.
- Flavor-Packed: From tangy jam to smoky salami and creamy cheeses, every bite is a winner.
- Customizable: You can easily swap ingredients based on your favorite flavors or allergies.
Ingredients You’ll Need
The magic comes from a fun combination of cheeses, meats, sweet jams, and crunchy accents — all chosen to bring out the shapes of our spooky skeleton. When you shop, look for good quality deli meats and fresh cheeses to make this board sing.
- Brie wheel: The perfect creamy “skull” base that’s easy to shape and deliciously smooth.
- Blueberry jam: Adds a sweet and slightly tart contrast; plus, its deep color adds spooky undertones.
- Yogurt covered pretzels: A crunchy, sweet “neck” that gives a fun texture.
- String cheese: Works great as the “sternum” thanks to its shape and mild flavor.
- Young manchego: Sliced into triangles, these make perfect “ribs” for the skeleton.
- Columbus Meats Italian Dry Salame: Adds smoky, savory flavor and folds nicely between ribs.
- Columbus Meats Charcuterie Tasting Board: Use a mix of salami, olives, and dried fruits for extra variety and color.
- Mild cheddar: Cubed to fill gaps and offer a familiar crowd-pleasing flavor.
- Dark purple grapes: For pops of juicy sweetness and visual depth.
- Dried orange slices: A decorative touch with autumnal vibes and a hint of citrus zing.
Variations
One of the things I love most about the Skeleton Charcuterie Board for a Spooky Snack Recipe is how flexible it is. I like to remix the meats or swap cheeses based on what I have or prefer — it’s so fun to make it your own!
- Vegetarian Variation: Replace salami with roasted veggies or stuffed mini peppers for a meat-free version my vegetarian friends adore.
- Cheese Swap: If you’re not a fan of manchego, try gouda or pepper jack triangles to mix up the flavor profile.
- Seasonal Twist: Add figs, pomegranate seeds, or roasted nuts for extra fall flair and texture.
- Kid-Friendly: Use milder cheeses and add fun-shaped crackers so kids can get involved and enjoy the spooky theme.
How to Make Skeleton Charcuterie Board for a Spooky Snack Recipe
Step 1: Chill and Shape the Brie Skull
Start by popping your brie wheel into the freezer for about 15-20 minutes — this makes it easier to cut and shape without it getting too squishy. When I first tried this, chilling made a huge difference in getting a clean “skull” shape. Then, cut wedges out of the sides of the bottom third of the brie to mimic a mushroom shape, and round the top edges for that skull silhouette. Slice off the top half-inch and set it aside for later.
Step 2: Create the Skull’s Features with Jam and Cut-Outs
Spread blueberry jam on the bottom piece of brie; not only does it taste amazing but it also helps “glue” the pieces together and adds that eerie dark color. Using a small paring knife, carefully cut out a rectangle for the mouth, a triangle for the nose, and circles for each eye. Here’s a trick I discovered — if you have tiny cookie cutters, those work perfectly for the eyes to get perfectly round holes. Place the top half-inch of the brie back on top of the jam layer.
Step 3: Add the Teeth and Assemble the Neck
Take one slice of manchego and cut it into five small squares to make the skull’s teeth, then place those into the mouth’s rectangular opening. Next, lay the brie skull on your board and arrange the yogurt-covered pretzels just underneath it — this quirky crunch forms the spooky neck. Below that, set the string cheese to stand in as the sternum. I’ve found this step really brings the whole skeleton together visually and texturally.
Step 4: Build the Rib Cage and Flesh Out the Board
Place the manchego slices in two rows on either side of the string cheese, alternating the direction of the triangles so they look like rib bones. Then fold the slices of salami into quarters and tuck them between the manchego ribs and sternum for that meaty texture. Add small ramekins with olives and chocolate-covered cranberries right on the board, then scatter salami slices like the calabrese around the edges. Finally, fill in the remaining gaps with juicy grapes and cheddar cheese cubes, and garnish everything with dried orange slices to give a perfect autumnal and slightly spooky vibe.
Pro Tips for Making Skeleton Charcuterie Board for a Spooky Snack Recipe
- Chill Brie Before Cutting: Brie can be soft and tricky to shape—chilling it first prevents squashing and helps you get clean cuts.
- Use Cookie Cutters for Precision: For the skull’s eyes, tiny cookie cutters or small bottle caps make cutting perfect circles a breeze.
- Alternate Rib Directions: Placing manchego triangles facing opposite ways on either side mimics real ribs and adds visual interest.
- Balance Sweet and Savory: The combo of blueberry jam, grapes, and sharp cheeses with spicy salami keeps every bite exciting and balanced.
How to Serve Skeleton Charcuterie Board for a Spooky Snack Recipe
Garnishes
I like to keep the garnishes simple but striking: dried orange slices not only add a nice pop of color but also a little fragrant citrus scent that ties everything together. Sometimes I toss on a few fresh rosemary sprigs for a touch of green and herbal aroma, which contrasts beautifully with the rich cheeses and meats.
Side Dishes
This spooky snack pairs wonderfully with easy sides like crusty baguette slices, warm spiced nuts, or even a bowl of roasted pumpkin seeds for some crunch. For drinks, I love serving it alongside autumn-inspired cocktails or a chilled white wine to compliment the creamy brie and sharp cheddar.
Creative Ways to Present
When I’ve made this skeleton board for Halloween parties, I like to use a rustic wooden board to keep that slightly eerie, natural look. You can also add little flickering LED candles around for a spooky vibe that’s safe for indoors. For kids’ parties, I sometimes add tiny plastic spiders or edible Halloween-themed picks — just enough to keep it fun without overdoing it.
Make Ahead and Storage
Storing Leftovers
Because this is a mostly cold board, leftovers store well covered tightly in the refrigerator. I usually wrap the brie separately in plastic wrap to keep it fresh and place any fruit separately in airtight containers. It lasts about 2 days without losing texture or flavor.
Freezing
I don’t recommend freezing the whole board or the fresh fruits since they don’t freeze well, but the meats and some cheeses can be frozen ahead of time if you want to prep in batches. Just thaw them gently in the fridge before assembly for the best texture.
Reheating
This recipe is meant to be enjoyed cold or at room temperature, so reheating isn’t necessary. If you want your brie softer, let it sit out for 15 minutes before serving rather than microwaving, which can alter the texture.
FAQs
-
Can I make the Skeleton Charcuterie Board ahead of time?
Yes! You can prep most of the ingredients and slice your cheeses and meats a day before. However, I recommend assembling the brie skull and the full board on the day you plan to serve so everything looks fresh and the brie doesn’t dry out.
-
What can I use if I don’t have blueberry jam?
Feel free to swap blueberry jam for any dark fruit jam like blackberry or blackcurrant. Raspberry jam works too but will give a slightly different, brighter red color.
-
How do I cut the holes in the brie without it breaking?
Chilling the brie in the freezer before cutting helps firm it up. Use a small, sharp paring knife and take your time. If you have tiny cookie cutters, they can make the eye holes much easier to cut without cracking.
-
Can I add other spooky elements to the board?
Absolutely! Mini plastic skeleton hands, edible eyeballs, or even black licorice “spiders” can amp up the spooky factor. Just make sure they’re food-safe if placed directly on the board.
Final Thoughts
I absolutely love how this Skeleton Charcuterie Board for a Spooky Snack Recipe brings a little theatrical flair to casual Halloween gatherings. It’s playful enough to impress kids but sophisticated enough for adults to enjoy. The first time I made it, everyone couldn’t stop talking about the brie skull — it’s become a Halloween tradition in my family! I hope you’ll give it a try and discover new ways to personalize it. Trust me, once you master this, you’ll be making it every spooky season.
Print
Skeleton Charcuterie Board for a Spooky Snack Recipe
- Prep Time: 20 minutes
- Cook Time: 0 minutes
- Total Time: 20 minutes
- Yield: Serves 8-10
- Category: Appetizer
- Method: No-Cook
- Cuisine: American
Description
Create a spooky and delicious Skeleton Charcuterie Board perfect for Halloween gatherings featuring a brie skull centerpiece surrounded by a variety of meats, cheeses, fruits, and festive garnishes.
Ingredients
Cheeses
- 1 (16-oz) brie wheel
- 16 oz young manchego, sliced into triangles
- 10 oz mild cheddar, cubed
- 1 string cheese
Meats
- 12 oz Columbus Meats Italian Dry Salame
- 1 (12.5-oz) package Columbus Meats Charcuterie Tasting Board
Fruits & Garnishes
- 2 oz blueberry jam
- 30 oz dark purple grapes
- 8 dried orange slices
- 4 yogurt covered pretzels
Instructions
- Chill the Brie: Place the brie wheel in the freezer for 15-20 minutes to firm it up for easier carving.
- Create the Brie Skull: Cut wedges out of the sides of the bottom third of the brie to shape a mushroom-like base. Round the edges at the top to form a skull shape. Slice off the top ½-inch and set aside. Spread blueberry jam on the bottom piece.
- Carve Facial Features: Using a paring knife, cut out a rectangle for the mouth, a triangle for the nose, and circles for the eyes in the jam-covered brie base. (Tip: A small cookie cutter works well for the eyes.) Place the reserved top piece of brie back on.
- Add Teeth Detail: Cut one slice of manchego into five small squares and place them within the rectangular mouth cutout to simulate teeth.
- Assemble the Skeleton: Place the brie skull centerpiece on the board. Position the yogurt covered pretzels under the skull to represent the neck. Below the pretzels, place the string cheese as the sternum.
- Create the Rib Cage: Arrange the manchego triangles in two rows on either side of the string cheese, alternating the direction of the triangles to mimic ribs.
- Add Salame: Fold the salame slices into quarters and tuck them in between the manchego ribs and the string cheese sternum.
- Prepare Sides: Place olives and chocolate covered cranberries into two separate small ramekins and position them on the board. (Note: If olives and chocolate covered cranberries are not provided, you can omit or substitute with similar bites.)
- Fill and Garnish: Arrange the additional Columbus Meats Calabrese around the edges of the board. Fill remaining gaps with clusters of dark purple grapes and cubed cheddar. Finally, garnish the board with dried orange slices for a festive touch.
Notes
- Make this skeleton charcuterie board as a spooky Halloween ‘scare-cuterie’ surprise for your guests.
- Chilling the brie before carving prevents it from becoming too soft and easier to shape.
- Feel free to customize with your favorite charcuterie meats and cheeses.
- Use small cookie cutters for precise carving of eyes or other facial features on the brie skull.
Nutrition
- Serving Size: 1/8 of board
- Calories: 350
- Sugar: 12g
- Sodium: 700mg
- Fat: 25g
- Saturated Fat: 12g
- Unsaturated Fat: 10g
- Trans Fat: 0g
- Carbohydrates: 18g
- Fiber: 3g
- Protein: 12g
- Cholesterol: 50mg

