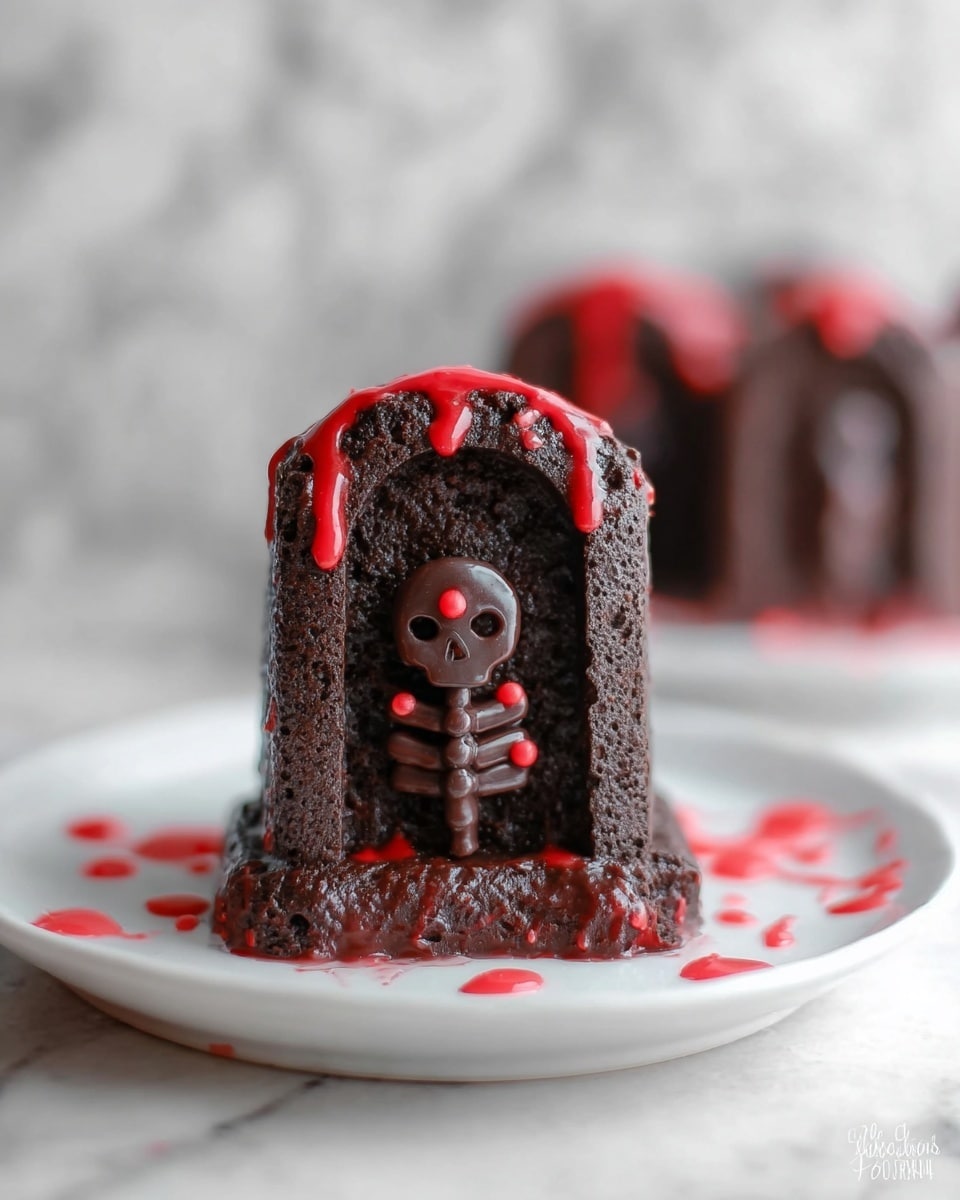
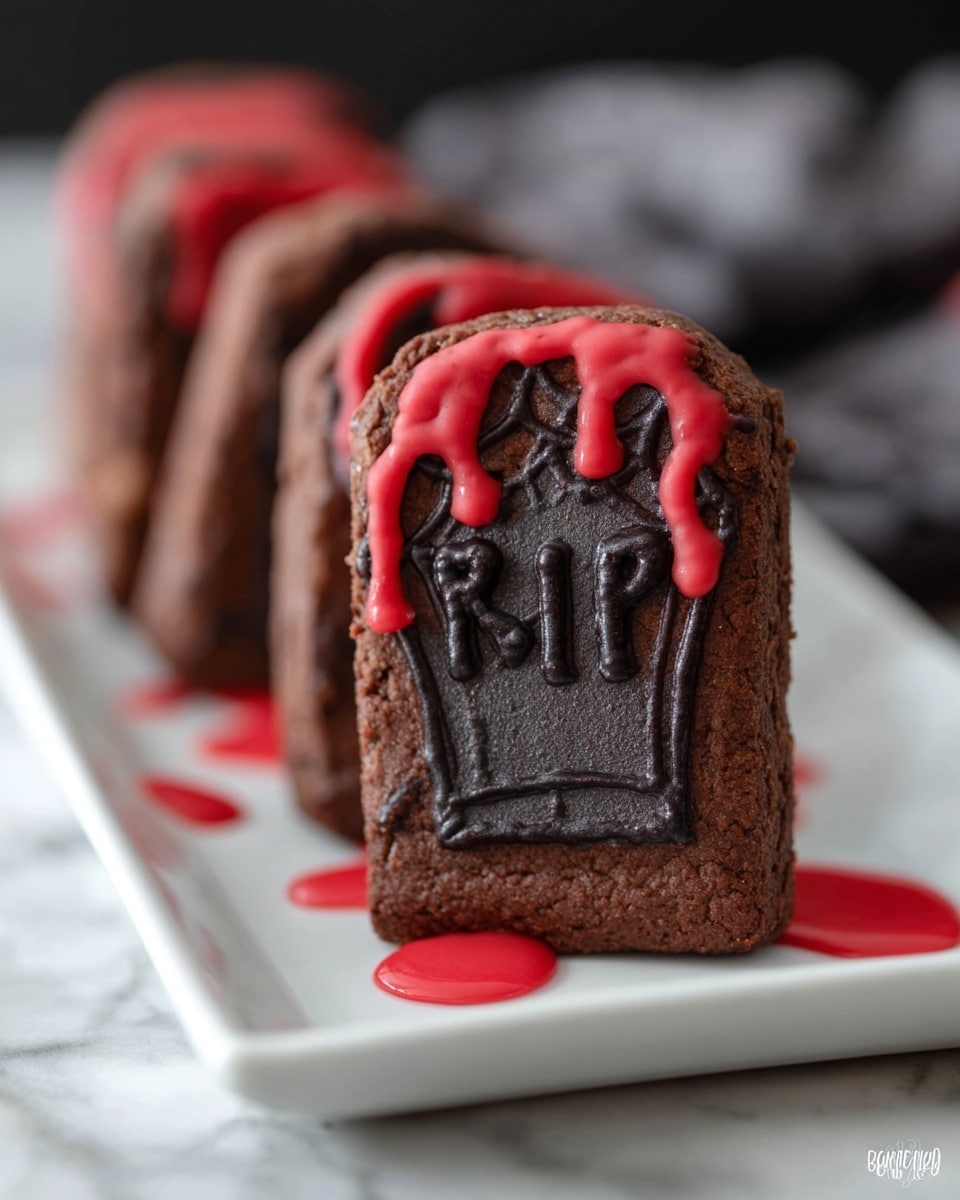
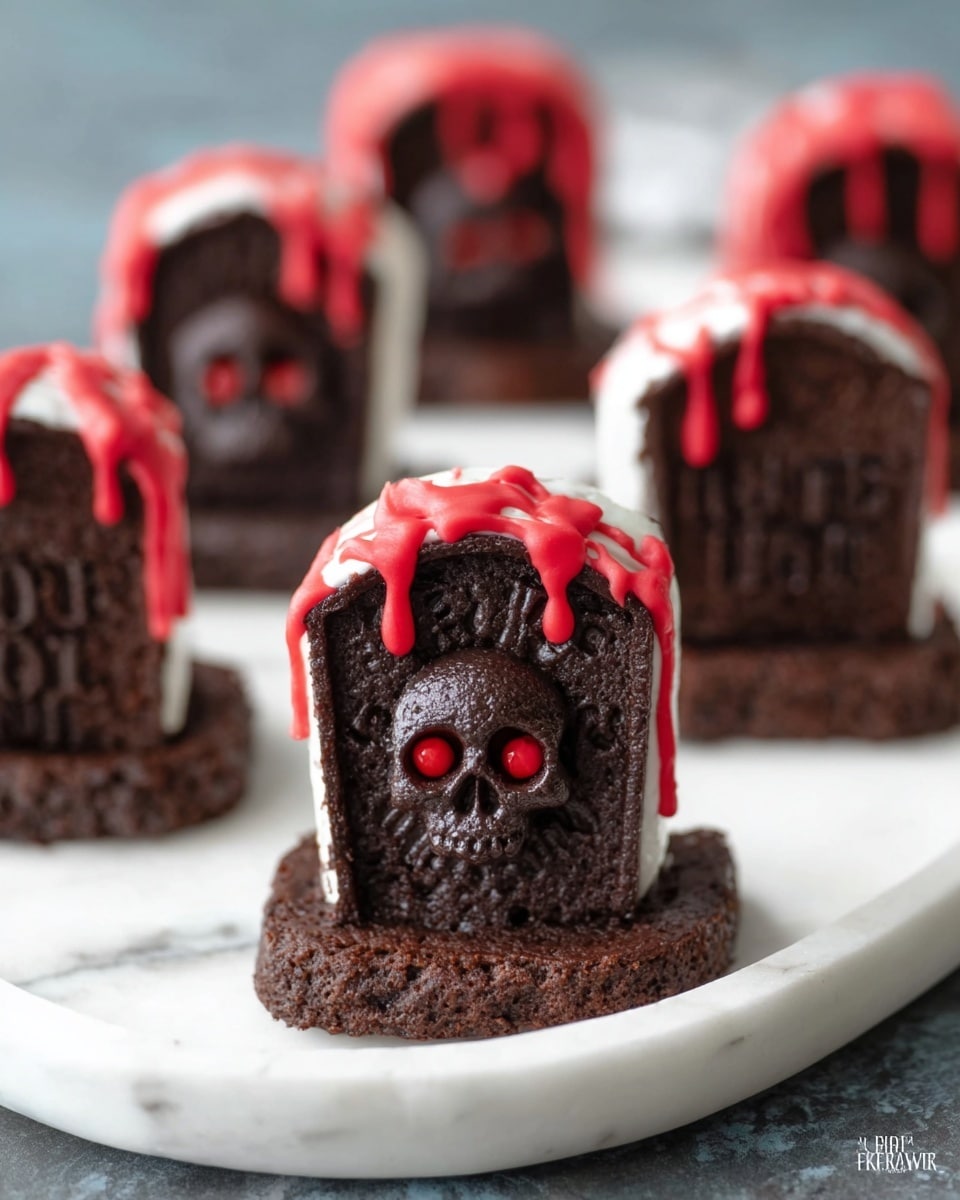
If you’re on the hunt for a dessert that’s both charmingly spooky and irresistibly delicious, you’re going to want to bookmark this one. The Tombstone Chocolate Snack Cakes Recipe is my absolute favorite when I want to impress friends with something cute, festive, and, most importantly, scrumptious. It combines rich chocolate, fluffy marshmallow filling, and a glossy glaze that all come together like magic. When I first tried this recipe, I couldn’t believe how perfectly these little tombstones captured that fun Halloween vibe while tasting like a decadent treat. Trust me, once you’ve made these, you’ll be adding them to your dessert rotation year-round.
Why You’ll Love This Recipe
- Perfect Balance of Flavors: The rich cocoa and cinnamon blend beautifully for a depth of taste.
- Playful Presentation: These little tombstones are a crowd-pleaser for Halloween or any fun gathering.
- Marshmallow Filling Magic: The creamy filling keeps every bite luscious and moist.
- Easy to Customize: You can tweak spices or colors to fit your mood or occasion.
Ingredients You’ll Need
To get these tombstone snack cakes just right, you’ll want ingredients that bring moisture, flavor, and a bit of fun all at once. I’ve found that using buttermilk really helps keep the cakes tender, and the cinnamon adds an unexpected warmth that makes the chocolate pop.
- All-purpose flour: The foundation for these cakes, I prefer using fresh flour for the fluffiest texture.
- Unsweetened cocoa powder: Go for a good quality one – it makes a big difference in richness.
- Baking soda: Helps the cakes rise just right; make sure it’s fresh for best results.
- Cinnamon: This little spice adds subtle warmth and depth to the chocolate flavor.
- Unsalted butter: Softened, it creates a tender crumb when creamed with sugar.
- Sugar: Granulated sugar sweetens and aerates the batter beautifully.
- Eggs: They bind everything together and provide structure.
- Buttermilk: Adds moisture and a subtle tang, ensuring a moist cake.
- Marshmallow creme: The star ingredient for that fluffy, sweet filling.
- Confectioners’ sugar: Used in both the filling and glaze for silky smoothness.
- Vanilla extract: Enhances all the flavors without overpowering them.
- Red food dye: For that spooky blood-red tint in the filling—feel free to adjust intensity!
- Milk: Thins out the glaze for that perfect drizzle.
- Pinch of salt: Balances the sweetness and elevates the overall flavor.
Variations
I love making this Tombstone Chocolate Snack Cakes Recipe my own, and you can too! Whether you want to dial up the spice, lighten it up for a crowd with dietary restrictions, or add an unexpected twist, these cakes are super adaptable.
- Spiced Up: Adding a pinch of cayenne or nutmeg amps up the cozy spice vibes, which my family devours.
- Dairy-Free Version: Swap out butter and buttermilk for vegan butter and almond milk plus a splash of vinegar for buttermilk—works like a charm.
- Fruit Twist: Try folding some finely chopped cherries or raspberries into the batter for a fruity surprise that pairs wonderfully with the chocolate.
- Gluten-Free: Use your favorite gluten-free flour blend; just make sure it contains xanthan gum for structure.
How to Make Tombstone Chocolate Snack Cakes Recipe
Step 1: Prep Your Oven and Pan
Start by preheating your oven to 350°F. Then, spray your baking mold generously with baking spray and dust it lightly with cocoa powder. This combo helps your cakes release cleanly and adds a hint of extra chocolate flavor right on the edges. I learned this trick after many sticky situations!
Step 2: Mix the Dry Ingredients
In a medium bowl, whisk together your flour, cocoa powder, baking soda, and cinnamon. Getting everything well mixed here is key for that even flavor and texture. Trust me, I used to just dump these in and my cakes would turn out unevenly flavored.
Step 3: Cream Butter and Sugar
Using a mixer, beat the softened butter and sugar for about 3 to 5 minutes until the mixture is light and fluffy. This step is where the magic starts—proper creaming gives your cakes an airy texture, so don’t rush it. I always tell myself to let the mixer do the work and resist the temptation to speed it up.
Step 4: Add Eggs One by One
Next, add the eggs one at a time, mixing well after each addition. Scrape down the sides of your bowl as needed so everything blends smoothly. I’ve learned that skipping the scrape step can leave little clumps and uneven batter—definitely something to avoid.
Step 5: Combine Flour Mixture and Buttermilk
Add the dry ingredients to your butter-egg mixture in thirds, alternating with the buttermilk (start and end with the dry mix). This helps keep the batter smooth and tender. I always make sure not to overmix here to avoid dense cakes—mix until just combined.
Step 6: Bake Your Tombstones
Fill your molds about 60% full and pop them in the oven. Bake for 13-15 minutes or until a toothpick inserted near the center comes out nearly clean (a little moisture is perfect). Let the cakes cool on a wire rack for 5 minutes, then carefully remove them from the mold and let them cool completely. If you want a flat top for easier filling, gently trim off the domed backs with a serrated knife — I find it’s easier to pipe the filling that way.
Step 7: Make the Marshmallow Filling
While the cakes cool, whip the marshmallow creme with softened butter until smooth. Then stir in confectioners’ sugar, cocoa powder, vanilla, salt, and that spooky red food dye until fluffy and bright. I love how the vibrant red turns out—it really pops on the chocolate for that perfect Halloween vibe.
Step 8: Prepare the Sugar Glaze
Whisk together confectioners’ sugar, milk, and vanilla until smooth. If you prefer a thinner glaze, just add a little more milk. This glaze adds a gorgeous sheen and seals in the marshmallow filling. I always do a test dribble on the side of a plate first to see if it’s the right consistency.
Step 9: Assemble Your Tombstones
Here’s the fun part! Use a wood skewer to carefully create a tunnel from the bottom to the top of each cake. Wiggle the skewer a bit to make space for filling. Then pipe in your marshmallow creme filling. Wipe away any extras with a damp cloth for neatness. Finally, brush the confectioners’ sugar glaze over all sides for that perfect glossy finish. I love how satisfying this part is—like building edible little tombstones.
Step 10: Final Touches
You can serve these right away, but if you want to dress them up even more, use any leftover red marshmallow filling to decorate the outside—think ‘bloody’ drips or little details that really sell the spooky aesthetic. My kids especially get a kick out of this step.
Pro Tips for Making Tombstone Chocolate Snack Cakes Recipe
- Don’t Skip the Cocoa Dust: Dusting your pan with cocoa instead of flour prevents white residue and adds extra chocolate flavor.
- Gentle Folding: When mixing flour and buttermilk, fold gently to keep your batter light and avoid dense cakes.
- Skewer with Care: Make sure to wiggle the skewer to create enough tunnel for filling without cracking the cake.
- Glaze Consistency Check: Test the glaze on a plate to ensure it’s not too runny (will drip off) or too thick (hard to brush).
How to Serve Tombstone Chocolate Snack Cakes Recipe
Garnishes
I love dusting finished tombstones with a little extra cocoa powder or edible glitter for that subtle eerie shimmer. Sometimes, I add tiny plastic spiders or candy eyeballs for the kids—it turns snack time into an event. Fresh mint leaves can also add a nice contrast if you want a pop of green.
Side Dishes
These chocolate snack cakes pair wonderfully with a cold glass of milk or a creamy chai latte if you want something cozy. For parties, setting them alongside a bowl of mixed berries balances out the richness perfectly.
Creative Ways to Present
For Halloween gatherings, I’ve had great luck displaying these tombstones sticking out of crushed Oreo “dirt” on a platter. It creates a mini graveyard scene that guests absolutely love. You can also serve them in small cupcake liners painted with black or grey edible spray paint for an extra spooky effect!
Make Ahead and Storage
Storing Leftovers
I store any leftovers in an airtight container at room temperature for up to 3 days. Because of the marshmallow filling, refrigeration can sometimes dry out the cake a bit, so I prefer to keep them out until serving. Just be sure to keep them away from heat and humidity.
Freezing
These cakes freeze beautifully! I suggest freezing unfilled cakes wrapped tightly in plastic wrap and placed in a freezer-safe bag. When you’re ready, thaw at room temperature and fill with marshmallow creme fresh. The filling doesn’t freeze as well, so making it fresh preserves that fluffy texture.
Reheating
If you have leftovers ready to eat, a quick zap in the microwave (about 10 seconds) softens the cake slightly and makes the marshmallow filling even more gooey—just make sure not to overheat or the filling may melt too much.
FAQs
-
Can I use regular marshmallows instead of marshmallow creme for the filling?
Regular marshmallows don’t have the same creamy texture as marshmallow creme, so the filling won’t be as smooth or fluffy. If you want to use marshmallows, you’d need to melt and whip them with butter and sugar to replicate the creme consistency, which can be tricky. I recommend sticking with marshmallow creme for the best results.
-
How do I make sure the cakes don’t crack when adding the filling?
Creating the tunnel with a skewer carefully helps prevent cracking. Wiggle the skewer gently to create enough space instead of forcing it straight through. Also, trimming the domed tops for flat surfaces helps maintain the cake’s structural integrity during filling.
-
Can I make these cakes ahead of time for a party?
Yes, you can bake the cakes a day or two in advance and keep them stored in an airtight container at room temperature. Make the marshmallow filling and glaze the day of the party for maximum freshness and presentation impact.
-
Is there a way to make these healthier?
To lighten these up, try reducing sugar slightly or swapping in whole wheat pastry flour, which adds fiber while retaining tenderness. For the filling, there aren’t many healthy swaps for marshmallow creme, but you could reduce the amount used or serve these as an occasional treat.
Final Thoughts
Honestly, the Tombstone Chocolate Snack Cakes Recipe has become one of those “go-to” desserts in my kitchen whenever I want to wow friends or just treat my family to something special. I love how it manages to be fun, festive, and downright delicious all at once—it’s perfect for Halloween but also a cool twist on chocolate snack cakes any time of year. Give this recipe a try and see for yourself how simple ingredients turn into these hauntingly good treats. You’ll be glad you did, and I’m betting you’ll hear the words “wow” and “can we have more?” echoing from the other room!
Print
Tombstone Chocolate Snack Cakes Recipe
- Prep Time: 20 minutes
- Cook Time: 15 minutes
- Total Time: 35 minutes
- Yield: 12 snack cakes
- Category: Dessert
- Method: Baking
- Cuisine: American
Description
Tombstone Chocolate Snack Cakes are a festive and spooky Halloween treat featuring rich cocoa-flavored cakes filled with a fluffy red marshmallow creme and topped with a sweet confectioners’ sugar glaze. These individually baked snack cakes are perfect for parties or as a playful dessert, offering a moist, chocolatey bite with a creamy, colorful filling.
Ingredients
Cake Ingredients
- 1 1/2 cups all-purpose flour
- 1/2 cup unsweetened cocoa powder
- 1/2 teaspoon baking soda
- 1 teaspoon cinnamon
- 1/2 cup unsalted butter (softened)
- 1 cup sugar
- 4 eggs
- 1 cup buttermilk
Marshmallow Creme Filling
- 1 1/2 cups marshmallow creme
- 4 tablespoons unsalted butter (softened)
- 1/2 cup confectioners’ sugar
- 1/2 teaspoon unsweetened cocoa powder
- 1/2 teaspoon vanilla extract
- Pinch of salt
- 2-3 teaspoons red food dye
Confectioners’ Sugar Glaze
- 1 1/2 cups confectioners’ sugar
- 4 tablespoons milk
- 1/2 teaspoon vanilla extract
Instructions
- Preheat and Prepare Mold: Begin by preheating your oven to 350 degrees F. Prepare your baking mold by spraying it with baking spray and dust lightly with cocoa powder. Set aside.
- Mix Dry Ingredients: In a medium bowl, whisk together the flour, cocoa powder, baking soda, and cinnamon until evenly combined. Set aside.
- Cream Butter and Sugar: Using a mixer, beat the softened butter and sugar for 3-5 minutes until the mixture is light and fluffy, incorporating air for a tender cake texture.
- Add Eggs: Add the eggs, one at a time, mixing well after each addition, ensuring each egg is fully incorporated. Scrape the sides of the bowl as needed to combine all ingredients thoroughly.
- Combine Wet and Dry Ingredients: Alternately add the flour mixture and buttermilk to the butter mixture, beginning and ending with the flour mixture. Mix just until combined to avoid overworking the batter.
- Fill and Bake: Fill the prepared molds about 60% full to allow room for rising. Bake in the preheated oven for 13-15 minutes or until a toothpick inserted near the center comes out about clean. Let the cakes cool on a wire rack for 5 minutes, then remove from the mold and cool completely.
- Prepare Marshmallow Creme Filling: In a mixing bowl, beat marshmallow creme and softened butter on medium-high until smooth. Add confectioners’ sugar, cocoa powder, vanilla extract, salt, and red food dye, mixing well until the filling is light and fluffy. Transfer to a piping bag fitted with a small round tip.
- Make Confectioners’ Sugar Glaze: Whisk together confectioners’ sugar, milk, and vanilla extract until smooth. Adjust consistency with additional milk if a thinner glaze is desired. Set aside.
- Assemble Cakes: Insert a large wood skewer from the bottom to the top of each cake to create a tunnel. Wiggle the skewer gently to make room for filling. Pipe the red marshmallow creme filling into each cake cavity, wiping away any excess filling.
- Glaze and Decorate: Use a pastry brush to apply the confectioners’ sugar glaze to all sides of the snack cakes. Optionally, use any leftover red marshmallow creme to decorate the outside of the cakes like tombstone designs.
- Serve or Store: Serve immediately for best texture or store in an airtight container until ready to serve.
Notes
- These filled Tombstone Chocolate Snack Cakes are both delicious and a little spooky, making them the perfect Halloween dessert recipe!
- Ensure cakes are fully cooled before filling to prevent the filling from melting.
- For a thinner glaze, add milk gradually to achieve desired consistency.
- Use a serrated knife to level the domed tops for neater assembly if preferred.
- Store leftover cakes in an airtight container to maintain freshness for up to 3 days.
Nutrition
- Serving Size: 1 snack cake
- Calories: 290
- Sugar: 28g
- Sodium: 150mg
- Fat: 14g
- Saturated Fat: 8g
- Unsaturated Fat: 5g
- Trans Fat: 0g
- Carbohydrates: 38g
- Fiber: 2g
- Protein: 4g
- Cholesterol: 75mg

