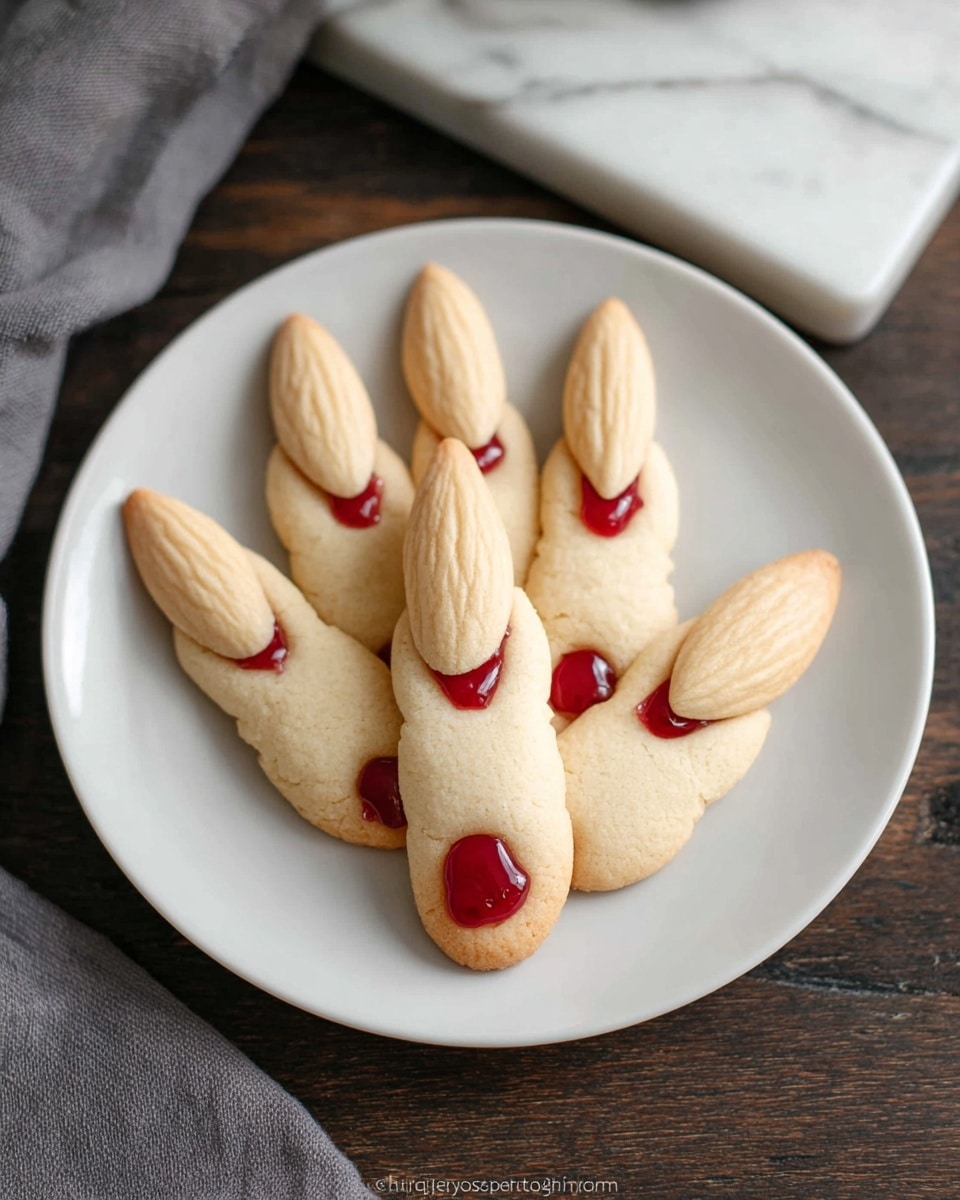
If you’re on the hunt for a fun and spooky treat this season, I can’t recommend this Witches Fingers Cookies Recipe enough. It’s not just a cookie; it’s a conversation starter at any party! These creepy, almond-tipped “fingers” are as delicious as they are entertaining, and I love how they bring a little theatrical flair to my kitchen — you’ll be amazed at how simple and fun they are to make. Ready to dive in? I promise you’ll nail this creepy-cute delight on your first try.
Why You’ll Love This Recipe
- Perfectly Themed: These cookies are the ideal spooky treat for Halloween or any witchy gathering.
- Simple Ingredients: You’ll likely have most of these pantry staples ready to go, making it super accessible.
- Fun and Interactive: Shaping the fingers and adding details is a creative, engaging process anyone can enjoy.
- Delicious Taste: The subtle almond and vanilla flavors balance out the buttery cookie base perfectly.

Ingredients You’ll Need
These ingredients come together to create a buttery, tender cookie with just a hint of almond — perfect for the witchy vibe. When shopping, I recommend picking a good quality almond extract, as it really makes a flavor difference.
- Butter: Use room temperature butter for easy creaming and the best cookie texture.
- Powdered sugar: This gives the cookie a smoother sweetness compared to granulated sugar.
- Egg: Acts as a binder and adds moisture.
- Vanilla extract: Adds warmth and depth to the cookie’s flavor.
- Almond extract: This is what gives the fingers their signature spooky nuttiness – don’t skip it!
- Flour: All-purpose works perfectly here for a tender crumb.
- Baking powder: Just a touch to help the cookies rise slightly.
- Salt: Balances sweetness and enhances flavor.
- Red gel frosting or red jam/jelly: For that creepy “blood” effect under the almond nail.
- Whole blanched almonds or sliced almonds: I prefer whole blanched almonds for authentic “fingernails.”
Variations
One of the things I love about this Witches Fingers Cookies Recipe is how easy it is to make your own. Feel free to experiment with the flavors or make it suit your dietary needs — it always comes out fantastic!
- Nut-free version: I once swapped the almond nails for small pieces of red candy or a drop of red frosting “blood” alone for friends with nut allergies — it still looked spooky and tasted great.
- Chocolate twist: Adding a teaspoon of cocoa powder gives these an eerie, darker look and a delicious chocolate undertone I’m obsessed with.
- Gluten-free adaptation: I’ve used gluten-free all-purpose flour with good results, just expect a slightly different texture.
- Vegan version: Replacing butter with vegan margarine and egg with flax egg works well, although the dough is a bit trickier to handle.
How to Make Witches Fingers Cookies Recipe
Step 1: Cream the Butter and Sugar
Start by whipping your room-temperature butter and powdered sugar in a large bowl with a handheld mixer until it’s light, fluffy, and creamy. When I do this, I usually beat it for about 3-4 minutes because that slight extra airiness creates a wonderfully tender cookie.
Step 2: Add Wet Ingredients
Beat in the egg, vanilla extract, and almond extract until everything is fully combined. The almond extract aroma kicks in here and makes the kitchen smell amazing! Be careful not to overmix at this point to keep the cookies tender.
Step 3: Combine Dry Ingredients and Make the Dough
Whisk together flour, baking powder, and salt in a separate bowl, then slowly add it to your wet mixture. I like to add the flour in parts to avoid a flour explosion, mixing gently until just combined. Once you have a soft dough, wrap it in plastic and chill for at least 30 minutes — chilling really helps the dough become easier to shape later.
Step 4: Shape Your Fingers
Preheat the oven to 325°F and line baking sheets with parchment paper. Scoop out dough balls about 1 inch in diameter, then roll them into 3-inch “fingers.” This is my favorite part — shaping the knuckles! Use the dull edge of a knife to make three lines across each “finger,” then pinch the dough just above and below the knuckles for a realistic effect. I also press my index finger gently at the top to make the nailbed—adds so much creepy charm. If your dough feels too soft, pop the tray in the freezer for a few minutes to firm up before baking.
Step 5: Bake and Decorate
Bake the fingers chilled for about 15 minutes or until they’re lightly golden. Once cooled for a few minutes, dab red gel frosting or jam on each nailbed and top it with an almond for that eerie “blood under the nail” look. Let them cool completely to ensure the nails stick well. Trust me, this little touch makes a huge difference in the presentation!
Pro Tips for Making Witches Fingers Cookies Recipe
- Chill the Dough Well: Chilling not only firms up the dough for easier shaping but also helps maintain finger shape during baking.
- Use the Dull Edge of a Knife: This gentle tool lets you create knuckle indentations without cutting through the dough.
- Don’t Skip the Almonds: They really complete the eerie finger look—whole blanched almonds work best.
- Work Quickly When Shaping: If your dough starts warming up too much, just pop it back in the fridge to make handling easier.
How to Serve Witches Fingers Cookies Recipe

Garnishes
I usually keep it simple with the red gel frosting or jam as my blood effect, sometimes adding a tiny sprinkle of edible glitter for an extra witchy sparkle. A few strategically placed edible googly eyes around the platter never fails to get laughs and compliments.
Side Dishes
These tasty fingers pair well with a rich hot chocolate or a spiced apple cider to keep the cozy Halloween vibes flowing. For parties, I’ll set them next to a bowl of “witches’ brew” punch or even a platter of other Halloween-themed sweets like spider web cupcakes.
Creative Ways to Present
I once arranged these on a platter lined with fake spider webs and placed plastic spiders crawling over them — so fun! Another time, I draped them from black licorice ropes for a “fingers hanging” effect that was a real hit. Wrapping each finger in clear cellophane and tying with orange and black ribbons makes a perfect spooky take-home gift.
Make Ahead and Storage
Storing Leftovers
I usually store my witches fingers cookies in an airtight container at room temperature, and they keep beautifully for up to a week. The texture stays nicely tender while the almond nails stay crunchy.
Freezing
If I want to prep in advance, I freeze the shaped fingers uncooked, laid out on a baking sheet, for a couple of hours. After they’re firm, I transfer them to a freezer bag. When ready to bake, I pop them straight in the oven (adding a couple of extra minutes to bake time). Freezing works great and saves last-minute stress!
Reheating
Once baked and stored, I warm these cookies in a low oven (about 300°F) for 5-7 minutes to bring back their freshly baked aroma and slight warmth. Just don’t overheat or the almonds might get too toasted.
FAQs
-
Can I make Witches Fingers Cookies Recipe without almonds?
Absolutely! If you or your guests have nut allergies, you can skip the almonds and use red gel frosting or jam alone, or substitute with small red candies to keep the spooky effect.
-
How do I keep the fingers from spreading too much in the oven?
Chilling the dough well before shaping and again once shaped is the key. The cold dough holds its shape better, preventing spreading and helping keep those creepy finger details crisp.
-
Can I use almond flour instead of all-purpose flour?
I wouldn’t recommend substituting almond flour here as it changes the texture dramatically. All-purpose flour gives the structure needed for shaping the fingers.
-
Are these Witches Fingers Cookies Recipe too difficult for beginners?
Not at all! This recipe is surprisingly beginner-friendly, especially if you take your time shaping and chilling the dough. Kids love to help with decorating too!
-
What’s the best way to ship or gift these cookies?
Let them cool completely, then pack in a sturdy box with parchment paper between layers. Adding a small cold pack helps keep the decoration intact during transit.
Final Thoughts
I absolutely love how this Witches Fingers Cookies Recipe turns out every single time — it’s playful, a touch spooky, and truly delicious. When I first made these, my family went crazy for them, and now they’re a Halloween staple in our home. If you’re looking for a recipe that’s fun to make and guaranteed to impress (or slightly gross out) your guests, trust me, this one’s a winner. Grab your almond extract and get baking. You’re going to have a blast!
Print
Witches Fingers Cookies Recipe
- Prep Time: 20 minutes
- Cook Time: 15 minutes
- Total Time: 35 minutes
- Yield: 30 cookies (approximately 5 dozen fingers, based on rolling 1-inch balls rolled to 3-inch fingers)
- Category: Dessert
- Method: Baking
- Cuisine: American
Description
These Witches Fingers Cookies are a spooky and delicious Halloween treat featuring buttery, almond-flavored cookie dough shaped into eerie fingers with knuckle details and almond nails, finished with a touch of red gel frosting to resemble blood.
Ingredients
Cookie Dough
- 1 cup butter, at room temperature
- 1 cup powdered sugar
- 1 egg
- 1 teaspoon vanilla extract
- 1 teaspoon almond extract
- 2 ¾ cups all-purpose flour
- 1 teaspoon baking powder
- ½ teaspoon salt
Decorations
- Red gel frosting or red jam or jelly (for the nailbed)
- 60 whole blanched almonds or sliced almonds (one for each cookie)
Instructions
- Cream Butter and Sugar: Using a handheld mixer, in a large bowl, cream together the butter and powdered sugar until light and fluffy. Beat in the egg, vanilla extract, and almond extract until fully incorporated.
- Mix Dry Ingredients: In a separate bowl, whisk together the flour, baking powder, and salt thoroughly to evenly distribute the leavening agent and salt.
- Combine Dough: Gradually add the flour mixture to the butter mixture, mixing slowly until a soft dough forms without overmixing to avoid toughness.
- Chill Dough: Wrap the dough tightly in plastic wrap and shape it into a disk. Refrigerate for at least 30 minutes to firm up the dough for easier shaping.
- Prepare Baking Sheets: Line baking sheets with parchment paper. Preheat oven to 325°F (163°C).
- Shape Cookies: Scoop out portions of dough and roll each into 1-inch diameter balls. Then roll each ball into a 3-inch long finger shape. Place fingers on baking sheets about 2 inches apart for spreading.
- Create Finger Details: Using the dull side of a knife, make 3 parallel marks across the middle of each finger to simulate knuckles. Pinch the dough above and below each knuckle mark to contour the finger shape. Press down gently with your index finger near the tip to form the nailbed.
- Chill Fingers: Place the baking sheet in the freezer for a few minutes to firm the shaped fingers before baking. This step helps maintain shape during baking.
- Bake Cookies: Bake the chilled fingers in the preheated oven for about 15 minutes or until lightly golden around the edges.
- Decorate Fingers: Remove the cookies from the oven and allow to cool slightly. Apply a small amount of red gel frosting or jam on each nailbed and press an almond onto each to create a realistic ‘almond nail’.
- Cool Completely: Allow the cookies to cool completely so the almond adheres firmly and the frosting sets before serving.
Notes
- These gnarly finger cookies with almond nails make a perfect creepy treat for Halloween parties and gatherings.
- Freeze the shaped dough briefly before baking to help maintain finger details and prevent spreading.
- You can use red jam, jelly, or gel frosting for the bloody nail effect depending on availability and preference.
- Use whole blanched almonds for the nail, or substitute sliced almonds if preferred for a flatter nail effect.
- Store baked cookies in an airtight container at room temperature for up to a week.
Nutrition
- Serving Size: 2 cookies
- Calories: 156
- Sugar: 5 g
- Sodium: 119 mg
- Fat: 10 g
- Saturated Fat: 4 g
- Unsaturated Fat: 5 g
- Trans Fat: 0 g
- Carbohydrates: 16 g
- Fiber: 1 g
- Protein: 3 g
- Cholesterol: 22 mg


